viaSocketUpdated 5 months ago
viaSocket is an AI-driven, no-code workflow automation platform designed to help users automate repetitive tasks without needing any programming expertise. It integrates over 5,000 apps and services, allowing users to build customizable workflows to streamline data movement, processes, and tasks. This platform is highly intuitive, enabling users to connect their favorite apps, set triggers and actions, and schedule workflows with ease.
With features like multi-user collaboration, API access, and AI-assisted automation, viaSocket empowers businesses to boost productivity, improve efficiency, and focus on more critical tasks.
viaSocket also supports integration with external systems and databases, making it a versatile tool for businesses of all sizes.
With your new Gorgias + viaSocket integration you will enjoy:
- Streamlined Automation: Automate repetitive tasks and workflows without coding, saving time and reducing manual effort.
- Seamless Integration: Connect over 5,000 apps and services effortlessly, improving cross-platform collaboration and data flow.
- Enhanced Productivity: AI-driven automation helps optimize processes, allowing teams to focus on more strategic tasks while increasing operational efficiency.
Steps
1. Log in to your viaSocket and your Gorgias accounts with Admin access.
2. Now, if you wish to create a flow that would connect Gorgias and Shopify for example through viaSocket, you will already have Shopify integrated with viaSocket. In the following steps we will focus on adding Gorgias to that flow.
3. On the path Settings → All Apps in Gorgias, find viaSocket on the list and click on it.
4. Click the blue ‘Connect App’ button.
.png) 5. You’ll be taken to the following page, where you’ll want to click the ‘Connect to Gorgias’ button right here:
5. You’ll be taken to the following page, where you’ll want to click the ‘Connect to Gorgias’ button right here:
.png) 6. From the same page, you can use pre-made flows instead of building a custom one, if you see any that match your use case.
6. From the same page, you can use pre-made flows instead of building a custom one, if you see any that match your use case.
7. The button will take you to viaSocket directly, where you’ll want to click ‘Connect to Gorgias’ once again like so:
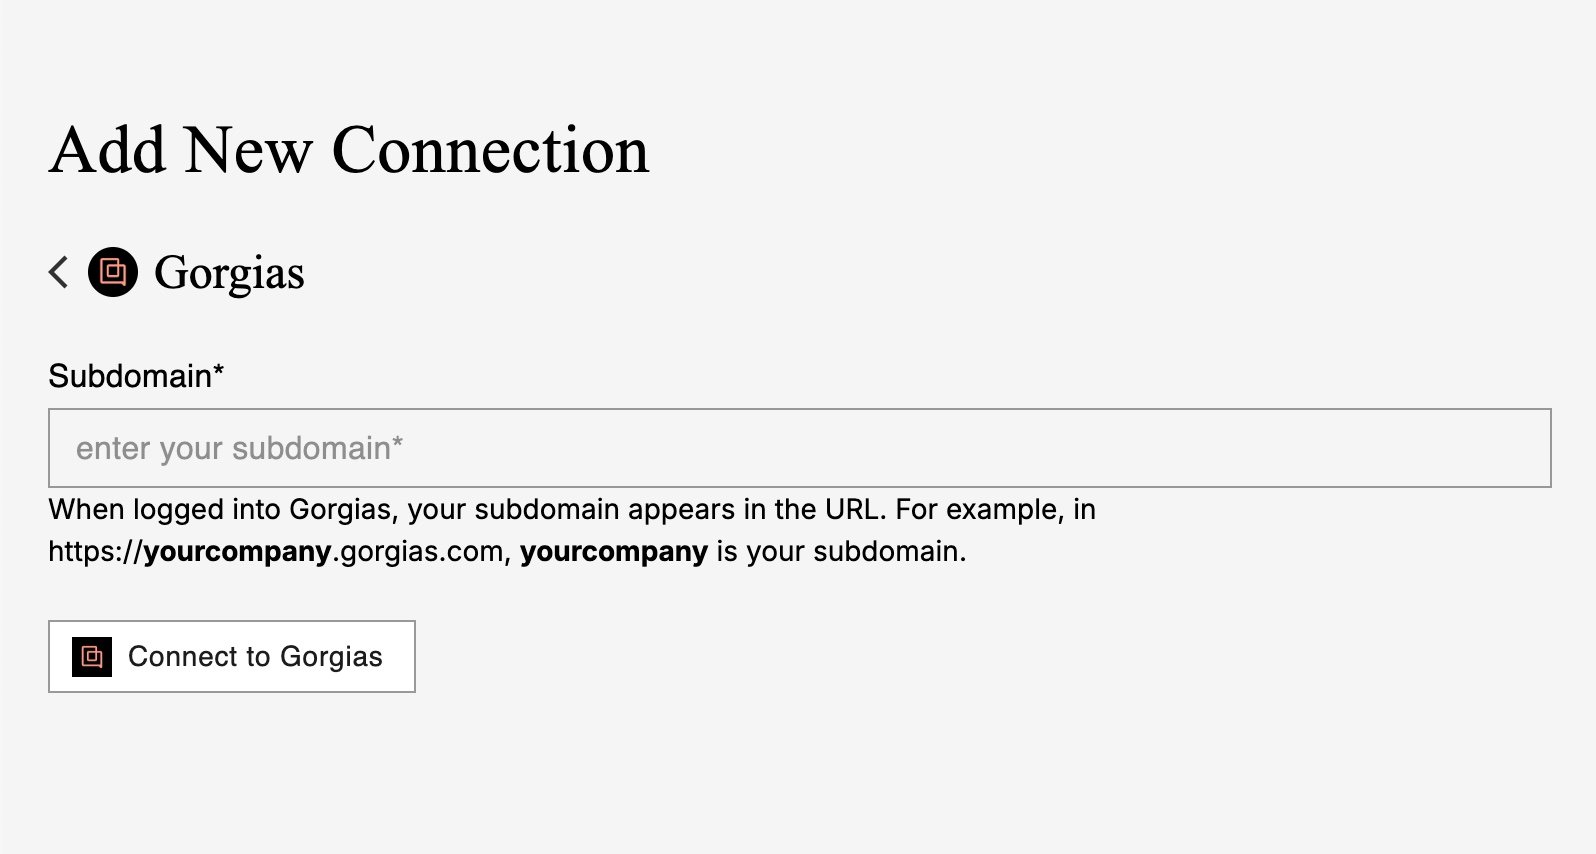
.png) 8. A new window will pop-up asking you to specify which Gorgias account you wish to integrate with viaSocket through its subdomain, so please add your Gorgias subdomain here as instructed, and then click ‘Connect to Gorgias’ once again:
8. A new window will pop-up asking you to specify which Gorgias account you wish to integrate with viaSocket through its subdomain, so please add your Gorgias subdomain here as instructed, and then click ‘Connect to Gorgias’ once again:
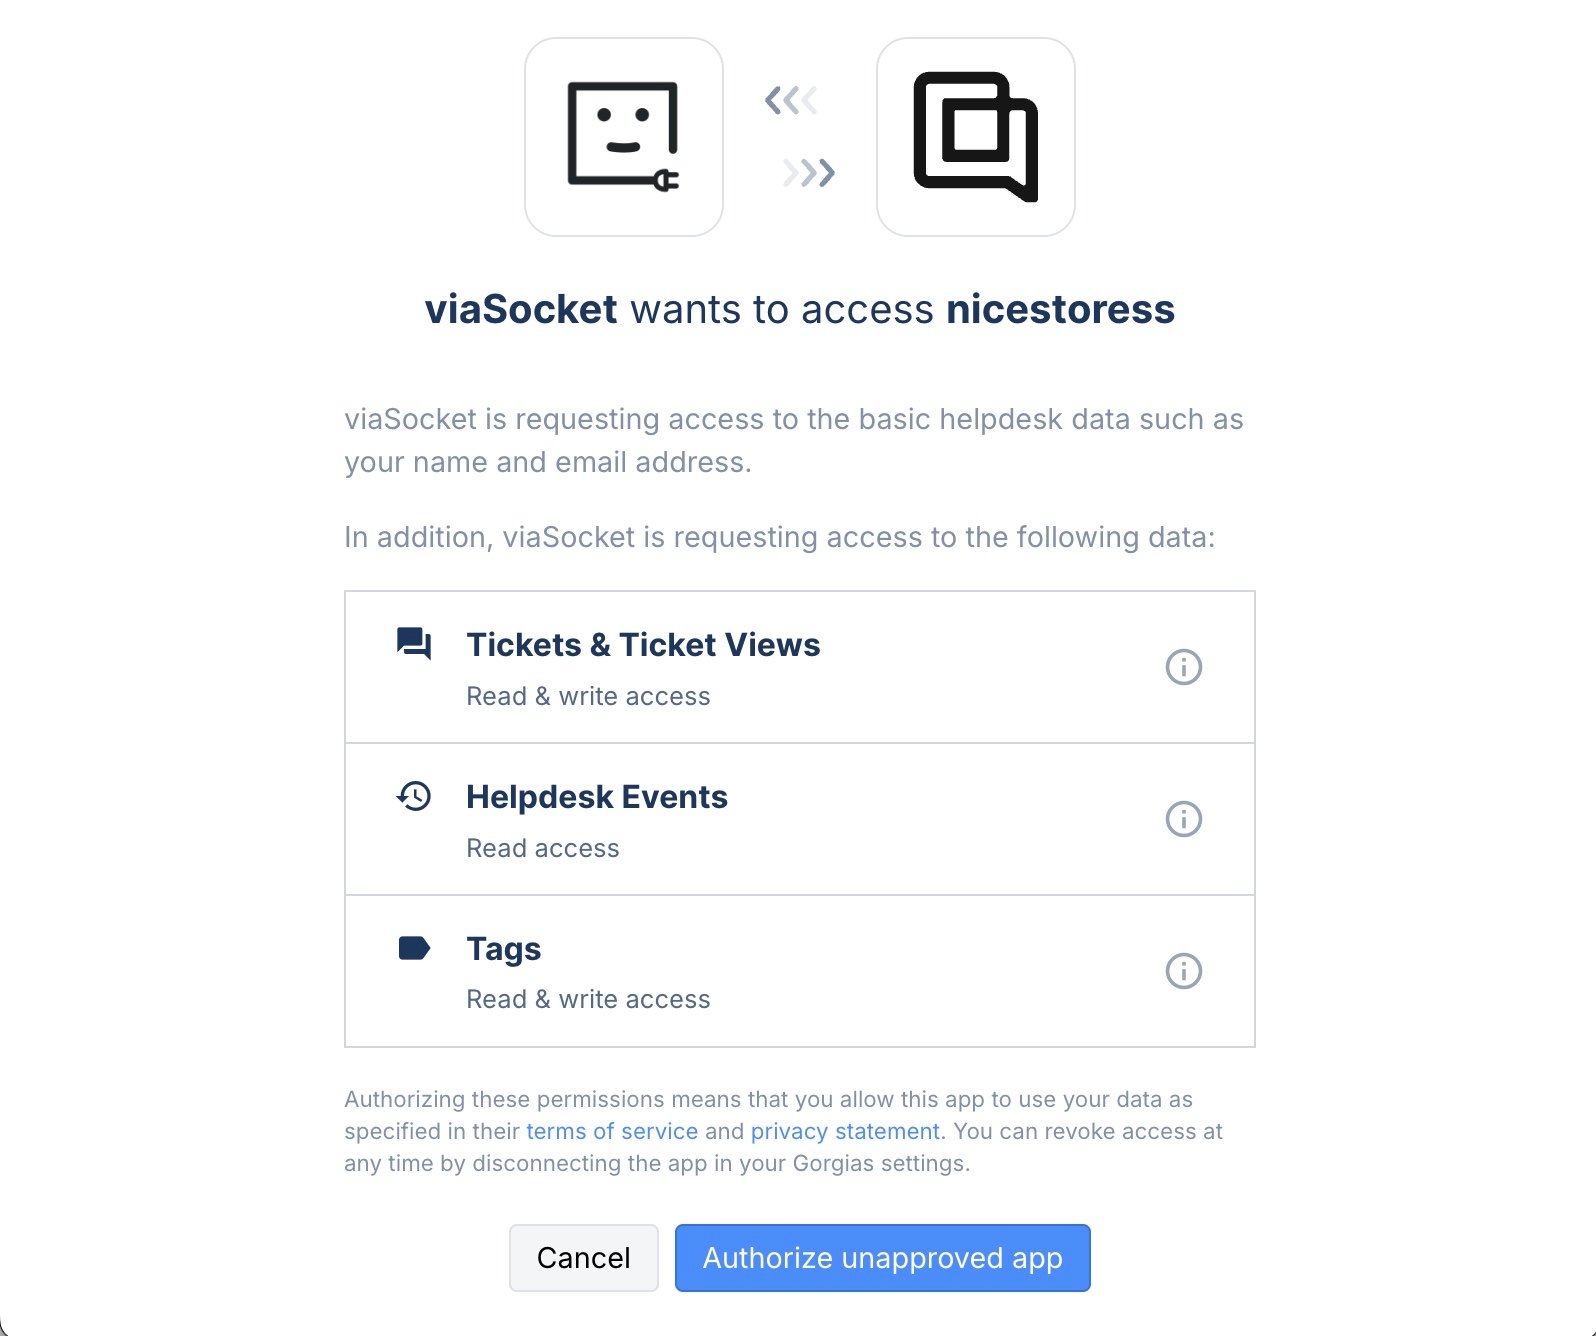
 9. Then, an OAuth2 window will open asking you to authorize the connection. Please make sure to do so:
 10. The integration has been established! Now, you are free to name it as you see fit:
.png)
Create a flow
There are numerous examples of how Gorgias and viaSocket can work together to automate and lighten your daily workload, limited only by your imagination. So, for the purpose of this guide, we will use one example where viaSocket, connected with Gorgias and Shopify, can enable a flow that would automatically create a new Ticket in Gorgias whenever a new customer is created on your Shopify store.
1. To start, please click the red ‘Create New Flow +’ button in the upper-left corner of your viaSocket dashboard. Then, you’ll be prompted to select a trigger, which in this case would be a new customer profile created on Shopify:
.png) 2. You will now want to click ‘Connect to Shopify’ to set up this trigger. The steps will be the same as with Gorgias previously, so please add your Shopify subdomain once prompted and the connection will be established.
2. You will now want to click ‘Connect to Shopify’ to set up this trigger. The steps will be the same as with Gorgias previously, so please add your Shopify subdomain once prompted and the connection will be established.
3. Now that we have a connection with Shopify, let’s test it to make sure it’s working. If yes, you will get some mockup data as a response:
.png) 4. Once happy with the test, click the red ‘Done’ button at the bottom of the page to complete the trigger. The trigger is all set!
4. Once happy with the test, click the red ‘Done’ button at the bottom of the page to complete the trigger. The trigger is all set!
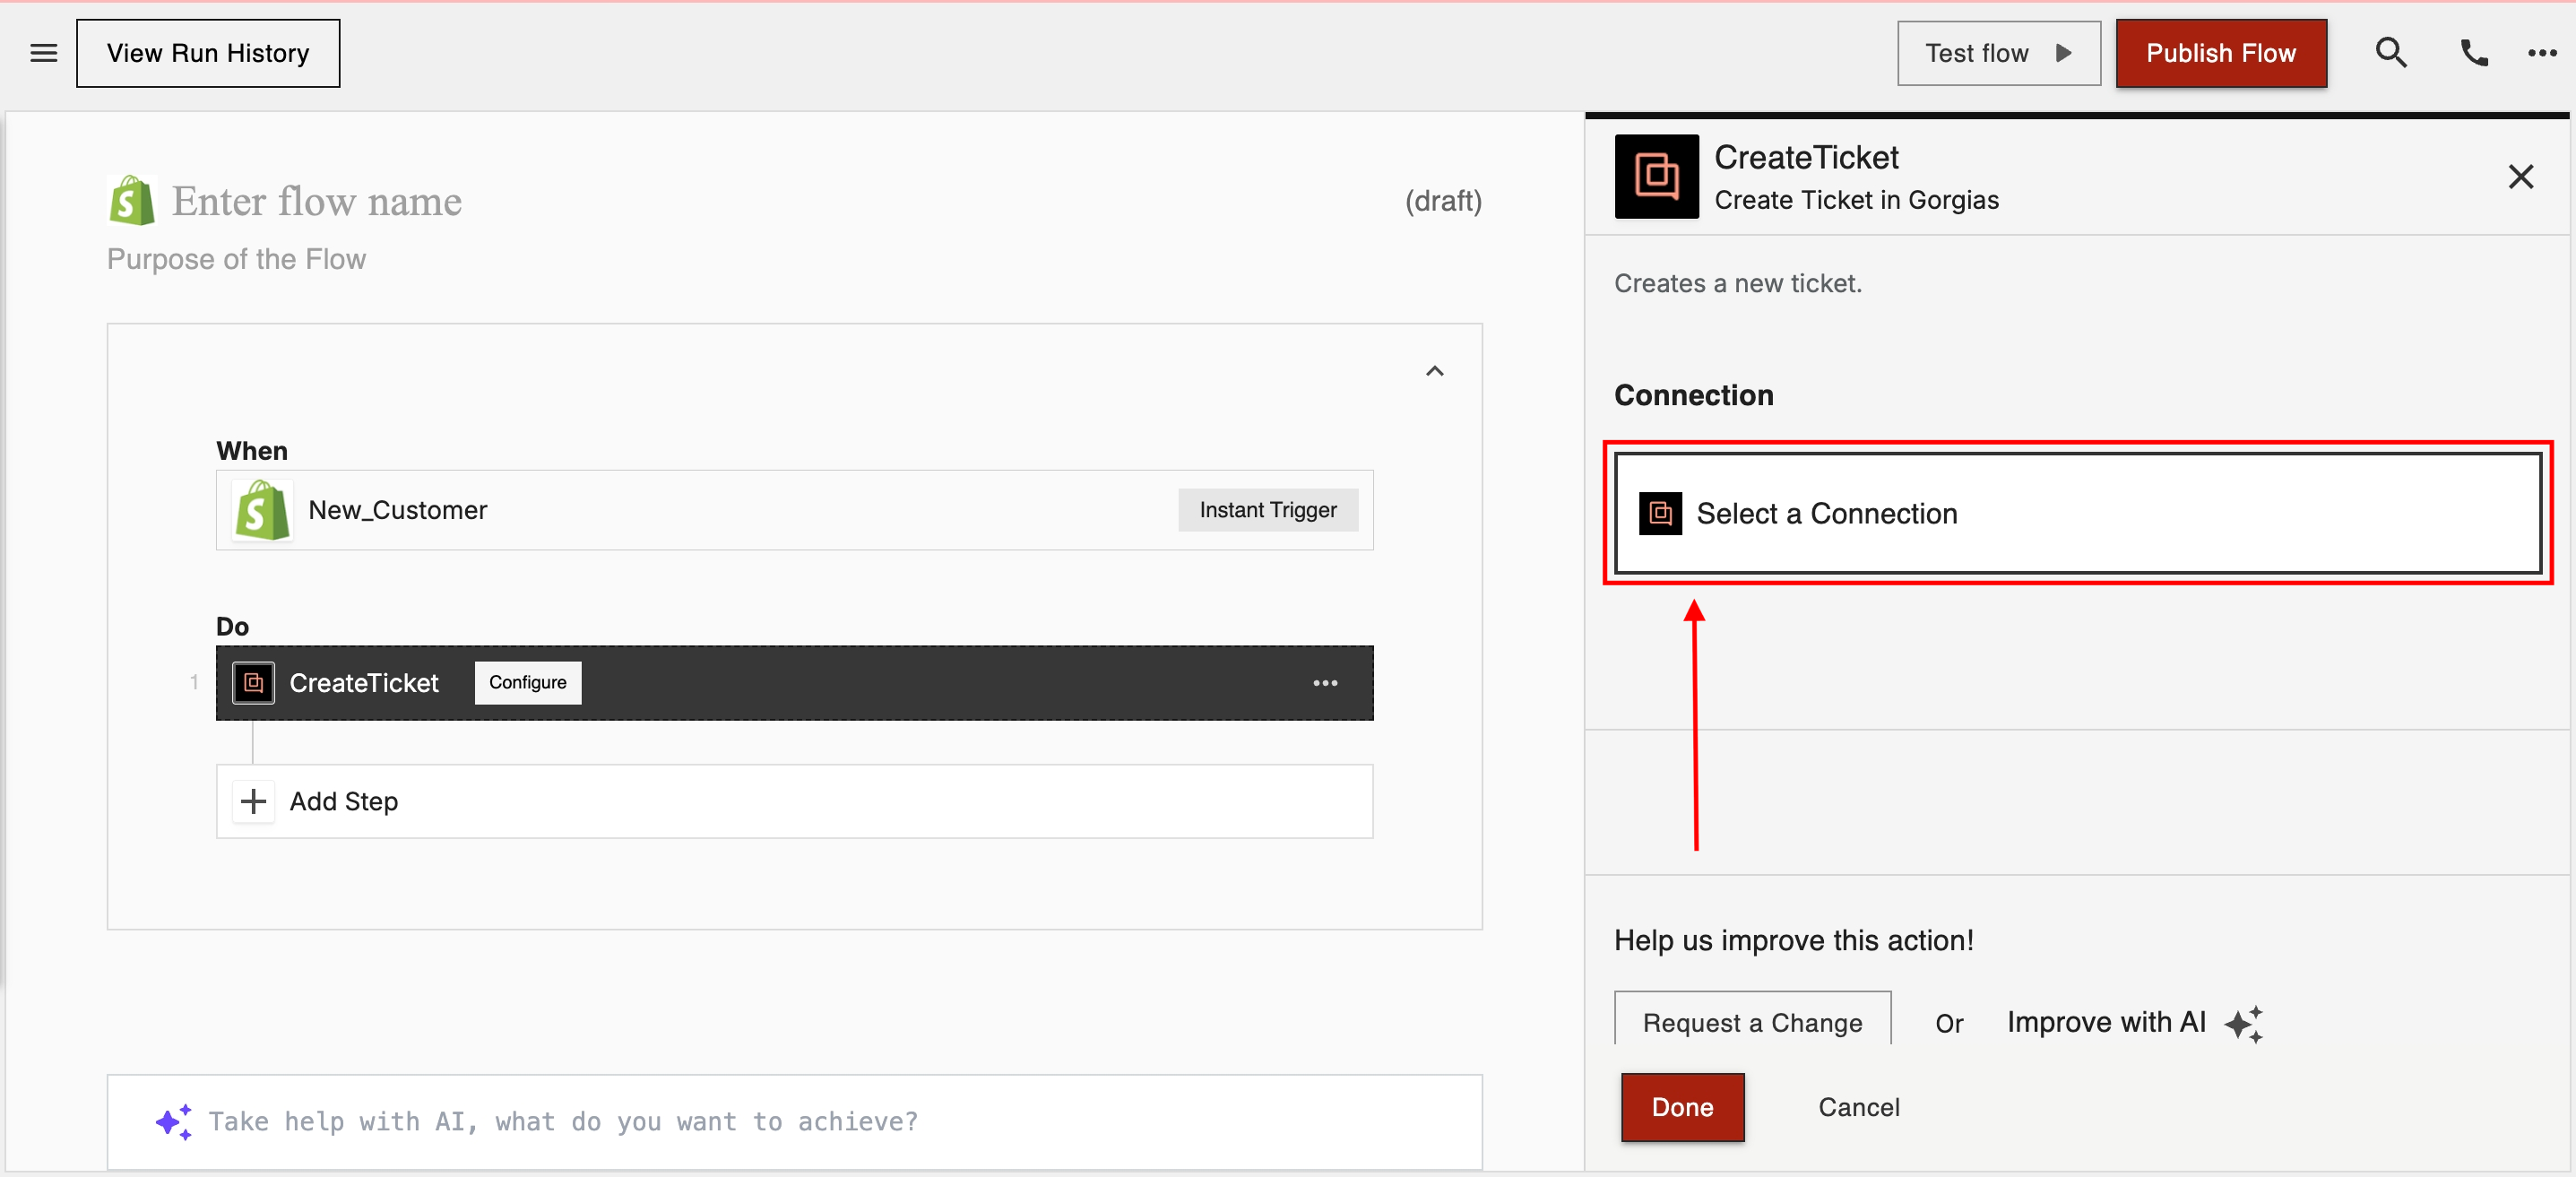
5. We can now move on to the ‘Do’ part of the flow, or the action. Please click the ‘+ Add Step’ tile:
.png) 6. Search for Gorgias on the right-hand side and select it once it pops up. Then, select ‘Create New Ticket’ from the following drop-down:
6. Search for Gorgias on the right-hand side and select it once it pops up. Then, select ‘Create New Ticket’ from the following drop-down:
.png)
.png) 7. You will then be asked to select a specific Gorgias instance that you’ll want to use for this new flow:
7. You will then be asked to select a specific Gorgias instance that you’ll want to use for this new flow:
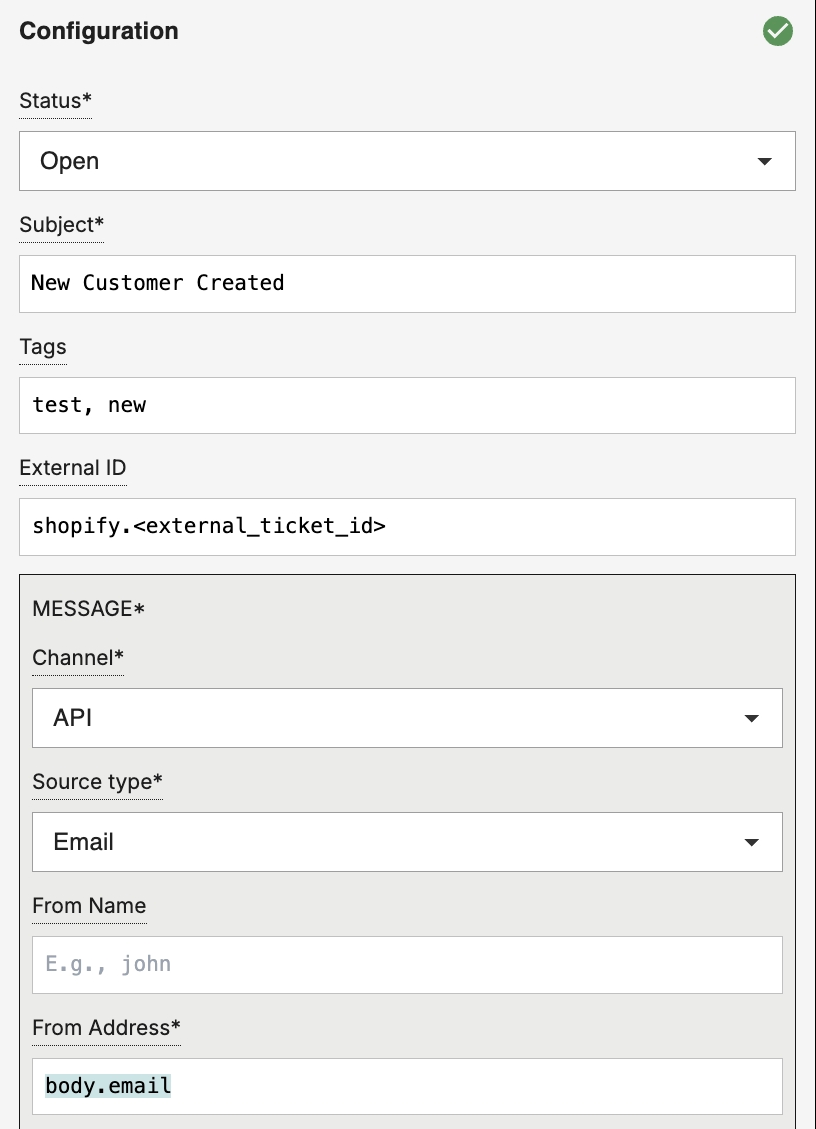
 8. Now you can configure this action by setting up the status of the ticket that would be created, the subject line, the channel via which it will be created, etc. Once you’re happy with your configuration, simply click the red ‘Done’ button:
 9. You can also leverage viaSocket’s AI helper, if you get stuck during your configuration at any point. For example, here’s how you can use it to get a variable and automatically add it to your flow. All you need to do is ask!
.png) 10. Make sure to test this step as well, and then you can run a test for the full flow:
10. Make sure to test this step as well, and then you can run a test for the full flow:
.png) 11. If the test returned some sample data and no error messages, then you’re all set!
11. If the test returned some sample data and no error messages, then you’re all set!
Limitations
- This integration currently only works for Shopify, Magento and BigCommerce users.
- The only available Gorgias Trigger right now is ‘Ticket Created’, and the only available Gorgias Action is ‘Create Ticket’. However, you can create custom ones with code.
