Shopify ActionsUpdated 6 months ago
If you open any ticket where your customer has Shopify data, you'll notice a number of different possibilities concerning that data in the right-hand sidebar in Gorgias.
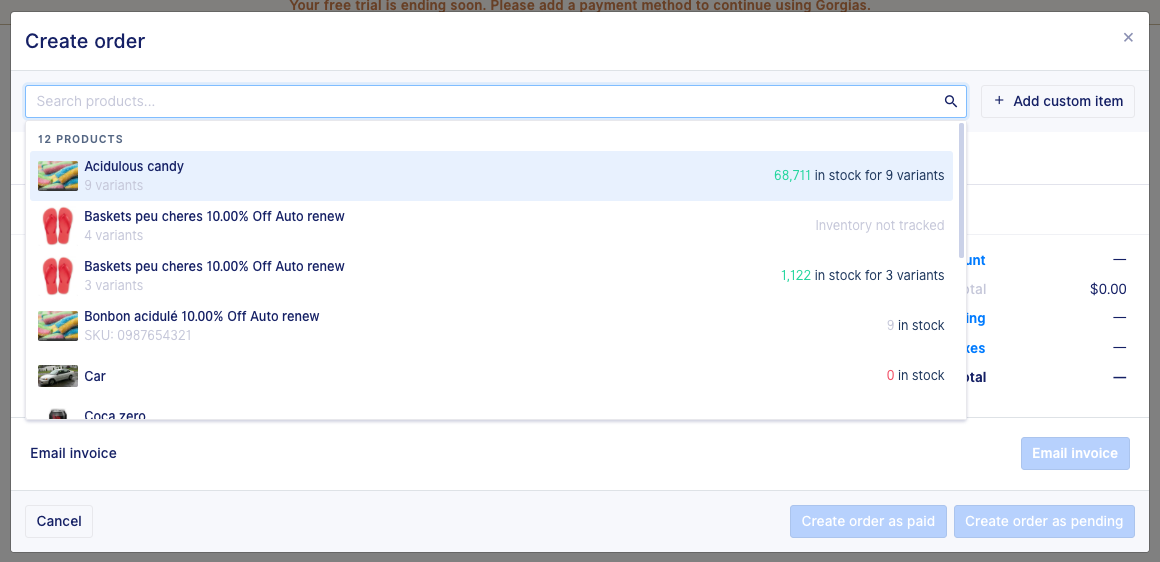
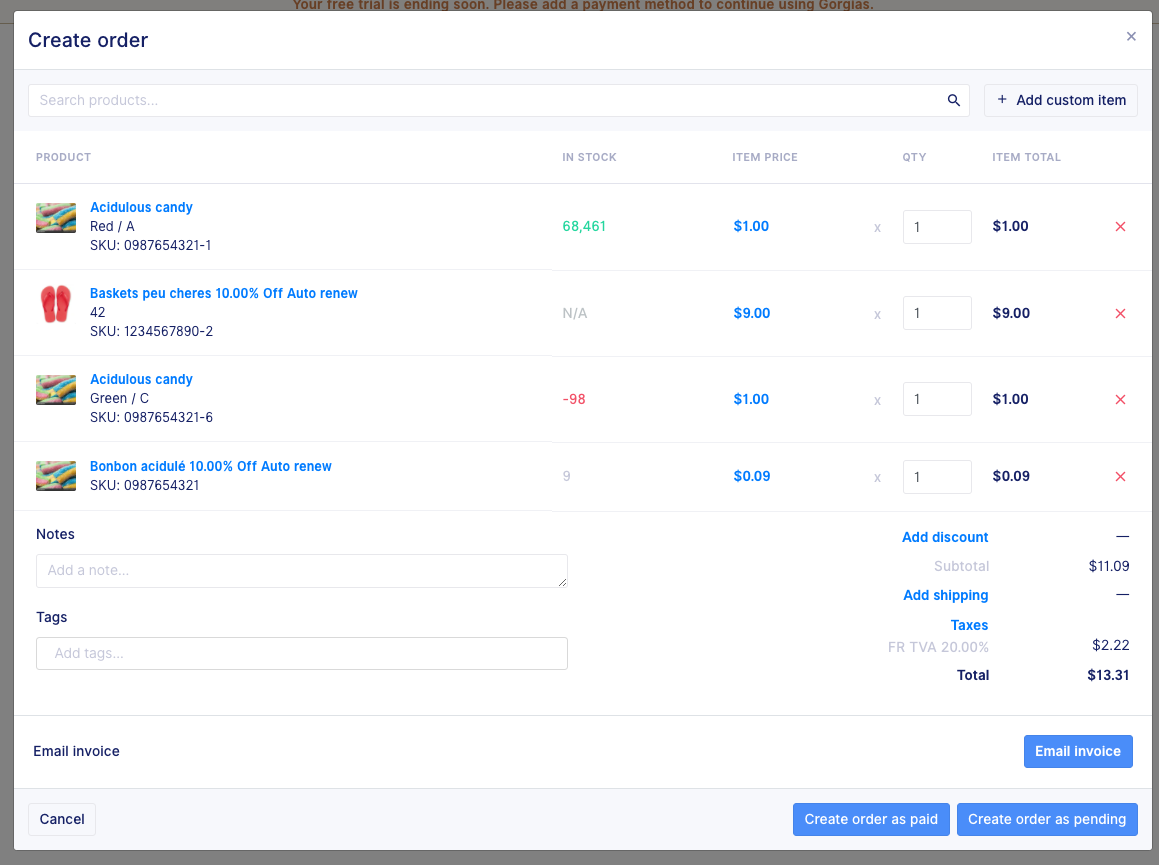
Create a new order
In the sidebar, in an existing Shopify customer's card, click on the button Create order.
Now you can:
- add existing products via the search input
- add custom items
- apply a discount on a line item (percentage or fixed amount)
- change quantities
- remove an item
- add Notes
- add Tags
- apply a global discount (percentage or fixed amount)
- add shipping
- choose to charge taxes
Then, you can choose to create the order as Paid or Pending and choose to email the invoice to your customer (sent from Shopify's end). Finally, you can type a custom message for your customer.
Duplicate an order
In the sidebar, click on the button Duplicate to open the following modal:
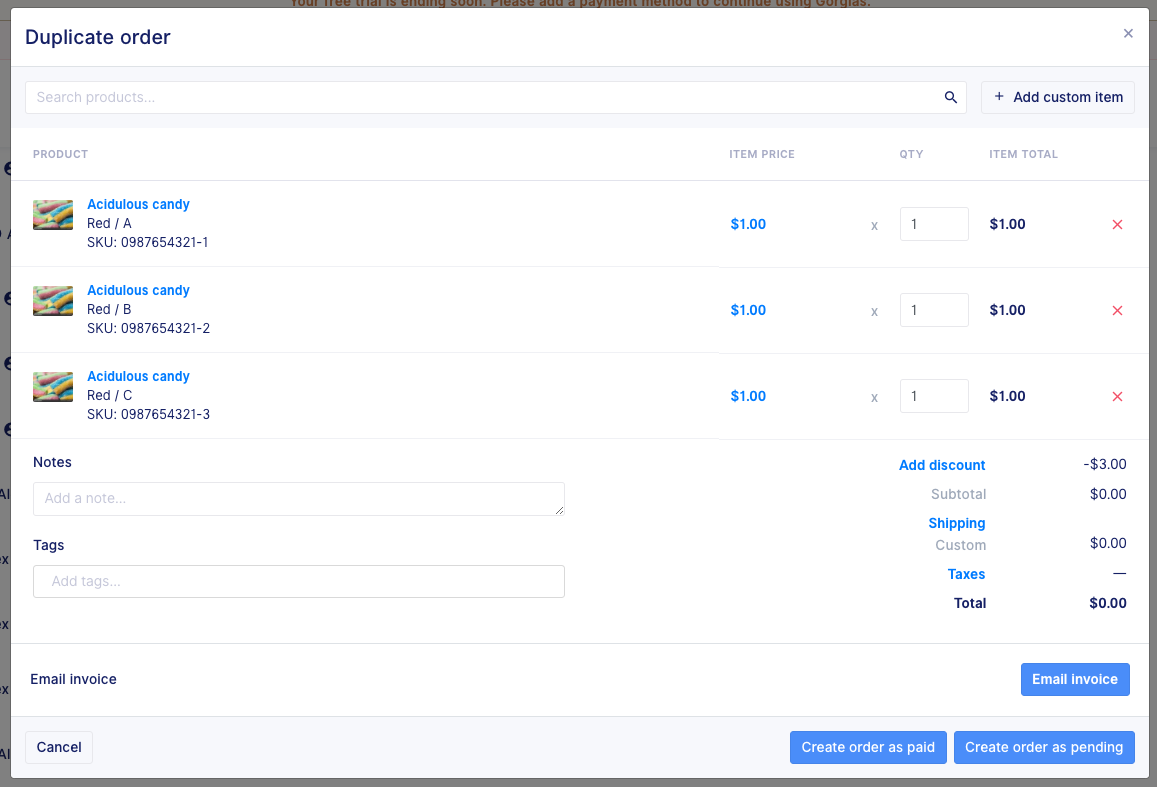
Here, you can:
- add existing products via the search input
- add custom items
- apply a discount on a line item (percentage or fixed amount)
- change quantities
- remove an item
- add Tags
- apply a global discount (percentage or fixed amount)
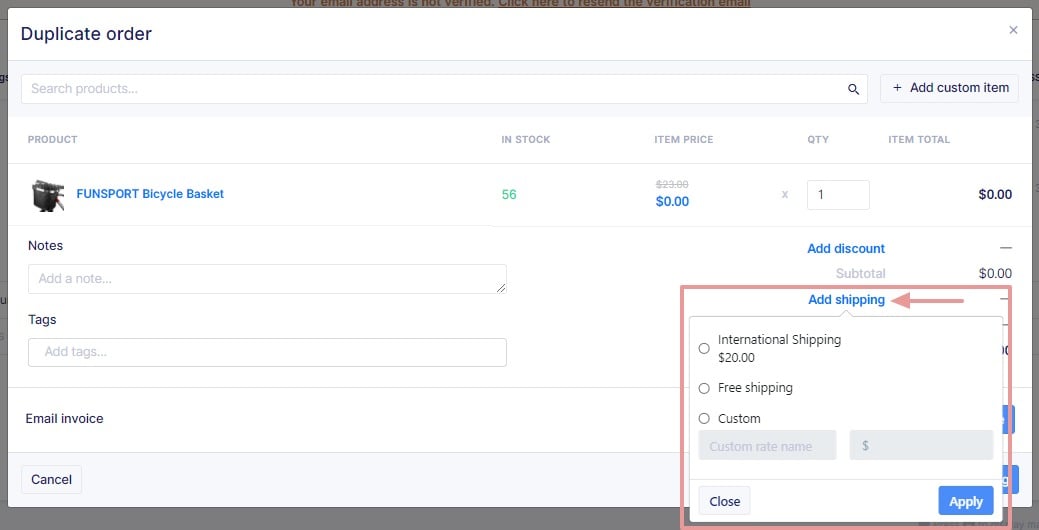
- add shipping
- charge taxes (or not)
Then, you can choose to create the order as Paid or Pending and choose to email the invoice to your customer (sent from Shopify's end). Finally, you can type a custom message for your customer.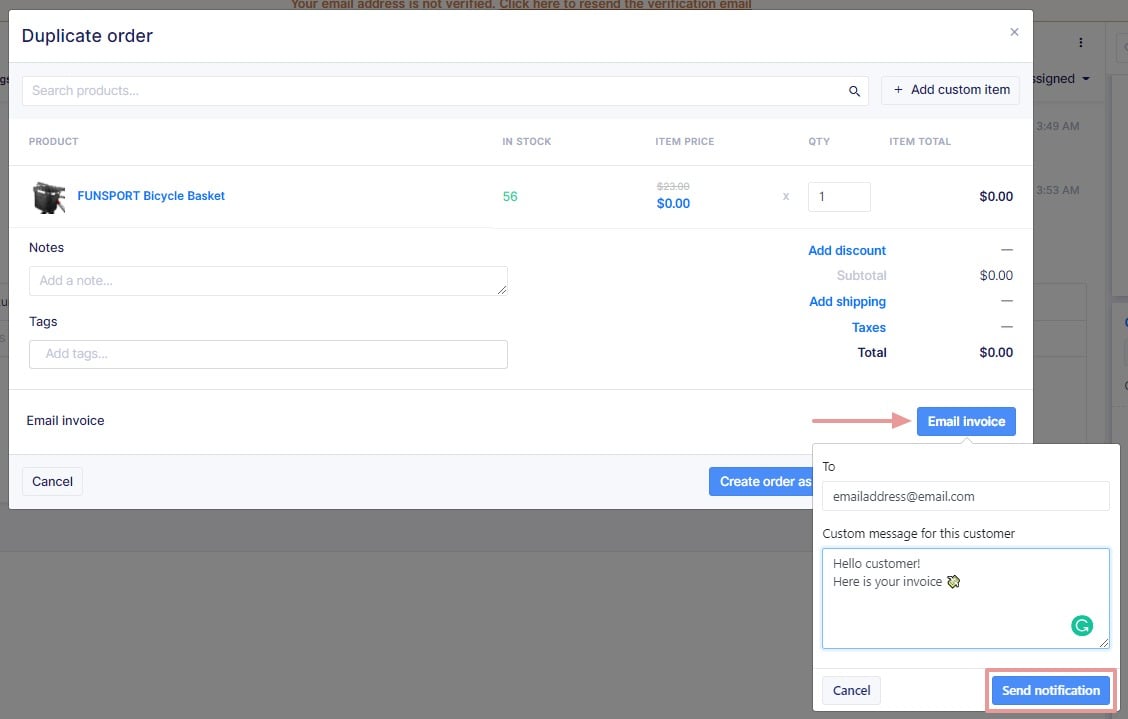
By default, when you open the modal, you can see that:
- a 100% global discount is applied
- if there is a shipping line, the price is set to 0
Gorgias will fetch the available shipping rates via the Shopify API, so that you can quickly add a shipping line:
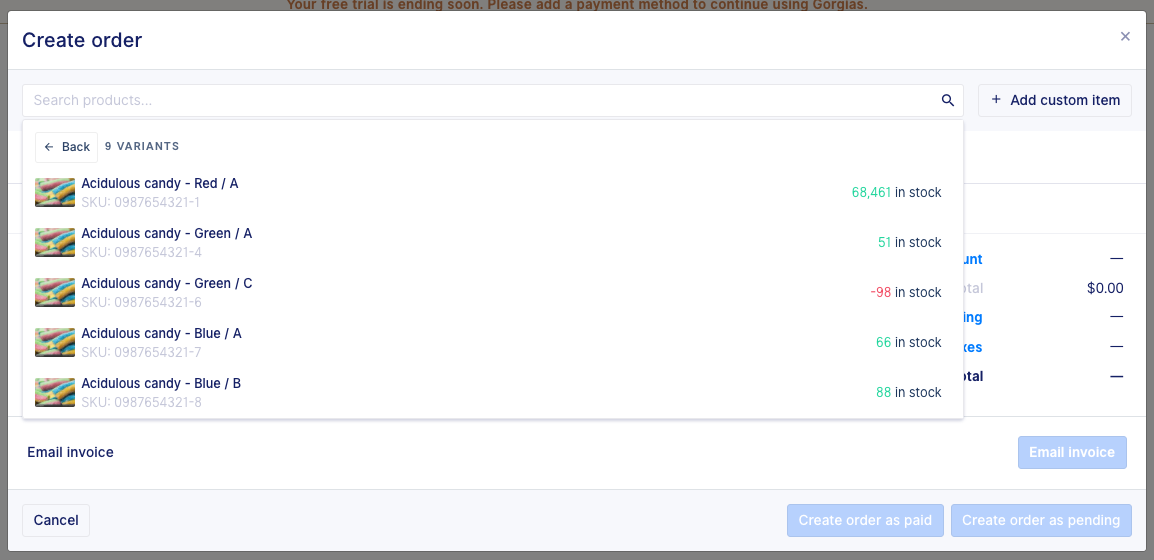
Check remaining stock
In the Create order and Duplicate order Shopify modals, we display the number of products in stock as well:
- When you search for a product (on the right)
- In the order itself (in the new column titled In stock)
Cancel an order
Click on the button titled Cancel to open the modal:

Here, you can:
- set quantities to refund
- set shipping amount to refund
- set custom refund amount
- set the reason for the cancellation
- restock items
- notify the customer
Refund an order
Click on the button Refund button to open the modal: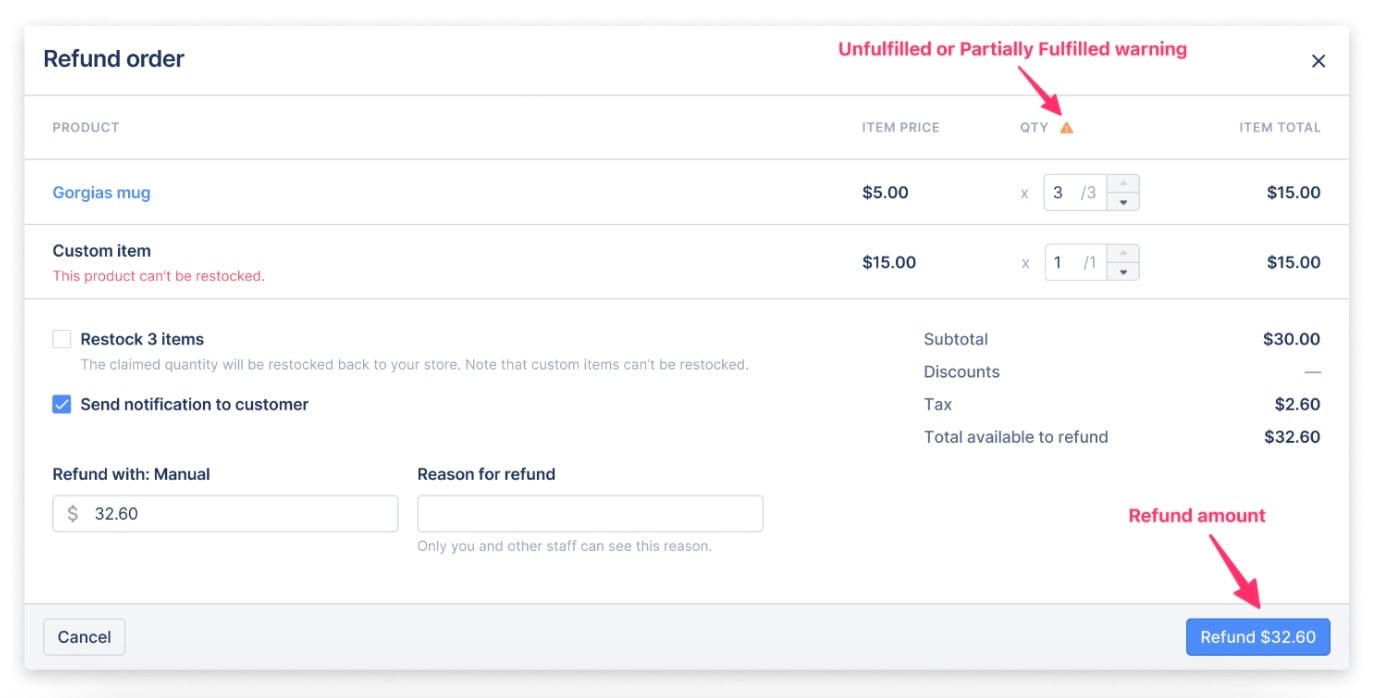
Here, you can:
- set quantities to refund
- set shipping amount to refund (it will automatically be set to '0')
- set custom refund amount
- set the reason for the refund
- restock items
- notify the customer
While many refunds are also returns, not all of them are - you'll notice that the quantity (QTY) field is always automatically set to 0 to avoid accidental returns, aligning with the default Shopify behaviour.
If you want to process a refund and also process a return, you can simply set the QTY fields to the desired value before proceeding. If you don't want to process a return at the same time, simply change the QTY fields to 0 before clicking Refund to complete the action.
If the quantity is set to anything but 0 the action will trigger in Shopify as returning an item as well.
Refund an order with multiple transactions
Gorgias will allow you to refund orders that have had multiple transactions within the following limitations:
- You can only refund orders that are coming from one payment gateway (like Credit Card 1). Orders that received payments from multiple different methods can't be refunded.
- Gift cards aren't supported because they're considered a payment gateway in Shopify and are excluded from the total amount that can be refunded.
To clarify further, these are the 3 scenarios that can occur:
1. Credit Card 1 + Gift Card → Only the credit card amount will be refunded
2. Credit Card 1 + Credit Card 2 → A refund won't be possible
3. Credit Card 1 + Credit Card 1 → The full refund will be available
![]()
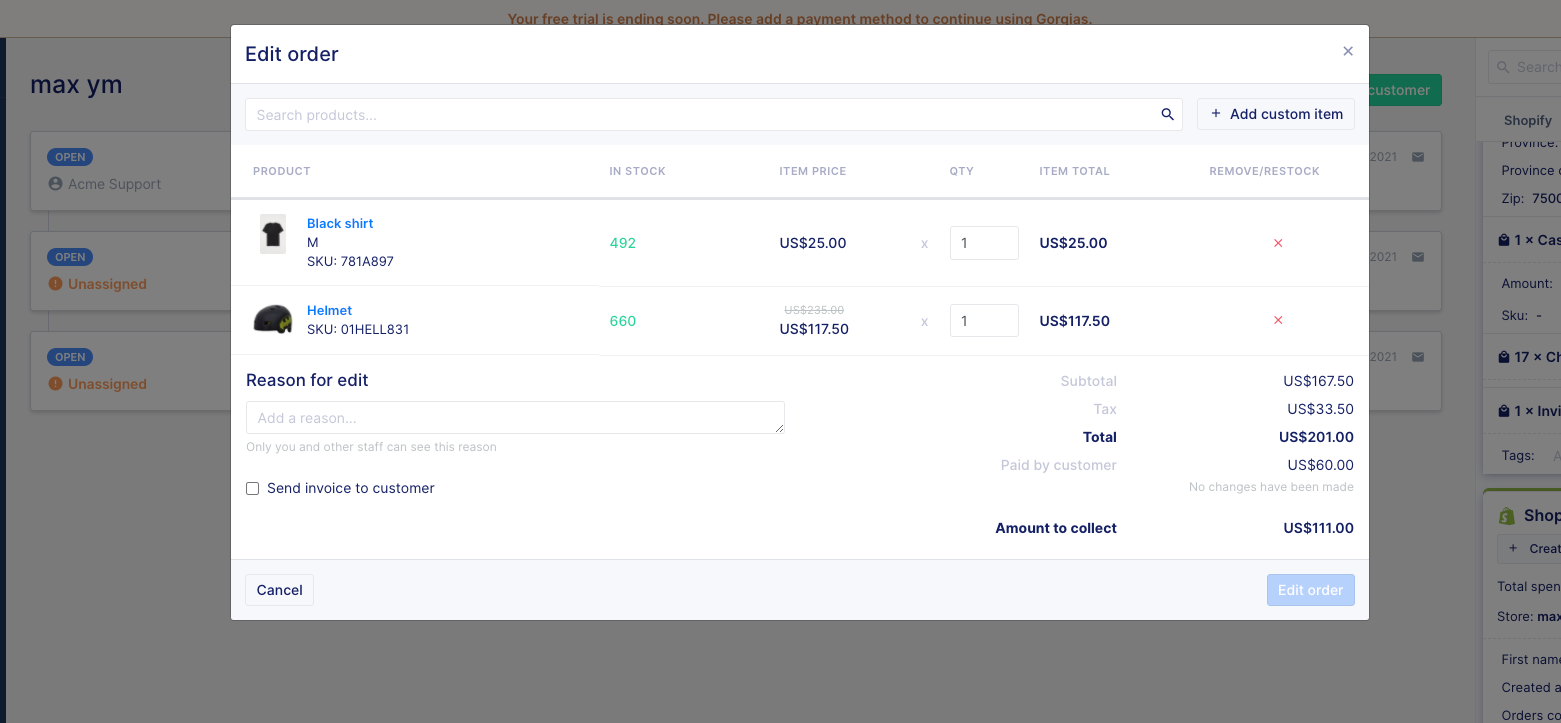
Edit order from Shopify
This feature allows agents to edit Shopify orders directly from the widget, whether or not the order is fulfilled.
Create a draft order
You can create a Shopify draft order on behalf of your customer directly from a ticket in Gorgias.
When you create a draft order, it appears for agents inside the ticket sidebar separate from other orders that the customer has completed. You can see up to the last 5 draft orders in Gorgias.
- Open the ticket with the customer who you want to create a draft order for
- If you don’t have a current ticket with the customer, create a new ticket first
- Select + Create Order from the ticket sidebar
- Use the Search products menu to add items to their order
- Select Create Draft Order
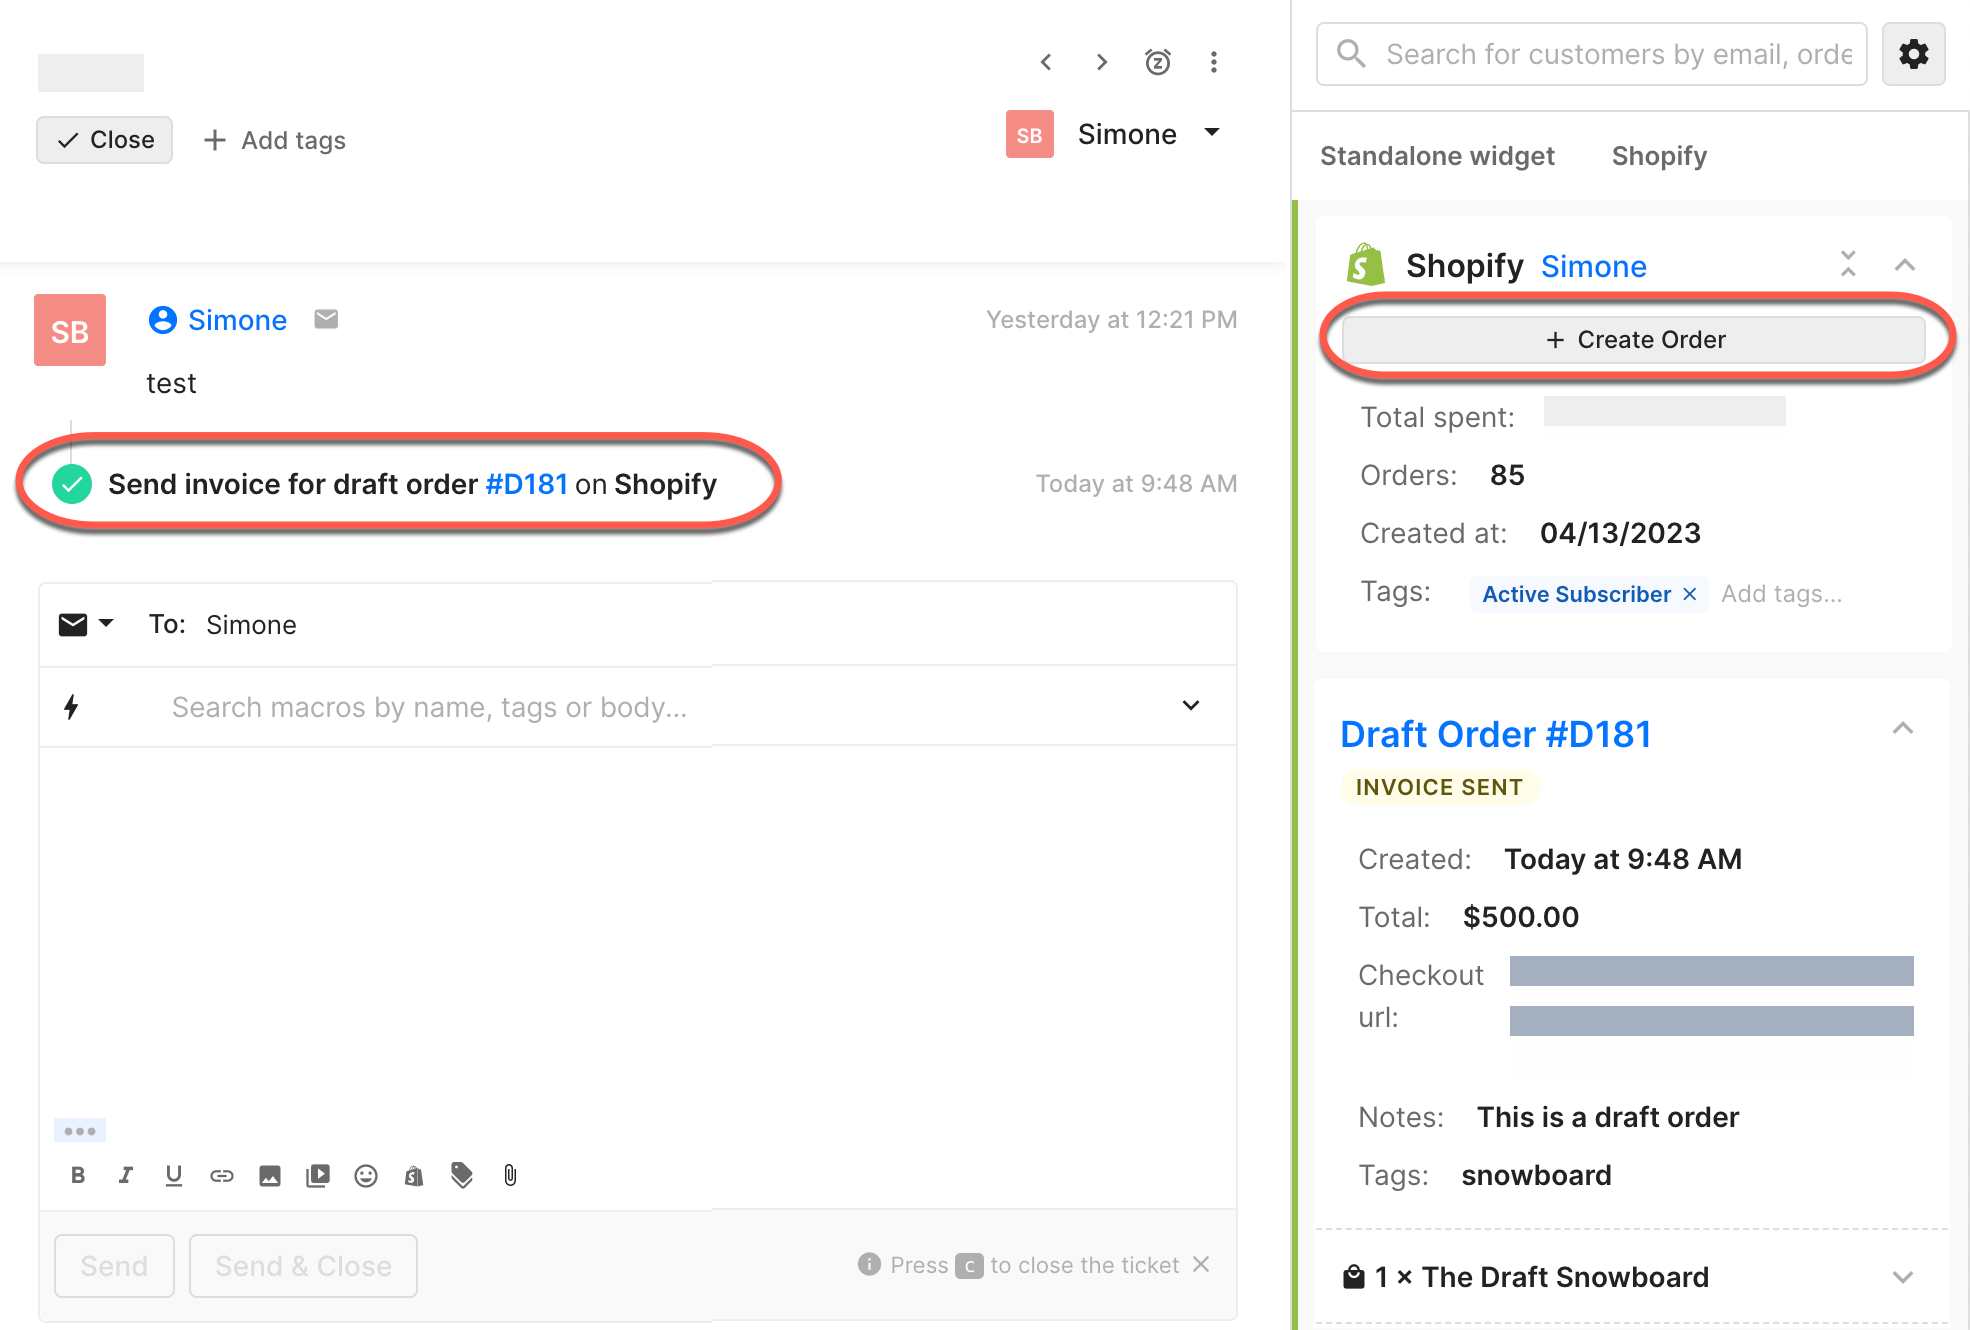
You can identify draft orders in the ticket sidebar because they start with D followed by the order number (Draft Order D#123). When the draft order is paid and completed by the customer, a non-draft order is created and appears in the ticket sidebar (Order #123).
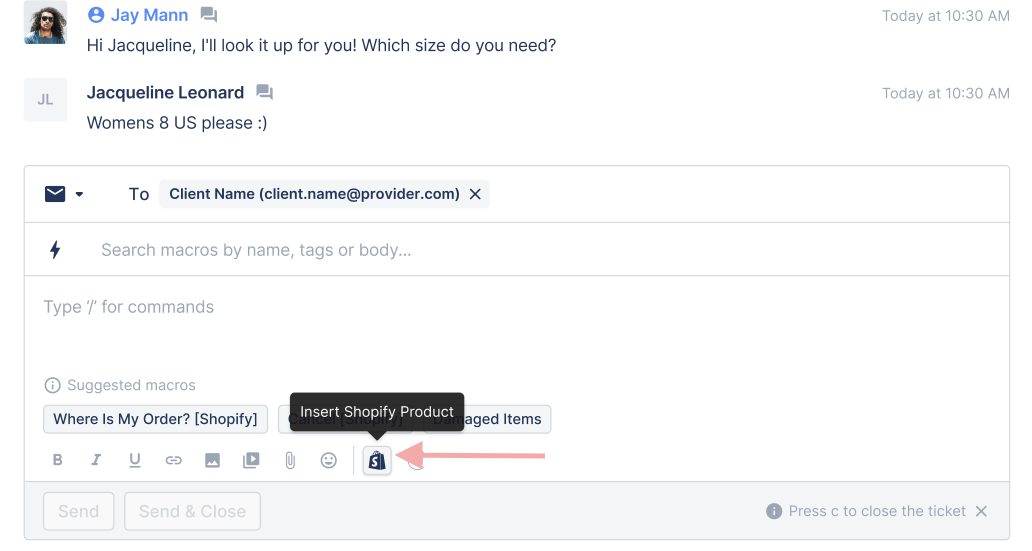
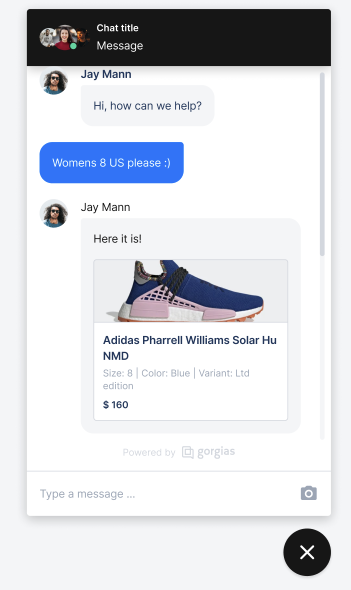
Insert Shopify product links
You can add product links or product cards directly from ticket - the link redirects to the product page in Shopify and the customer can then add it to their cart.
Edit the shipping address
To edit a shipping address:
1. Click the Edit button under Shipping Address in the Shopify order widget.
2. Clicking the button opens a pop-up with all the fields required for an address, including phone numbers, province (when necessary) and ZIP codes, pre-filled with the shipping address set for the current order.
3. To edit the order, change any of these fields to the correct value and click the Save changes button.
4. You can also completely replace the current order address with any of the addresses saved in the customer’s Shopify profile - click Select another address, choose the right address, and then click the Save changes button.
Once submitted, the order’s address will be updated in both Gorgias and Shopify. If you don’t see the change immediately in the Gorgias widget, you’ll just need to refresh the page to see the most up-to-date values.
Customer and order Tags
You have the option to edit the customer's and order Tags directly from your Shopify widget in Gorgias. Once editing is over, all of your Tags will be synced with Shopify.
You can add, remove or move this field as you like in your Shopify widget. If you removed this field and want to re-add it, make sure to use the new type as Editable List which is only available for the Tag field in the Shopify widget.
To add the widget:
1. Open the widget settings by clicking on the cog icon.
2. Click the Tags Variable on the right side of the screen.
3. Select the option Editable List from the drop-down menu and click Submit.
4. Save your changes.
Customize your orders and customers using Suggested Shopify Tags
You can manage your Shopify customer's and order Tags even better by using the existing Tags provided from Shopify directly in the helpdesk. You can simply reuse an existing Tag, or create a new Tag if it’s not already on the pre-populated list.
Shopify metafields
You can bring context from Shopify into Gorgias by importing your most relevant metafields into your helpdesk. Once imported, metadata will appear in customer profiles and the Shopify widget in your ticket sidebar, and they can be used as a variable in macro reply text.
Customize the widget
You can customize the Shopify widget on the right-hand sidebar further, until the information displayed is just what you need for your daily workflow.
To customize the displayed fields, click on the cog icon in the upper right corner of any ticket where the customer has Shopify data and a widget settings page will open.
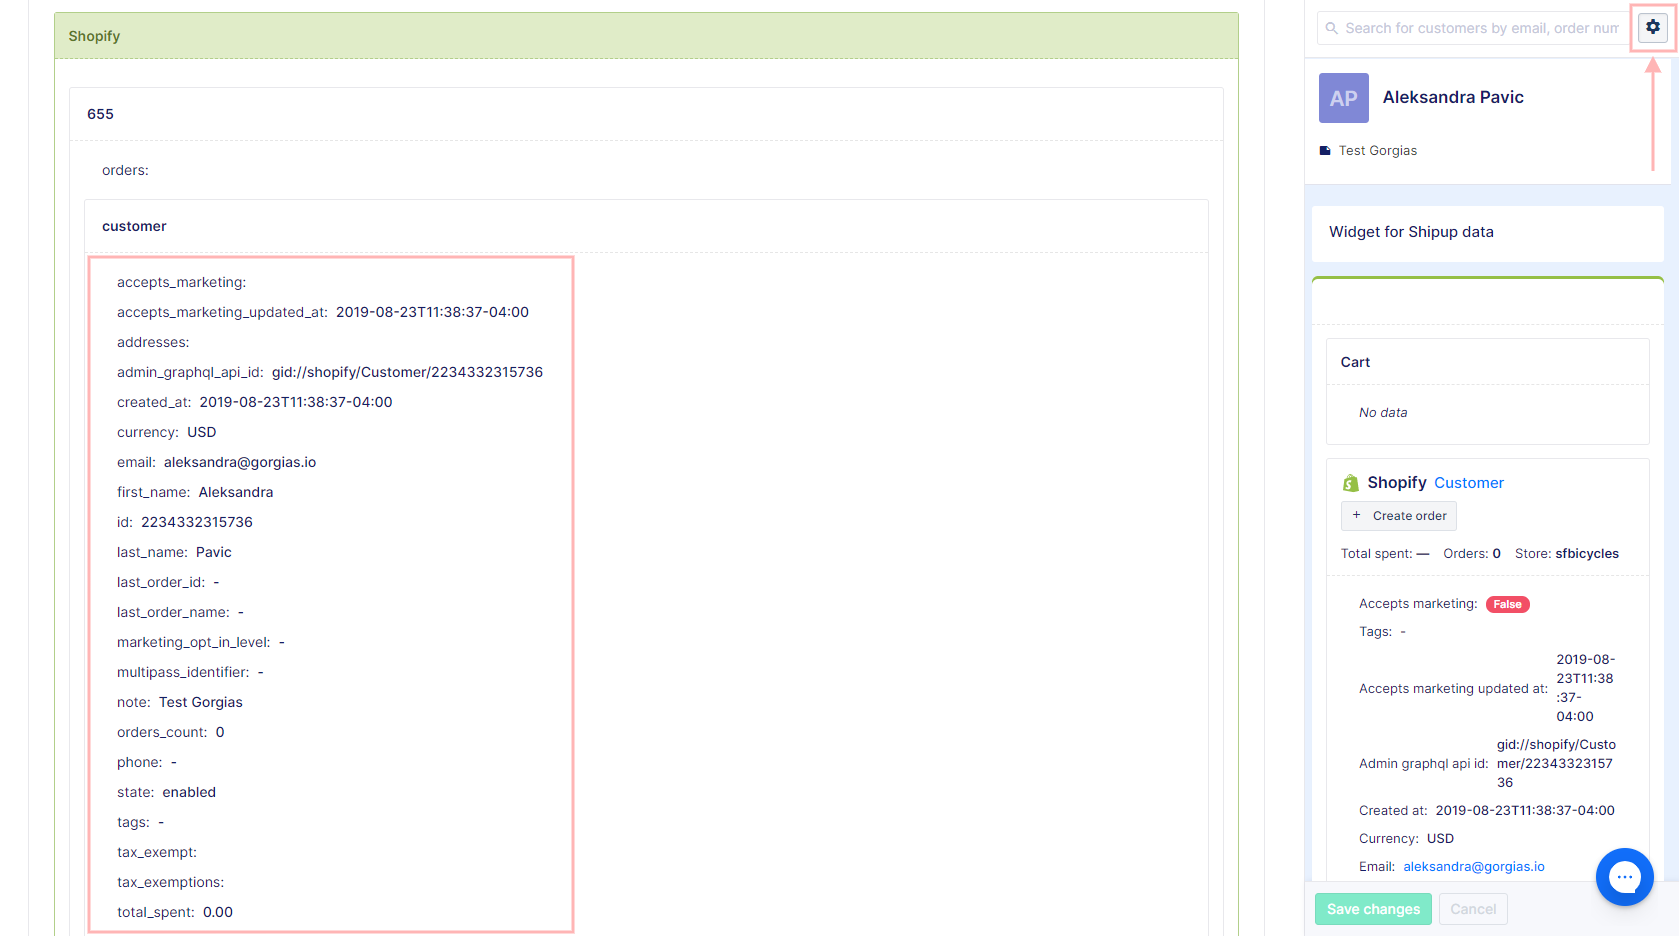
Grab any piece of info found in the list on the left and drag and drop it to the desired place in the sidebar on the right. When you do this on one ticket, all other tickets where the customer has Shopify data will display the same field as well from then on.
Custom Redirection Links
You also have the option to add redirection links at the top of every root widget in the right-hand sidebar - they can point to anything and open in a new browser tab.
The link text and URL use the current templating system if you want to add dynamic values to it.
Copy order number
You can copy the Shopify order numbers in just one click:
