Gorgias logo
Gorgias logo

All articles

Macros 101Updated a month ago

Macros are pre-made responses you can use to respond to your customers faster. They are especially useful if a large number of your customers tend to ask similar things or comment on similar topics.


How it works

Macros can perform a number of actions on a ticket including:

  • Insert response text: insert text into the response area. You can include variables such as the customer's first name
  • Set subject: change the subject of the ticket
  • Add tags
  • Add an attachment (20MB file size limit)
  • Set status as 'open' or 'closed'
  • Auto-snooze a ticket (more on the new auto-snooze feature in the video tutorial below)
  • Set assignee
  • HTTP actions: trigger webhooks in other applications (such as refunding a customer on Stripe)
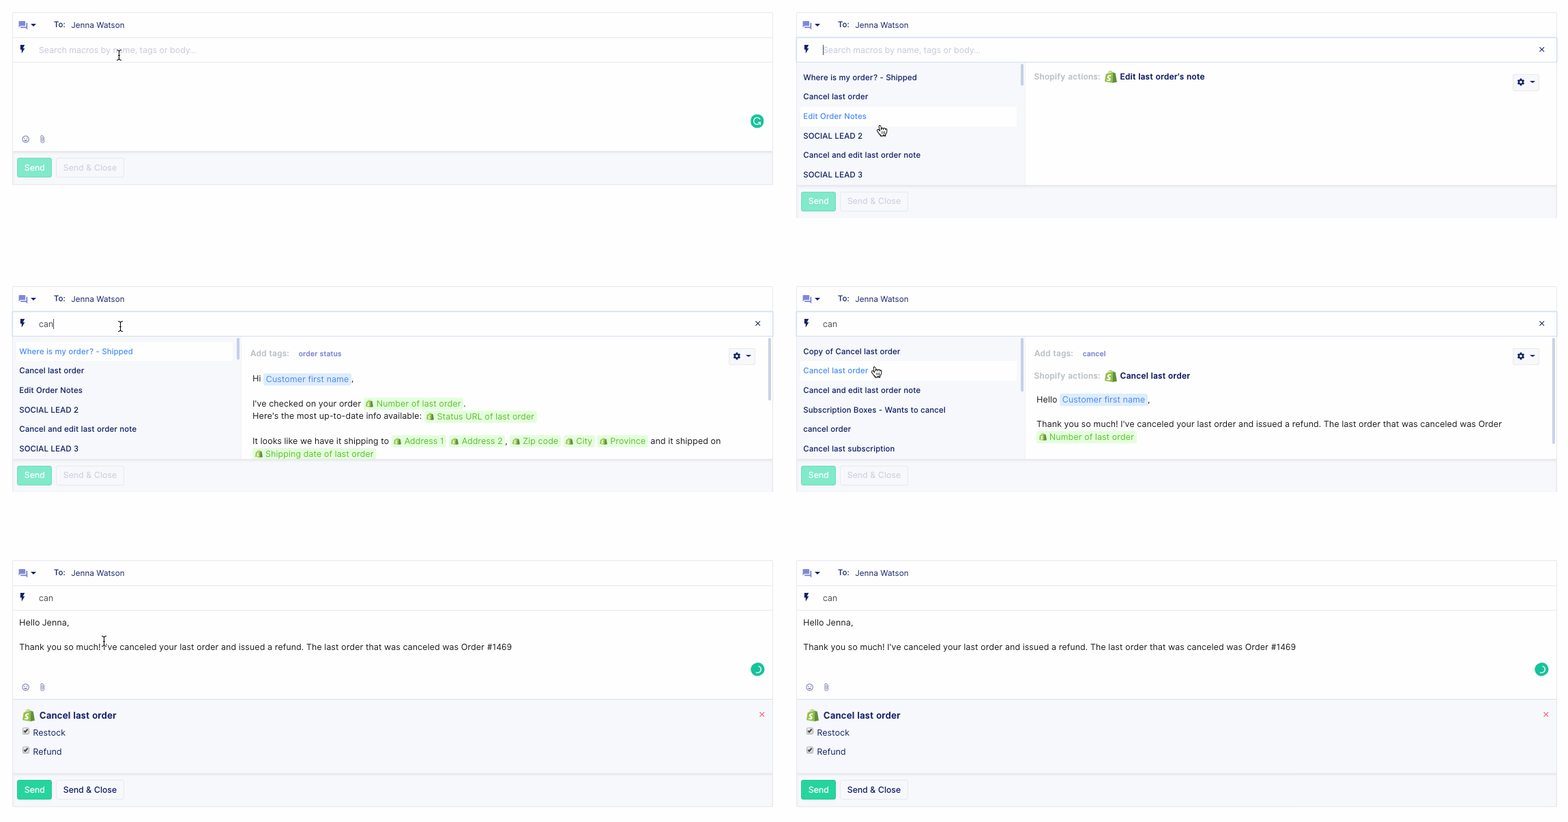
To insert a macro in a ticket, the system will default to a macro menu display. It will be automatically enabled for accounts that have 20 or more macros available. Please note that you can't search for macros using symbols that they contain in their name, for example '#', only the keywords.


To disable this function and have the option to search for macros manually in your tickets as shown above, you can go to Your Name (in the bottom-left corner of your dashboard) → Your Profile and uncheck the option under 'Account Preferences'.


Setup instructions

Here's how to create a macro: 

  • Go to any ticket
  • In the reply area, click on Search macro by name
  • Click on Manage Macros on the right of the preview panel, this opens the Manage macros page
  • Click on Create macro
  • Name your macro, and type the pre-made response in the Set response text area
  • *Optional: add an action, like editing a Shopify order or adding a tag (see more on macro actions here)
  • Click the green Create macro button at the bottom right


Macro Import and Export

You can import and export your macros via the Gorgias UI. If you navigate to Settings > Macros page, you will find two options in the upper right corner:

As you can see you can import a CSV file of your existing macros from a different helpdesk into Gorgias. Then, you can export a CSV file containing all of the macros that you have in Gorgias, enabling a rapid visualization of your macros content at a glance. You can even update groups of macros at once by exporting, revising, and reimporting your macros into Gorgias.


Please keep in mind that the import macros feature does not conserve formatting when importing new macros. The import will work properly only if the CSV is encoded in utf-8 (you can choose your encoding when saving the CSV from your external editor like Excel or Sheet).


With the macros import button, the customer should use existing tags on the import or it won't be completed.

The import process supports 4 columns: name, body text, tags, and id. Any additional column in your CSV will be ignored during the import. The order of the columns does not matter, only the name of each column does.

  • If no id is provided a new macro will be created for each line in the CSV.
  • If an idis provided then the process will check if an existing macro has the same id in your account (this is mainly relevant if you import back into your account a CSV that was generated using our export macro feature since it's the main way to get macro ids at the moment) :
    • If the answer is yes then the process will update the existing macro with the new content from the CSV.
    • If the answer is no then the process will skip the line in the CSV and nothing will happen (no macro will be created as a result).
Please make sure to name your columns exactly 'name', 'body_text', 'tags' and 'id' without any capitalization!


Example 1: If you import the CSV below the process will create a new macro with the title: “Greet customer”, the text: "Hello dear customer" and 2 tags: “tag1" and “tag2”.


Example 2: If you import the CSV below the process will create a new "Greet customer" macro since no id is provided and will update the current macro with the current id = 3. Nothing will happen with the 3rd line since the id=45 does not exist in your Gorgias account at the moment so the line will be skipped by the importer.

Please note that, if you export macros from Gorgias, edit them and import them into Gorgias again, the macro actions related to the macro won't be affected by these changes.

Manage macros

It is possible to manage your macros outside of your tickets too. Simply navigate to Settings > Macros.


This will give you the ability to monitor usage in a single place while giving you the same customization abilities. You will be able to create, duplicate, and delete macros from the same page.


By default the macros are organized by created date/time on this page, the oldest macros displayed first. You can change this by clicking right next to the Macro column to change the order to alphabetical. Clicking on the little arrow that appears again will change the order to reverse-alphabetical.

If you want them listed by usage count, simply click next to the Usage Count column. The same goes for Last Updated.


Macro Organizing

You can use new options to organize your macros. We've added two new columns to the macros: Language and Tags.

  • You can assign a language to a macro:
  • This will enable you to filter and list macros by language. In Settings, you can list every macro of a specific language.
  • When replying to a ticket, the macro list will be automatically filtered with macros matching the ticket’s language:


  • When editing a macro, the language will be autodetected based on the reply text you type. If a macro has no particular language, for example, a macro that only adds tags, you can leave the language field empty, and the macro will show up regardless of the language filter.

You also have the possibility to filter macros by the tags applied. The settings page will show all the tags that each macro applies to the ticket, and you can filter the macros based on those tags.

  • In additon to that, we now list the top 3 AI recommended macros at the beginning of the list, and then display the rest of the macros alphabetically. This means you’ll be able to skim faster through your macros and the search will be easier.


Additional features

Still not fast enough? We have three additional macro features for you to help you maximize your efficiency!

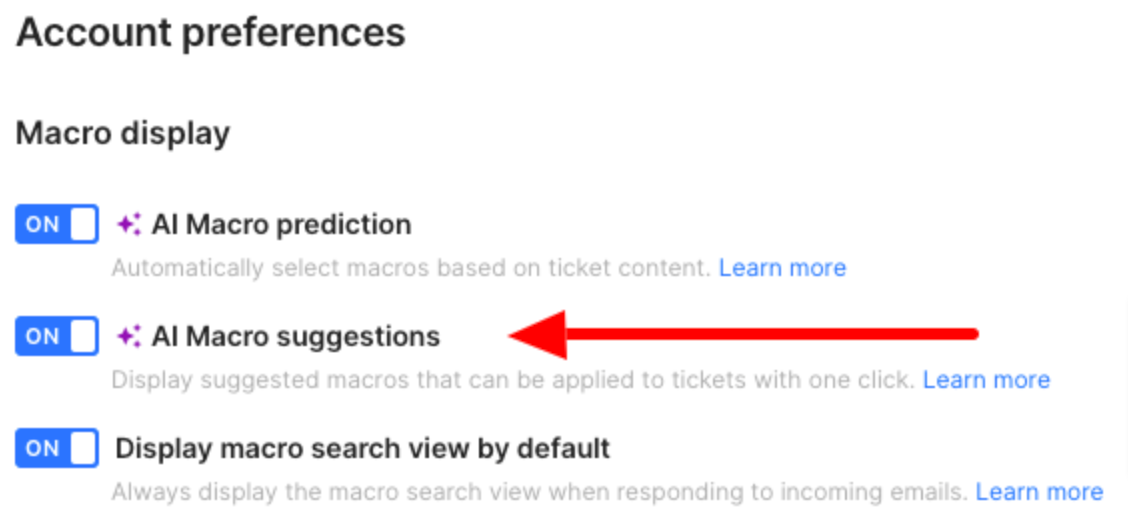
Navigate over to your profile settings as shown below and under Account Preferences you will find the following options:

  • Auto-fill macros with high success rate
    When the system predicts that you would use a certain type of macro on the ticket that you're replying to, this option will pre-fill your typing field with the relevant macro automatically.
  • Display macros by default on emails
    This option will open up the macros panel automatically every time you open a ticket.
  • Display macro suggestions in message editor
    This feature will display the top 3 suggested macros for the specific ticket that you're about to reply to based on our own machine learning powered recommendation engine.


Speed up your workflow even more using cmd (ctrl) + 1, 2 or 3 to send one of the recommended macros using your keyboard!


More pro tips

Take a look at our quick video guides on macros below for more information on how to get the most out of this feature:


Another quick tip is to use macros and then auto-snooze tickets in one go! This is a brand new feature, and you can check out how it works below:


Other macro actions can be found here!


FAQs

If a client has multiple support email addresses integrated and they have "Apply macro" action set in their rules, which email address will be used in the "From" field?

When the macro is used in bulk, it will behave exactly the same way as if an agent sent the message on their own while responding to tickets.

How can macros get sorted?

Macros are sorted automatically by relevance using artificial intelligence.

How can I disable macro suggestions?

You can disable macro suggestions by clicking on your user avatar in the bottom left corner and then clicking on Your Profile. There you will have the option to disable/enable macro suggestions:


Can the note be added to the customer's Shopify profile without creating a ticket?

It can be easily created using a webhook.
Since the note cannot be added directly to a customer's Shopify profile, the 'Change Last Order Note' action in Macro is used for this purpose. Just a short note - this macro should be used in the internal note and not in a separate reply.
More on macro actions here!

Why can't I create/update a macro? The system is coming up with an error.

You may have reached the limit! In Gorgias, at least for now, you can create up to 5000 macros.
Another reason could be that, for example, if you set up your macro to add certain tags and left the tags field empty, the system will come up with an error and won't let you save until the field is fulfilled.

How are macro recommendations made?

Recommendations are based on a mix of machine learning (using text similarities, text classification) and usage frequency.

How do we exempt a macro that is rarely used from macro recommendations?

At the moment this is a recommender system (like a Google search page), so it will always recommend something. We are waiting to gather usage information once the macros are in the editor to display certain macros or not.


Apply for the Masterclass

You can apply for the Macros Masterclass here.

If you are facing an issue with your macros that isn't covered above, please write to us at [email protected] or reach out to us via our live chat and we'll be happy to troubleshoot for you!


Last reviewed Thu, 9 Nov 23 by Senka

Was this article helpful?
Yes
No