Handle tickets in GorgiasUpdated a month ago
Every customer conversation in Gorgias lives in a ticket. When a customer reaches out with a support inquiry, Gorgias creates a ticket and routes it to your team, regardless of which channel the request originated from. This guide walks through the full workflow for handling a ticket: reading the conversation, writing a reply, using macros and keyboard shortcuts to save time, leaving internal notes for your team, and managing ticket status.
Requirements
- Available on all Helpdesk plans
- Everyone (except Observers) can view and reply to tickets
Understand the ticket view
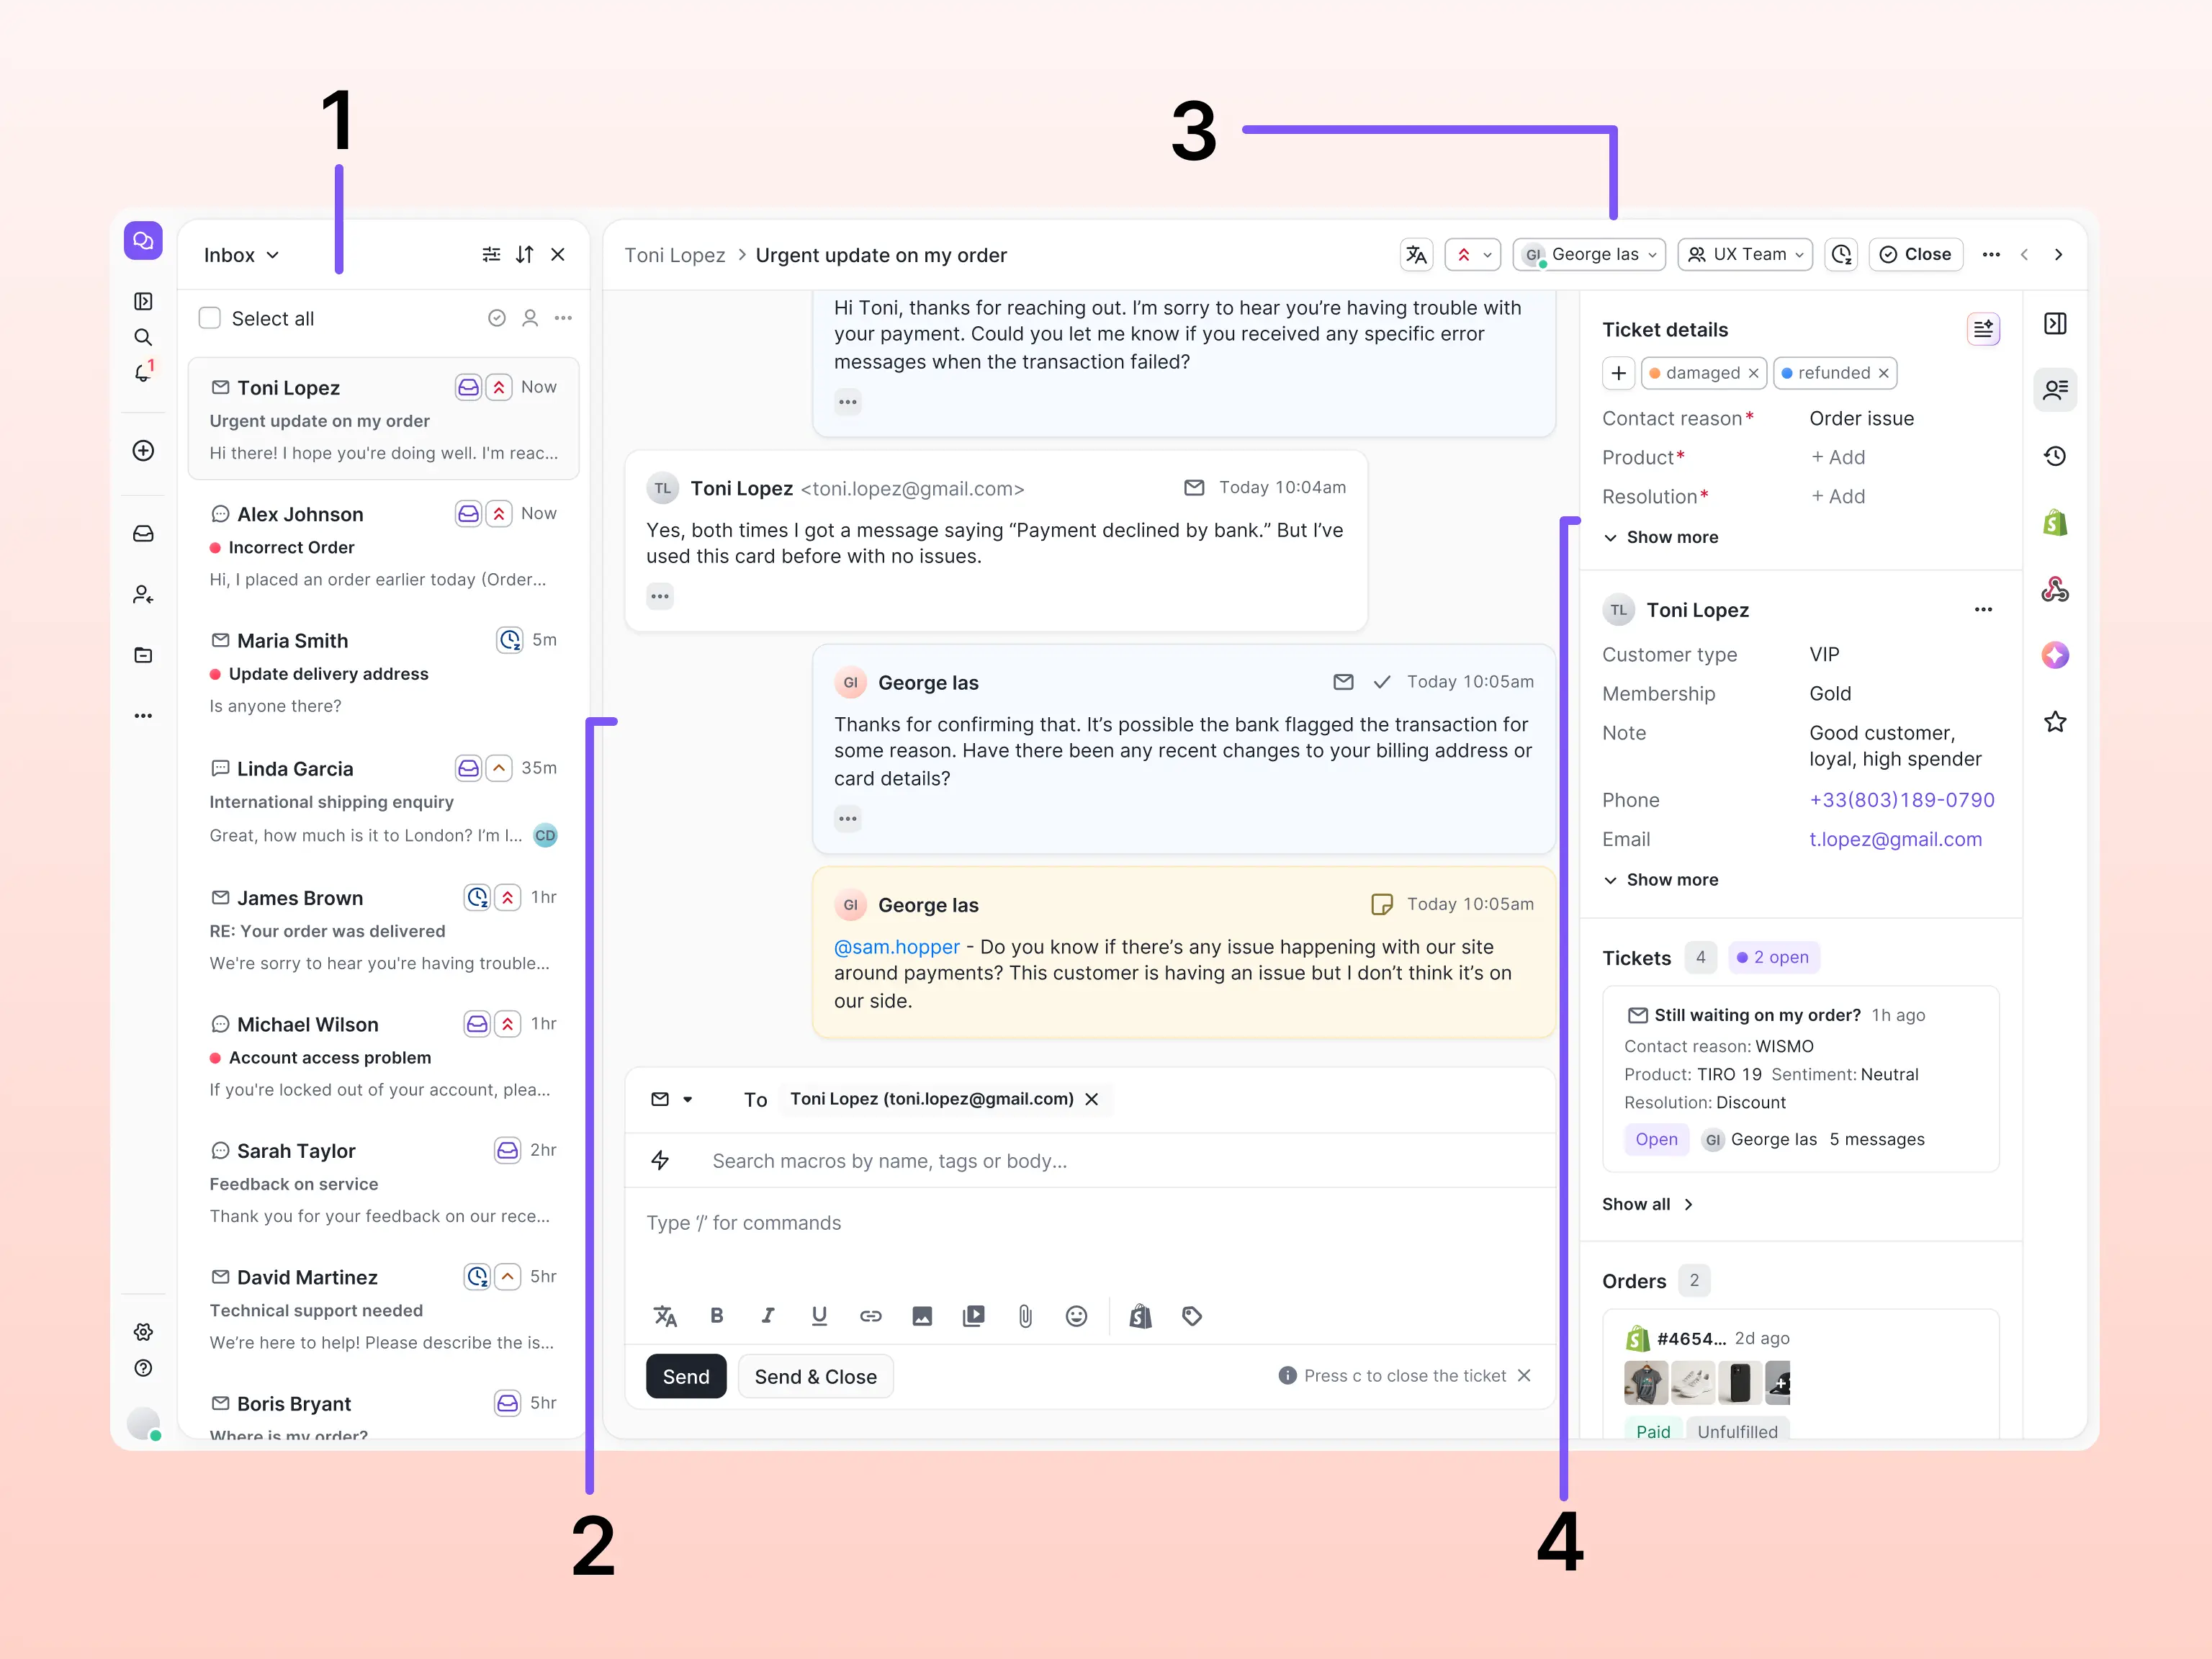
When viewing a ticket, there are four key areas to be aware of.
- The ticket panel lists every ticket from the view you’re currently working out of. Each ticket is a separate conversation, and you can move between tickets by selecting them from the panel.
- The conversation thread shows the full message history between your team and the customer, with the most recent message appearing at the bottom. Each message shows who sent it, when, and the channel it came in on. Directly below the thread, you’ll find the message composer, which is where you’ll draft your reply, search for macros, and switch between channels.
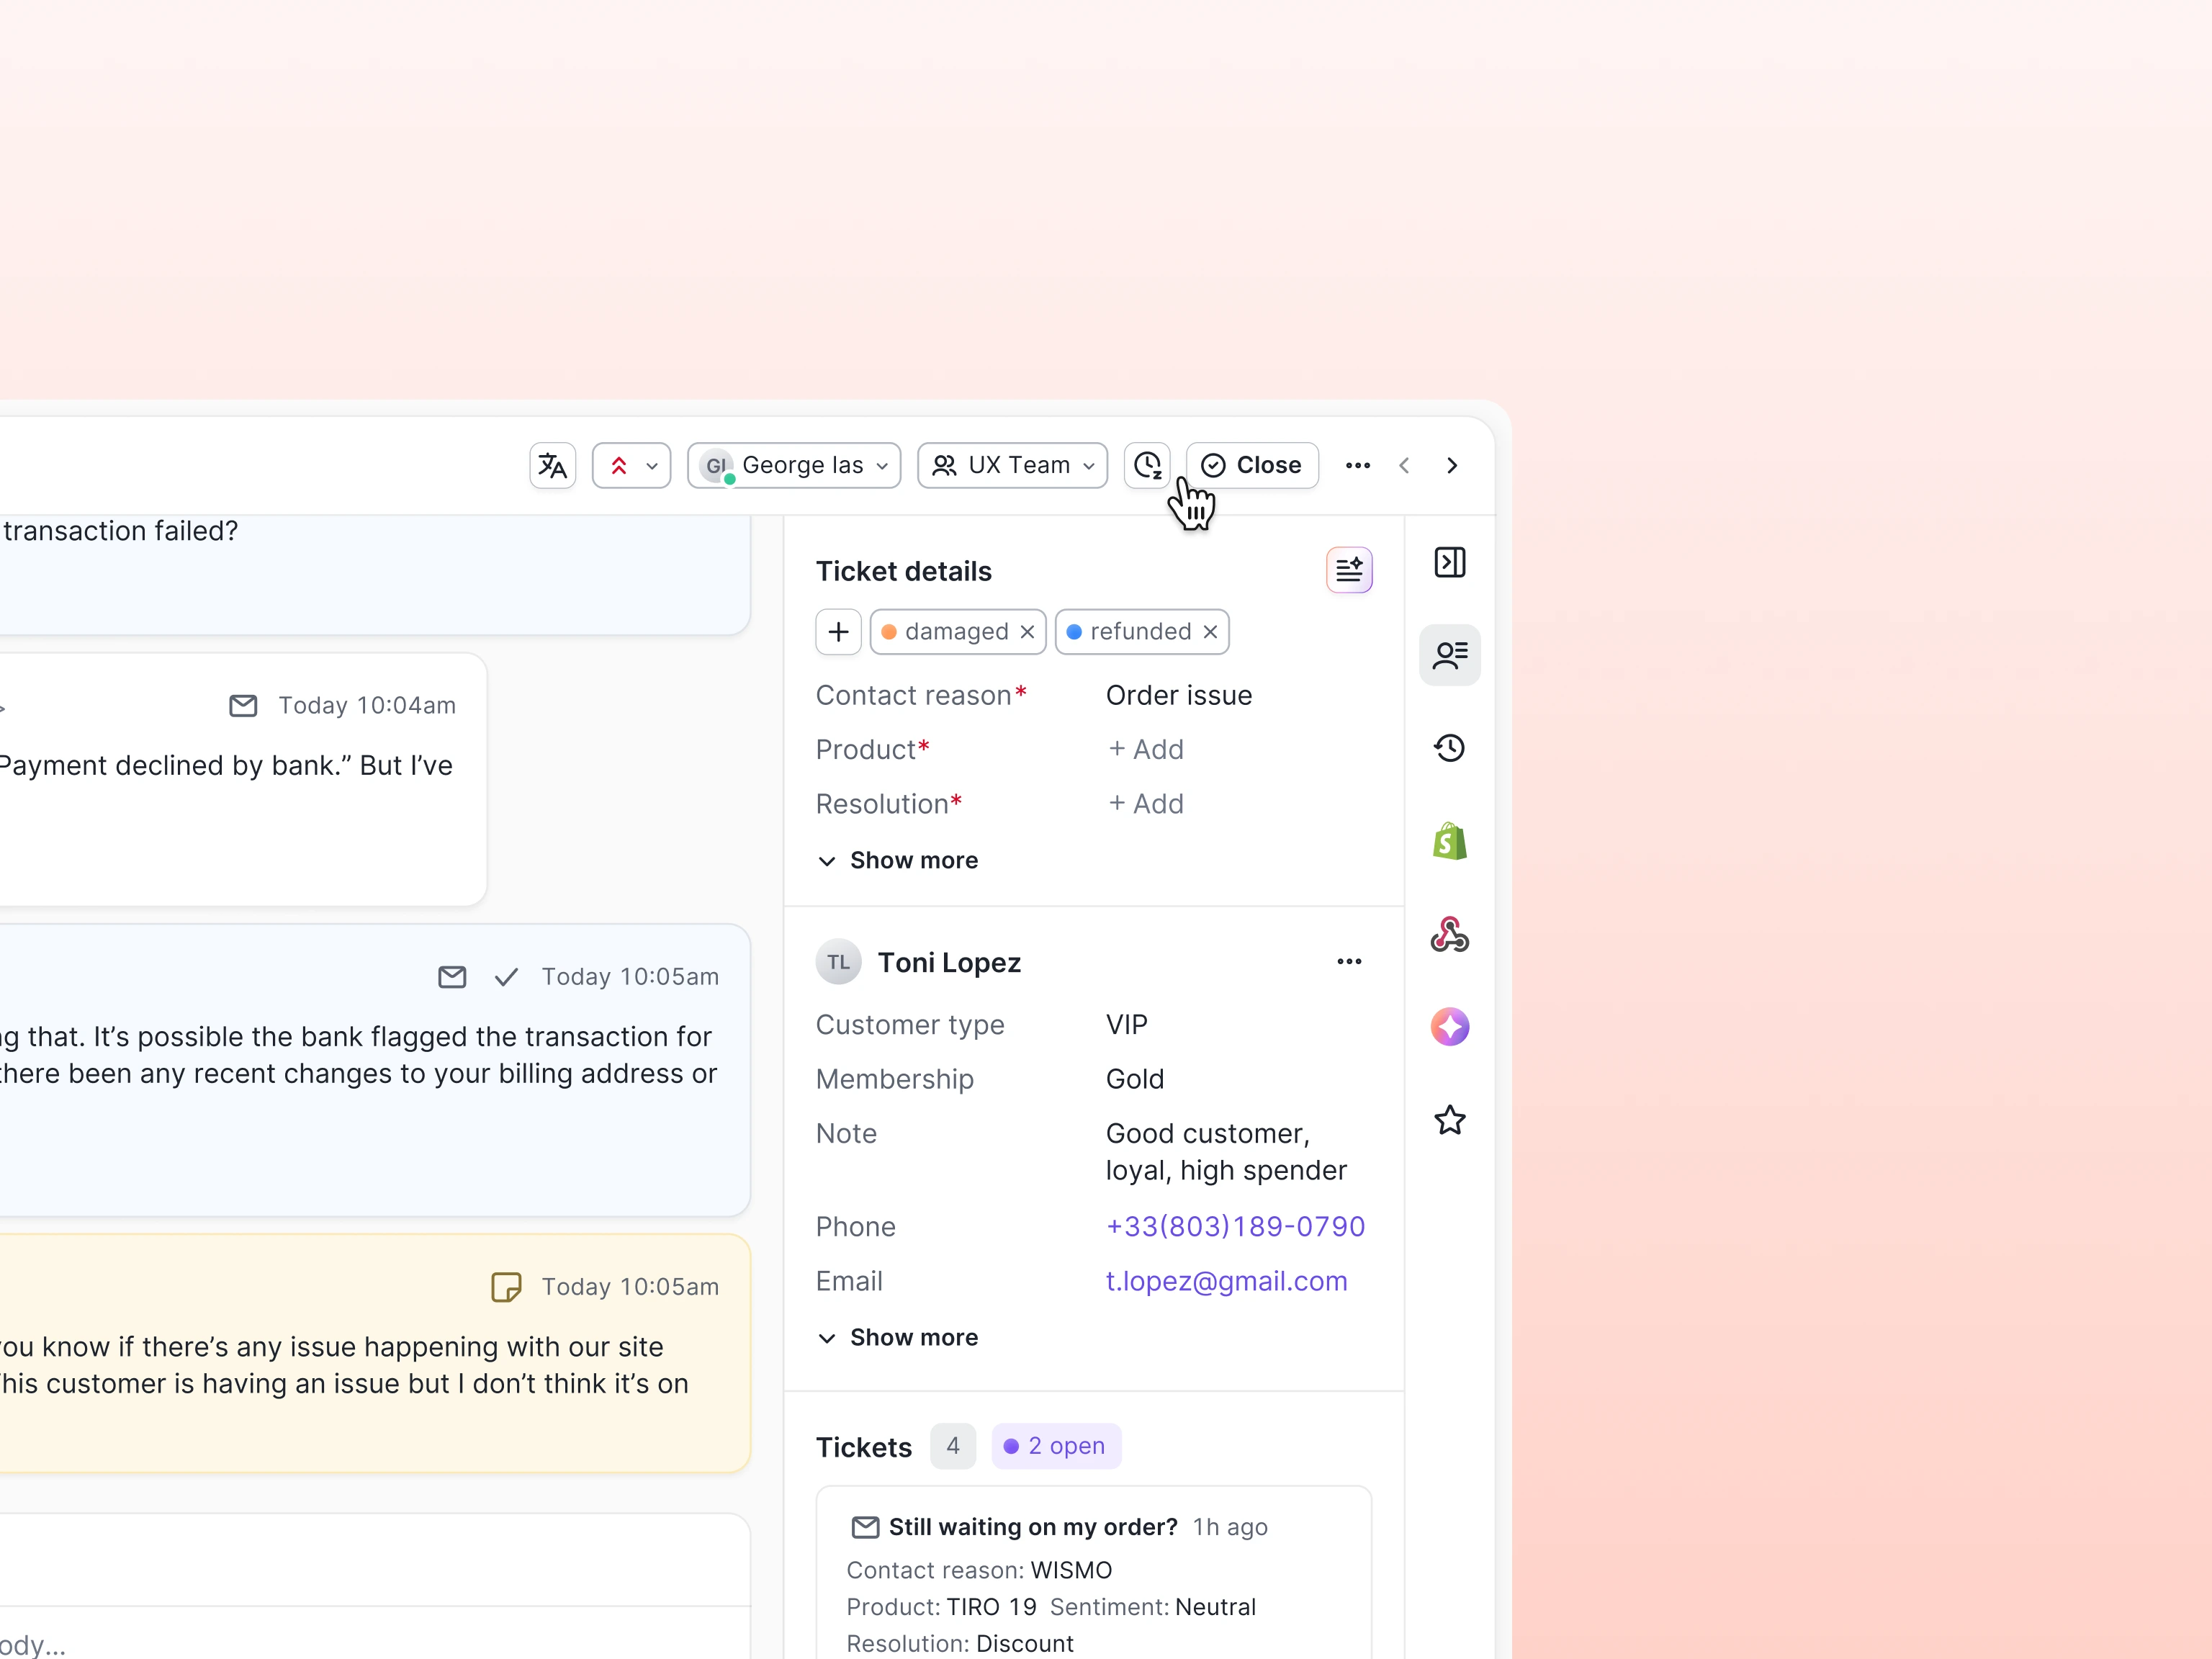
- The ticket header contains key details like the ticket’s status, priority, and assignees.
- The ticket sidebar on the right-hand side of every ticket updates dynamically for every conversation. Click through the icons on the far-right to display details relevant to resolving the customer’s inquiry, including the ticket and customer details, the customer timeline, and data from integrations like Shopify, BigCommerce, or Magento 2.
Before you reply
Before you get started on composing a response to your customer, take a moment to review and update the details in the ticket sidebar. This is a great way to get context on your customer’s issue, and an important step in keeping the tickets in your helpdesk organized between your teammates.
Assign a ticket

Assigning tickets ensures the right person is responsible for following up and helps your team manage workload. Tickets can be assigned to an individual agent, a team, or left unassigned. Assigning a ticket to yourself lets your team know it’s being handled, and prevents two agents from working on the same ticket without realizing it.
The assignee dropdown is in the ticket header. It shows the current assignee's name and profile picture, or Unassigned if no one is assigned yet.
- Click the assignee dropdown in the ticket header.
- Type a name in the search field to filter agents and teams.
- Select an agent or team from the list. You can assign both a team and an individual agent at the same time.
To assign the ticket to yourself, click Assign yourself — it's always available near the top of the list and doesn't require a search.
To remove an existing assignee, open the dropdown and click the × next to their name.
Review and add tags and fields
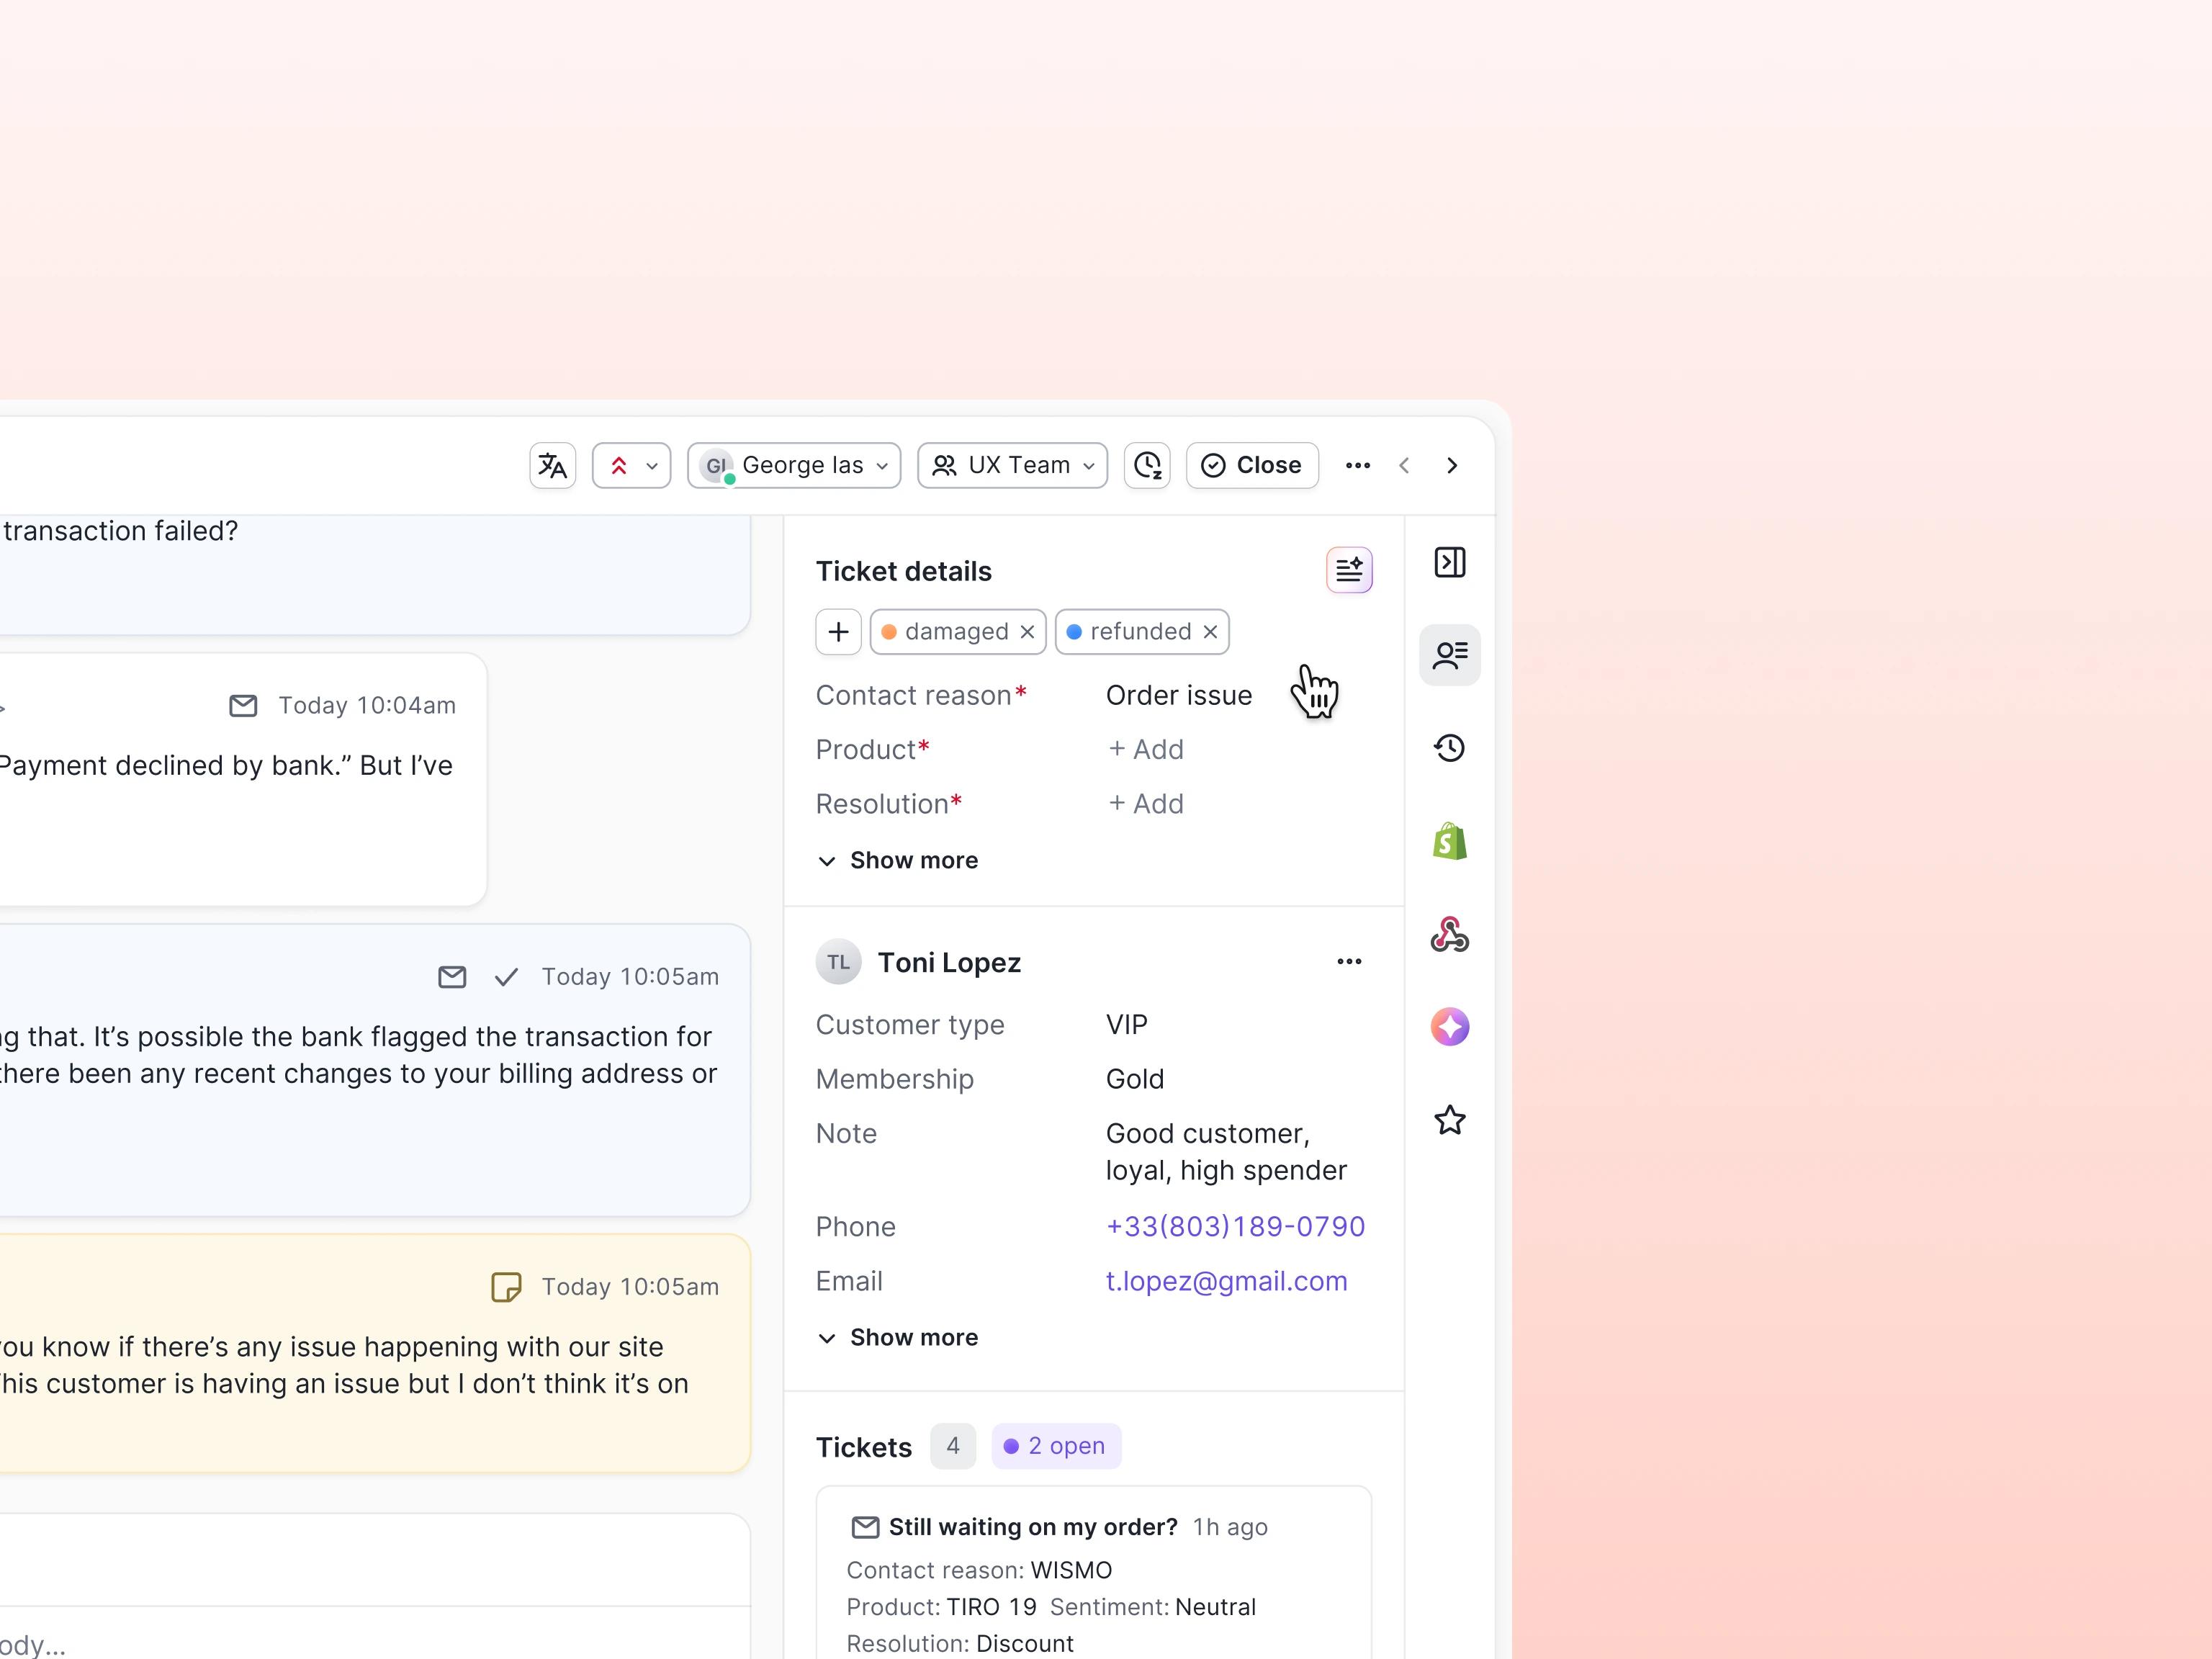
Tags and fields can be added to tickets by automations or by your teammates, and often provide a useful overview of the content in the ticket. If you notice that any are missing, you can add them yourself.
Tags help you categorize tickets so you can filter, report on, and act on them later. For example, you might tag tickets with the issue type ("damaged-item", "wrong-order") or the resolution ("refunded", "exchange-sent").
To add a tag:
- From the ticket sidebar, click the plus icon in the ticket details.
- Type the tag name.
- Select an existing tag from the menu, or press Enter to create a new one.
To remove a tag, click the × next to it.
Ticket and customer fields are used to collect structured, consistent data about your tickets and customers. For example, you might fill out a Product field with the product name a customer is writing about, or a Membership field in the customer’s profile if your brand sells subscriptions. If a field is marked with a red asterisk (*), it has to be filled out before you can close the ticket.
To add a field:
- From the ticket sidebar, click +Add next to the field in either the ticket details or customer details.
- Enter or select a value.
To remove a field you selected from a menu, click the value and select Clear selection.
Review the customer’s ticket history
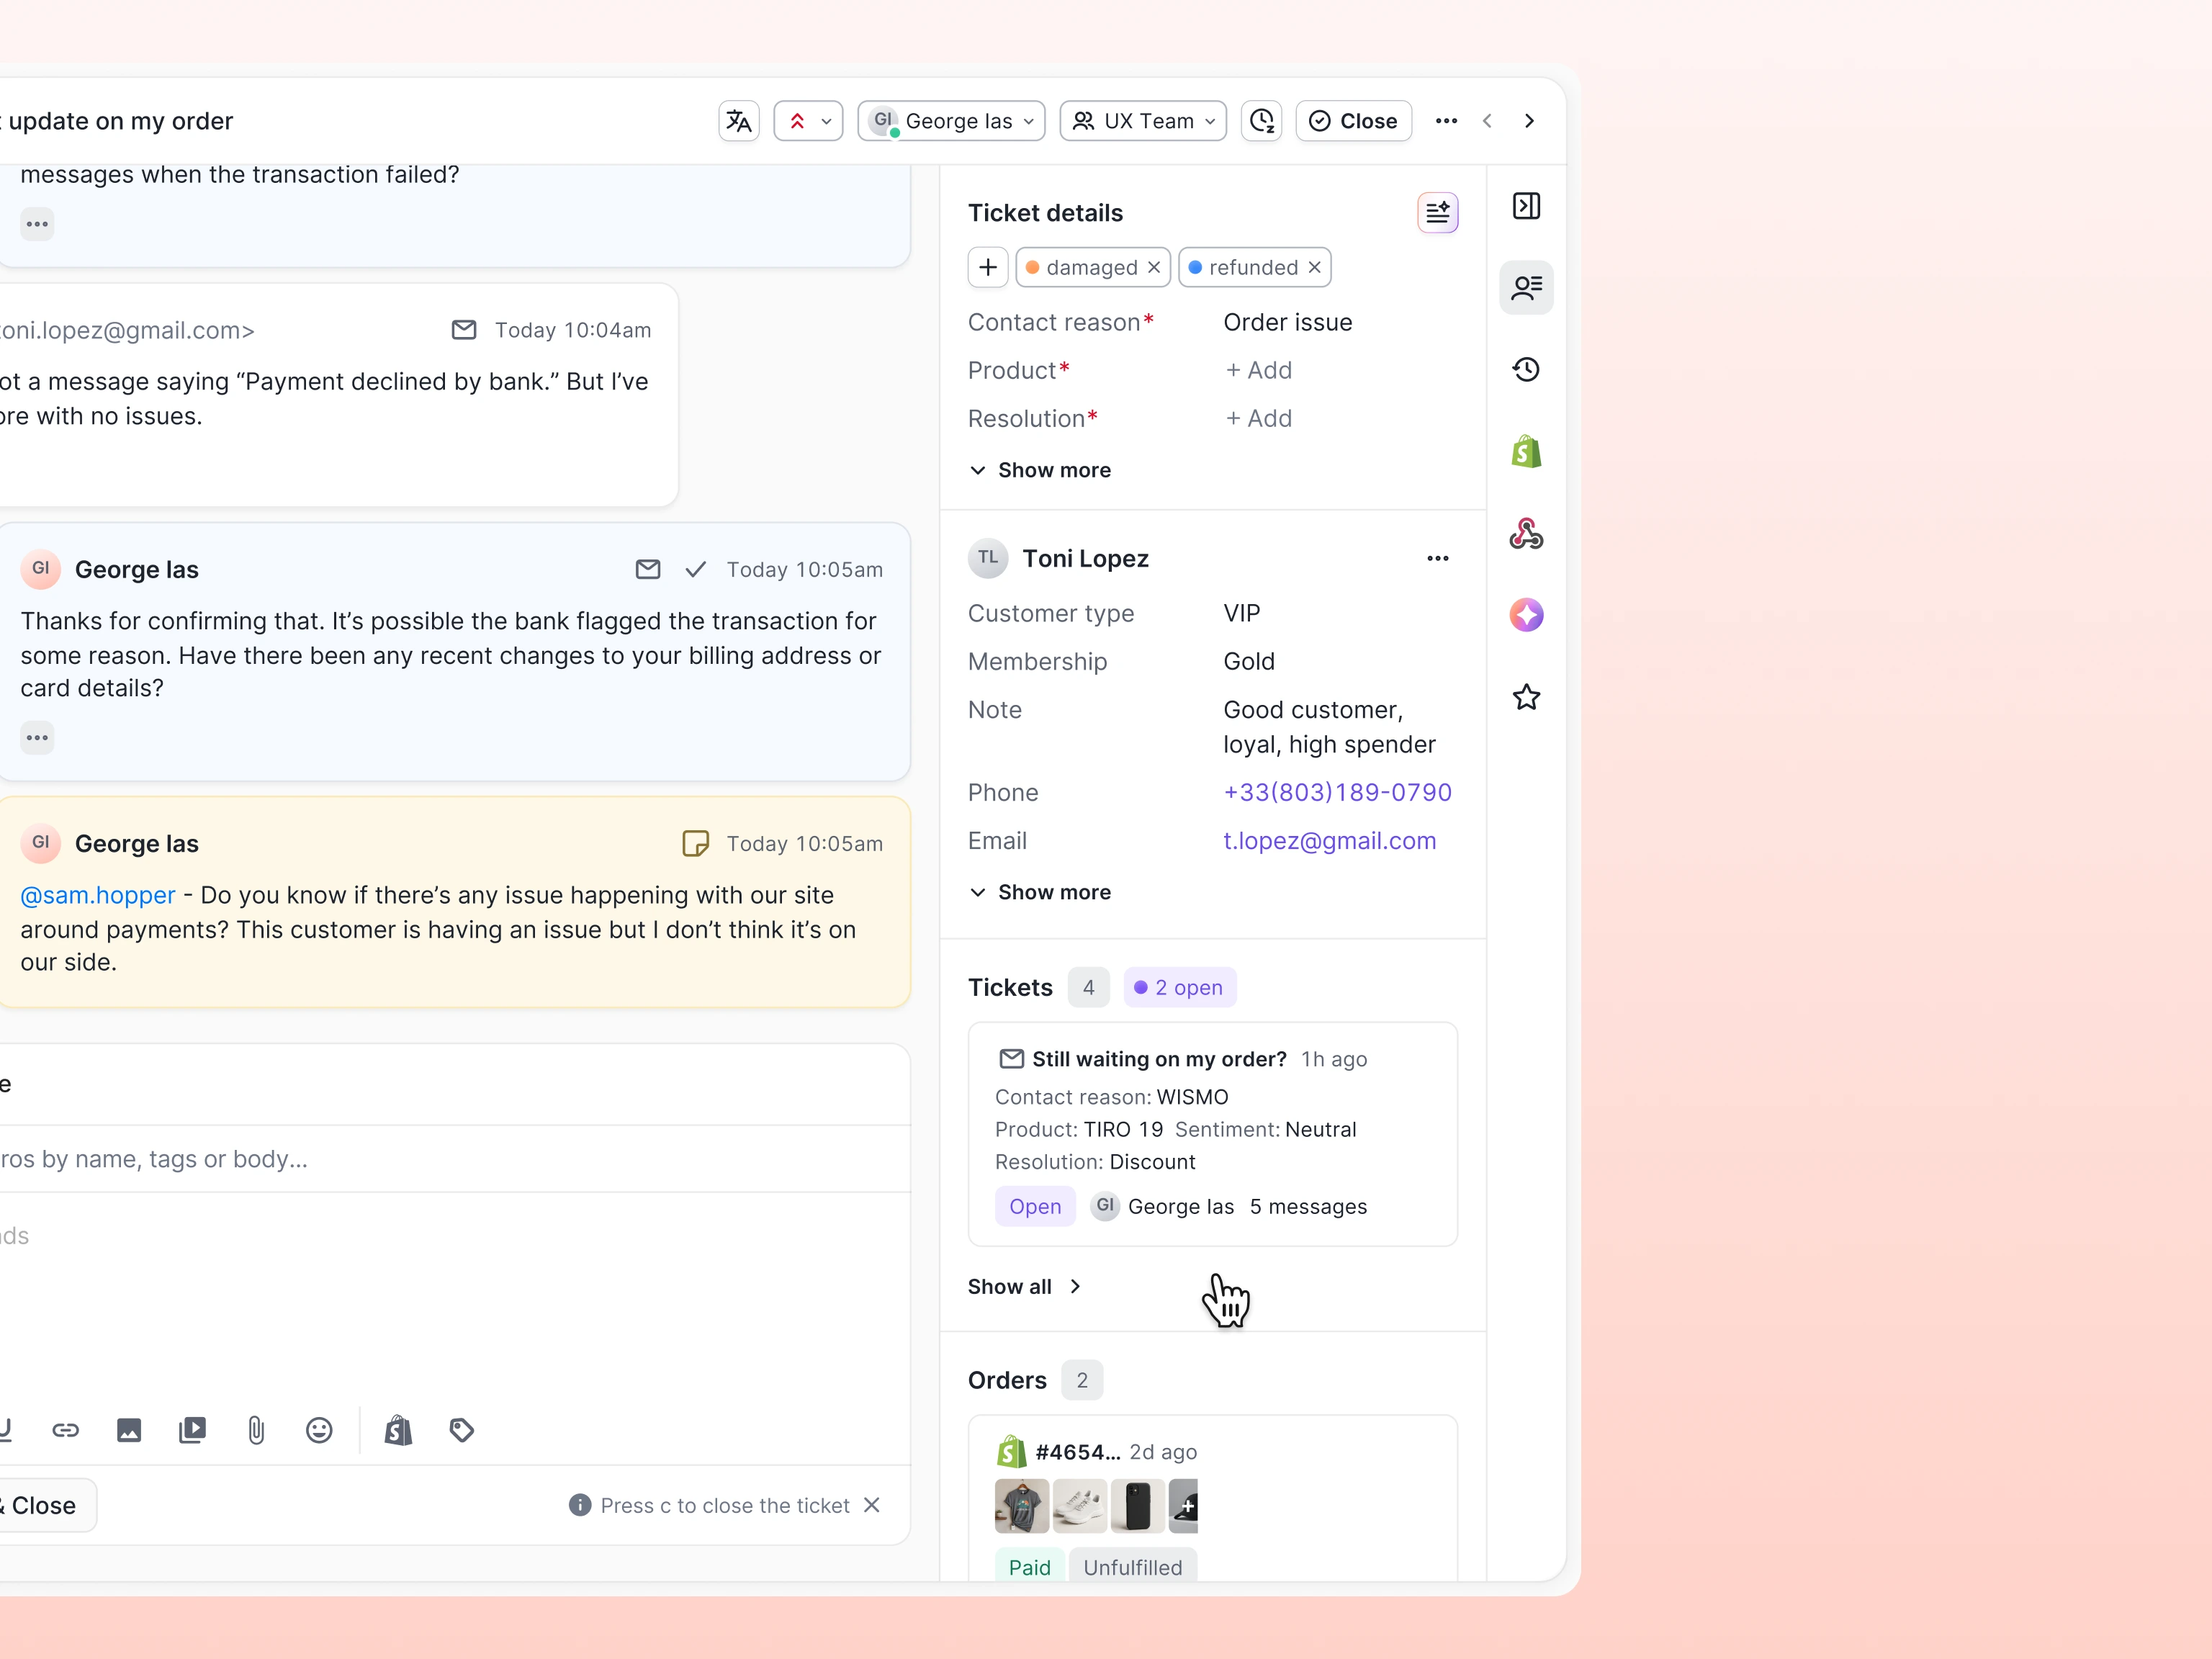
Before replying to a ticket, it's worth checking whether the customer has contacted you before. The Tickets section in the sidebar shows a summary of their full history with your team, including the total number of tickets from the customer, and a preview of up to three of their most recent tickets.
Click any preview to read the full ticket alongside the ticket you’re currently working on, or click Show all to see the full customer timeline.
Reply to a ticket
Replying to a ticket is the most common way you’ll interact with tickets. Familiarize yourself with the different components of the message composer to efficiently communicate with your customers.
Choose a reply type
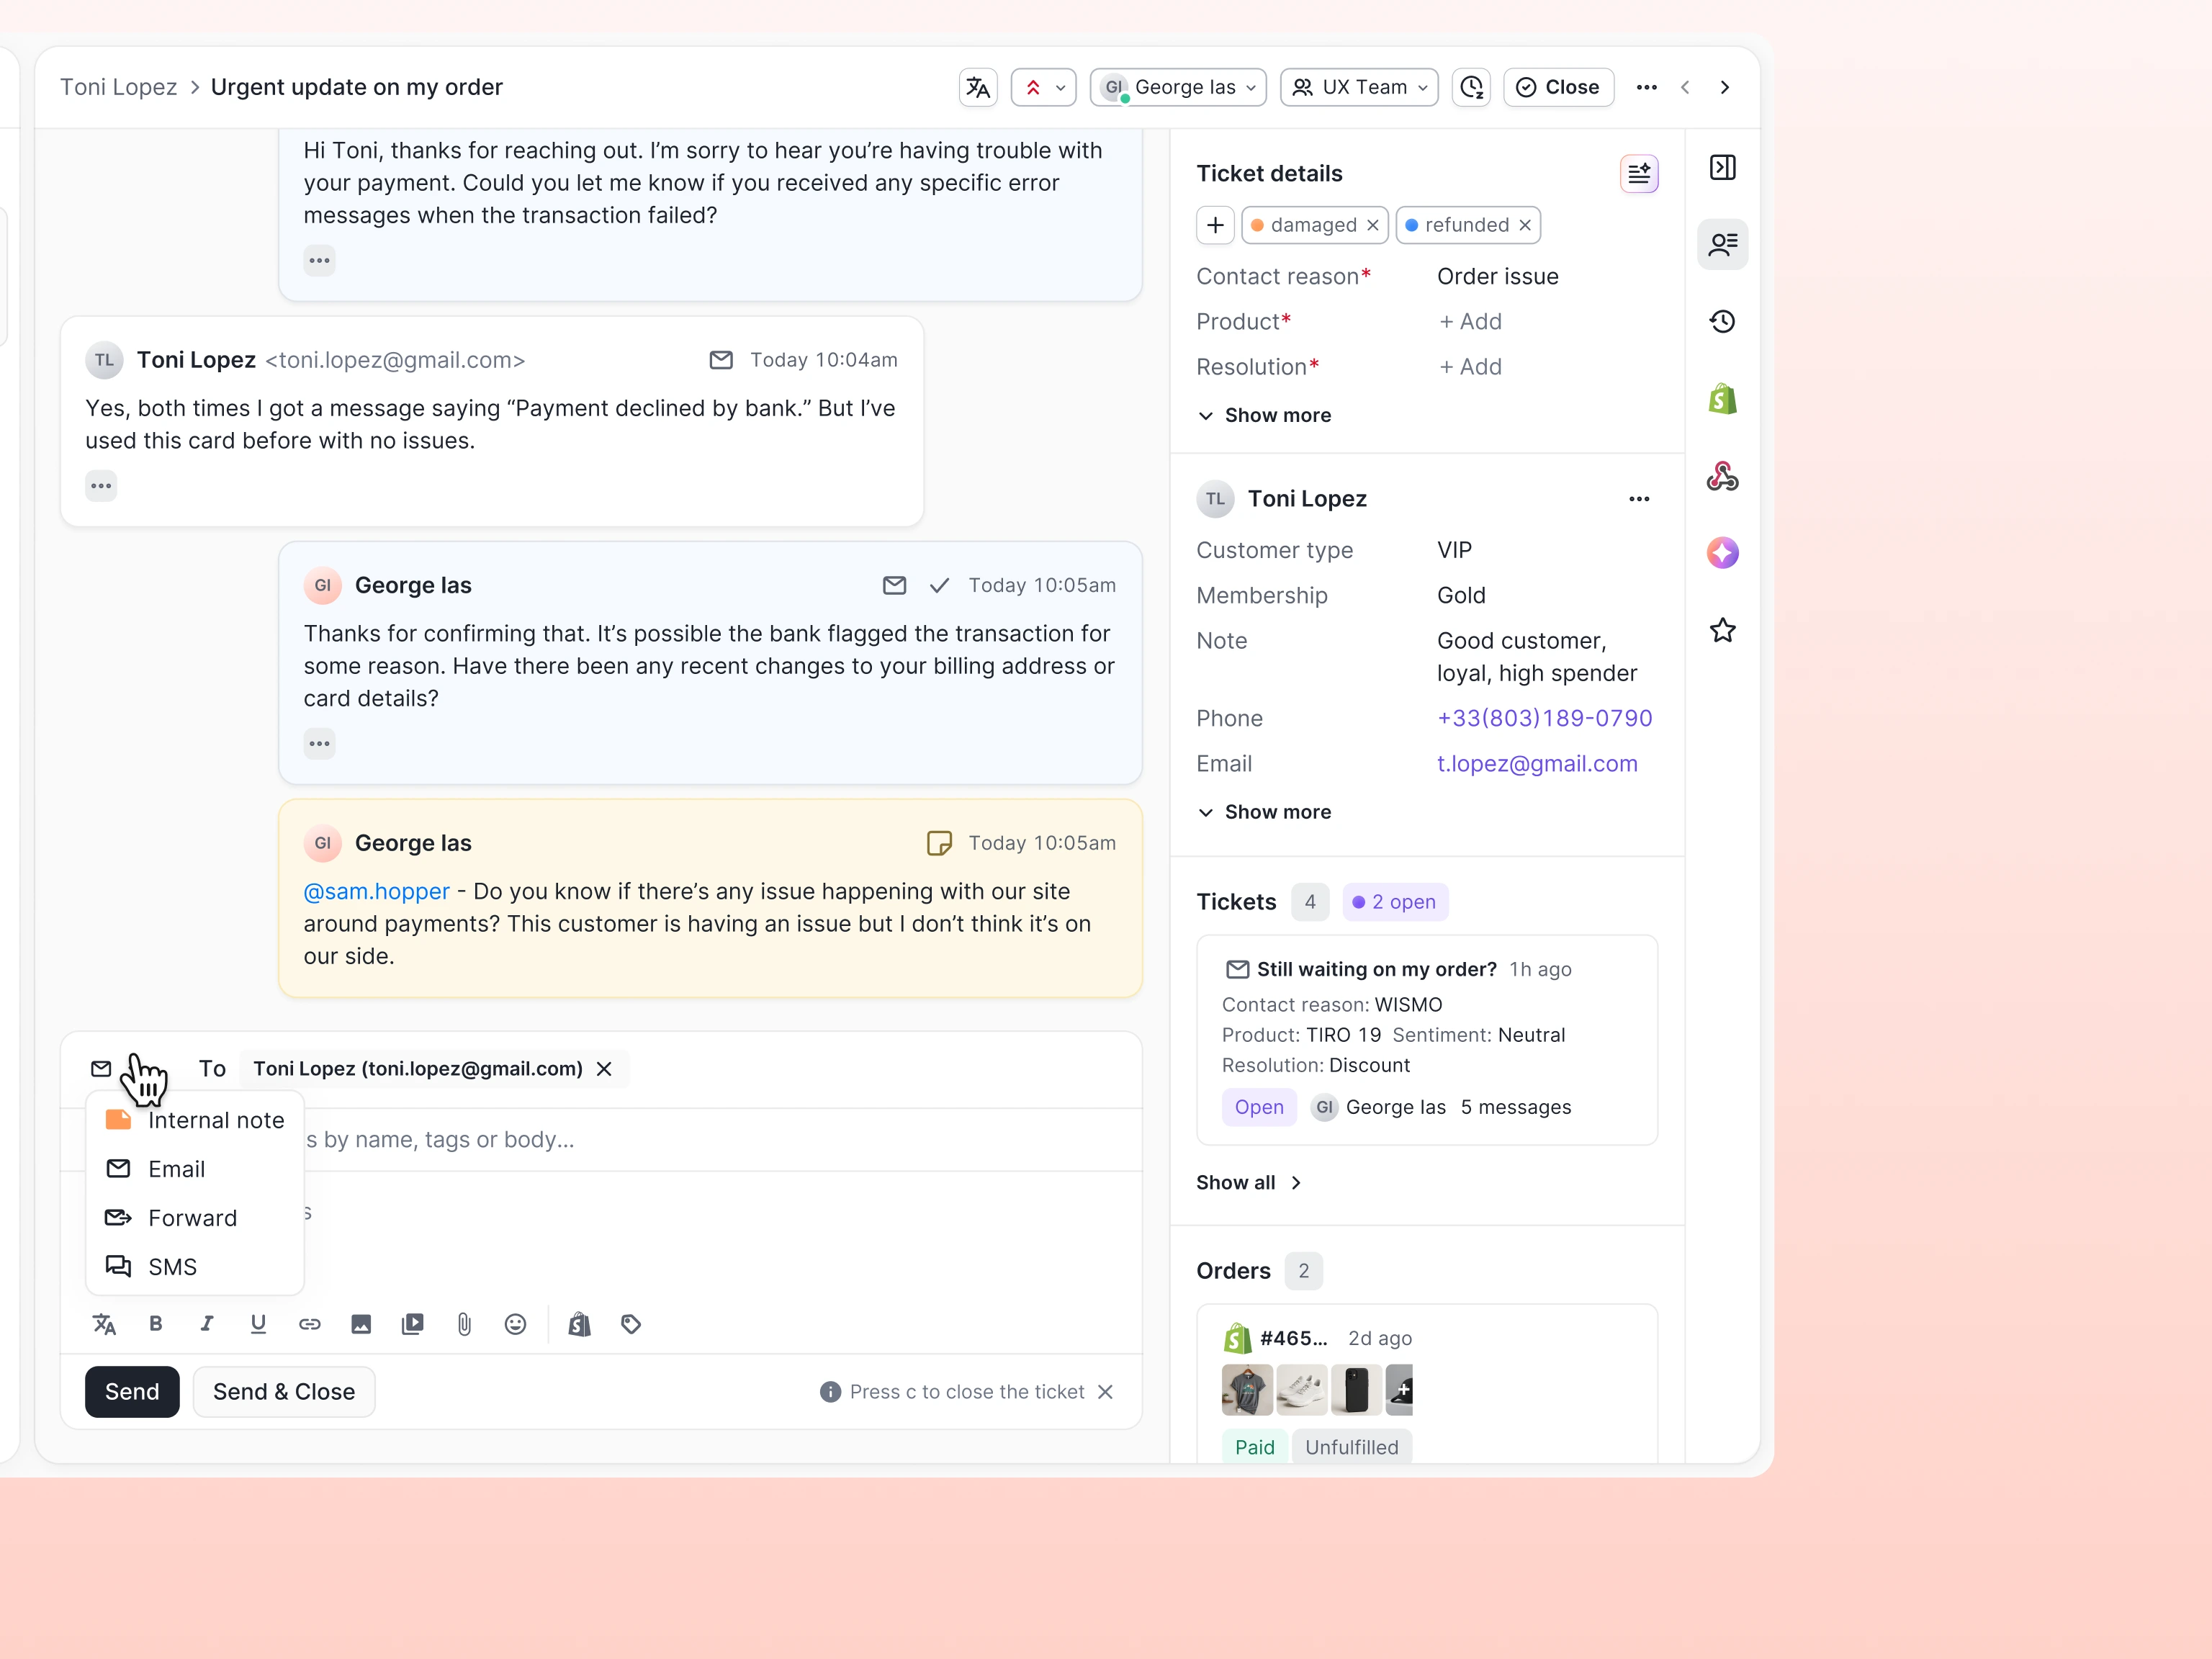
The channel selector is the dropdown in the top-left of the reply area. It controls how your reply is sent. By default, it's set to match the channel the customer used; if the ticket came in by email, your reply goes out by email. You can change this to reply on a different channel, or switch to Internal Note to write a message only your team can see. The available channels in this menu will reflect the available contact information in a customer’s profile. For example, if you have the phone number of a customer who emailed you on file, you can switch to SMS.
- In the reply area, click the channel selector dropdown in the top-left corner.
- Select the reply type you want to use.
Write your reply
Click anywhere in the text area to start typing.
The toolbar along the bottom of the editor allows you to make some changes to your reply before sending:
- — basic text formatting options
- — insert a hyperlink
- — insert an inline image
- — insert an attachment from your computer
- — add an emoji
- — embed a video link
- — insert a discount code from your connected store
- — translate your reply before sending
The toolbar will update when you’re sending a non-email reply (like chat or SMS) to display only the options that channel supports.
Send your reply
Once your reply is ready, you have two options:
Send sends the message and leaves the ticket open. Use this if you’d like to keep the conversation in your inbox.
Send & Close sends the message and closes the ticket in one step. Use this when your reply resolves the issue and no further action is needed — it keeps your queue tidy without requiring a second click.
Forward a ticket
You can forward a ticket to another email address to send the full conversation to a colleague who doesn't use Gorgias, a supplier, or an internal team. The original customer can continue to reply normally once a ticket has been forwarded.
- In the channel selector dropdown at the top of the reply area, select Forward.
- In the To field that appears, enter the email address you want to forward to.
- Write your message, then click Send.
Use macros
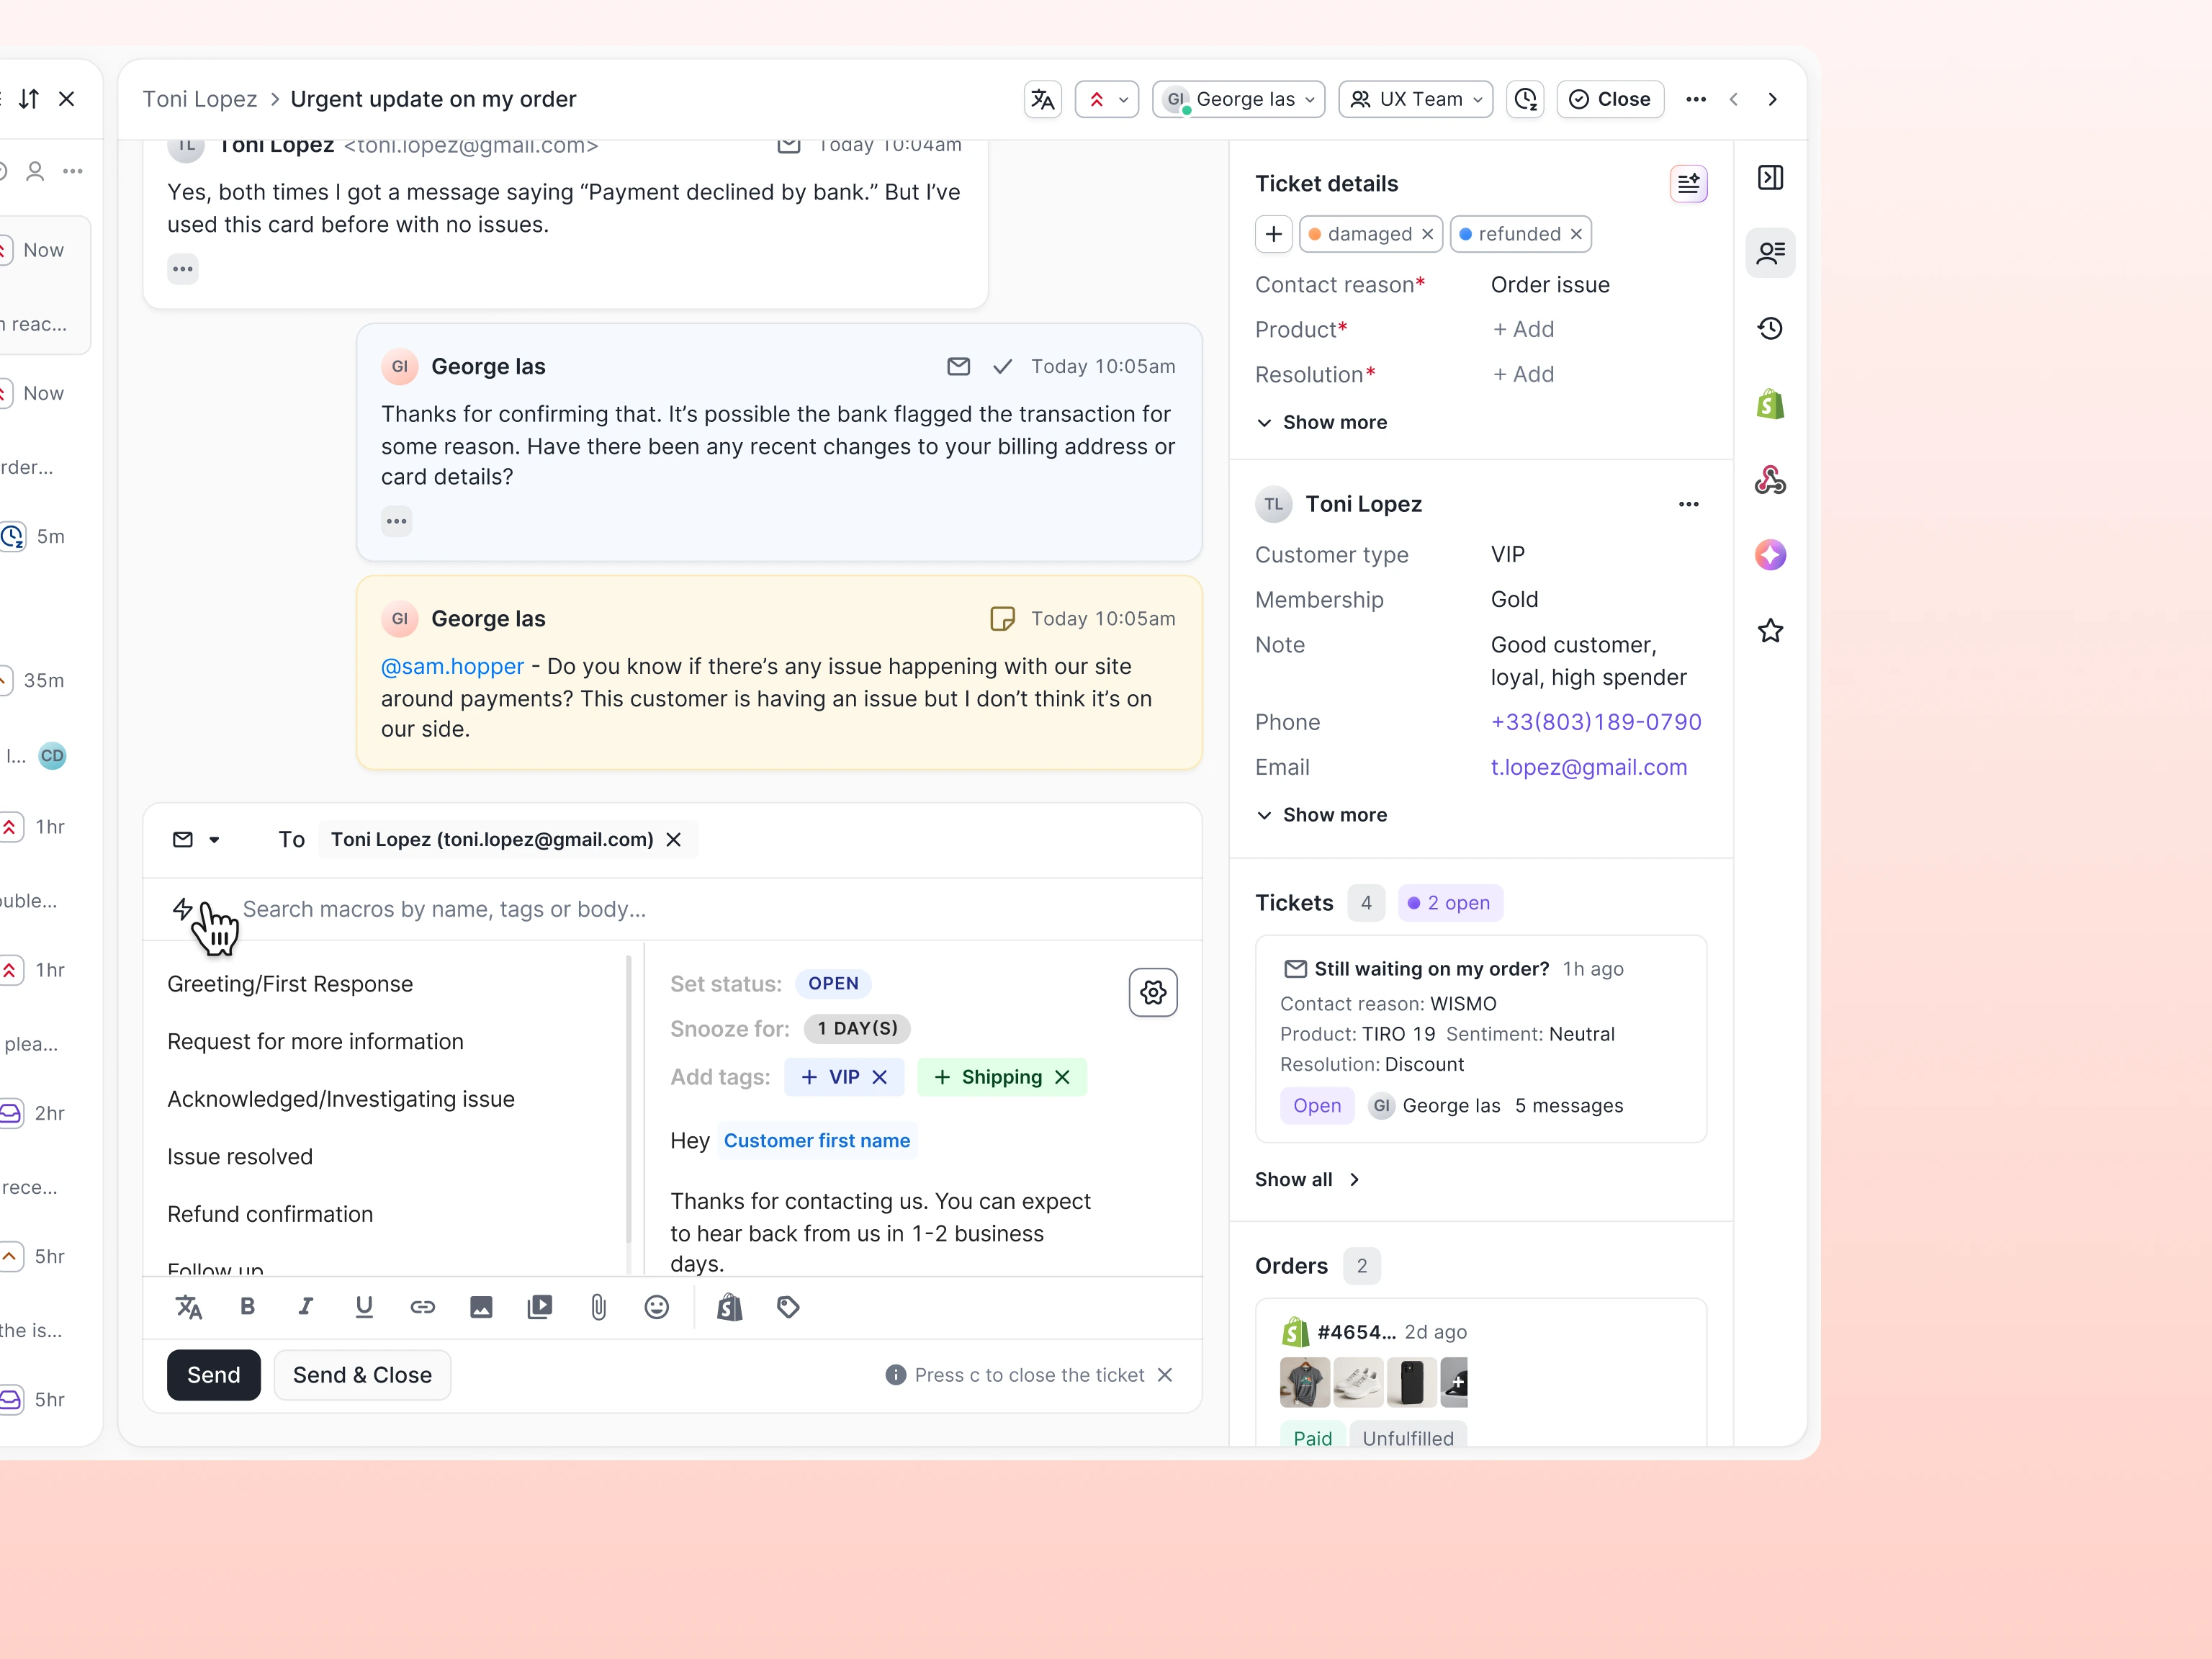
Macros are saved responses you can apply to a ticket with a single click. Depending on how they’ve been configured, they can populate the reply text, add tags, set the ticket status, assign the ticket, and more. Each support team’s macros are unique, but in general using macros for common questions is a simple way to keep response times low. Check with your team to find out which macros are available to you.
Find and apply a macro
- Click the lightning bolt icon in the message composer to open the macro search.
- To search for a specific macro, type part of its name, tag, or body text into the search bar.
- Select a macro from the list to apply it.
Once applied, the macro's text is added to the message composer. If the macro includes any actions, they’ll be shown below the editor under Actions performed on send. You can remove any action from this list before sending if you don't want it applied.
Write an internal note
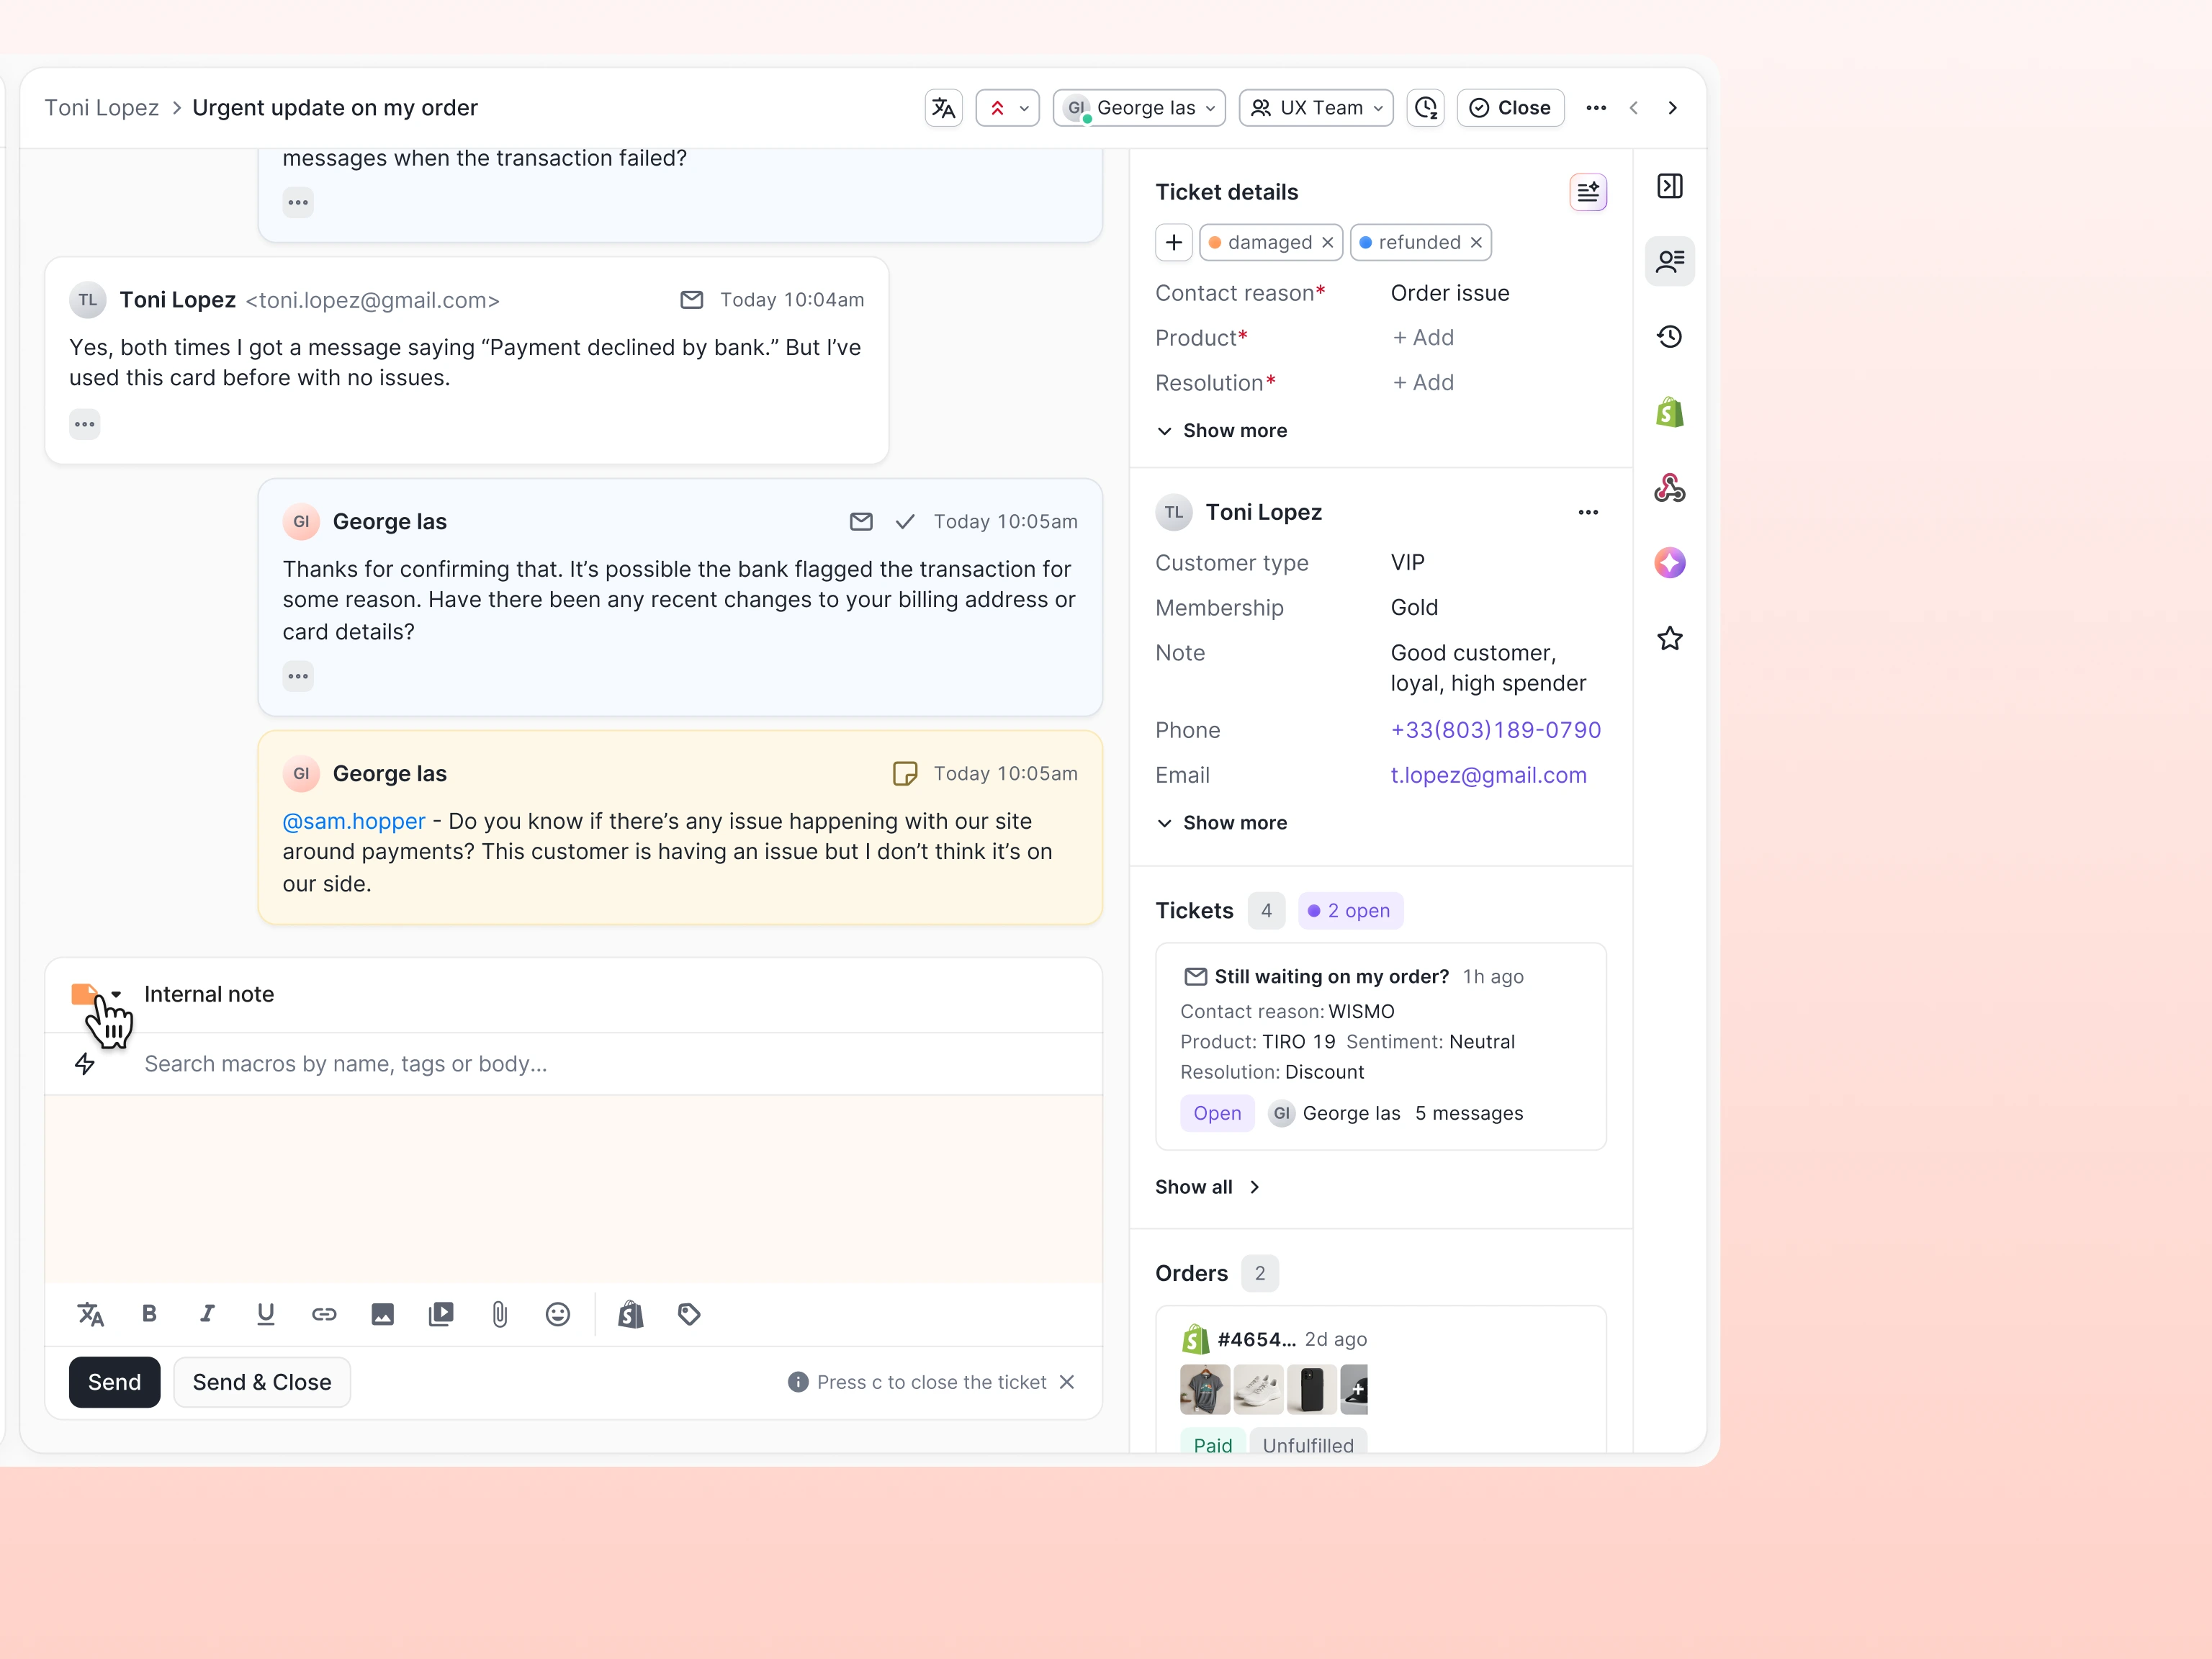
Internal notes are messages you send in a ticket that only your teammates can see. You can use internal notes to leave context for teammates, flag something that needs follow-up, or record information you gathered from a phone call.
- Click the channel selector dropdown, then select Internal Note.
- The message composer will change color to indicate you're writing a note.
- Write your note. You can @mention a teammate to notify them directly — type @ followed by their name.
- Click Send to post the note. Internal notes cannot be "sent and closed" — use the standard Send button.
Change a ticket’s status
Managing the status on your tickets keeps your views up-to-date with tickets waiting on a reply and helps to ensure that nothing gets missed. A ticket can be in one of three statuses: open, closed, or snoozed.
Close a ticket
When you’ve resolved the issue described in a ticket, or the ticket doesn’t require a reply from your team, you can close it to move it out of the view you’re working from (assuming the view isn’t filtered to show closed tickets). You can close a ticket at any point — with or without sending a reply.
- To close without replying: click Close in the ticket header.
- To close after replying: use the Send & Close button in the reply area.
Once closed, the Close button will update to say Closed.
Reopen a ticket
If a customer replies to a closed ticket, Gorgias automatically reopens it. You can also reopen manually if you realize a ticket was closed prematurely.
- Click the Closed button in the ticket header to reopen a ticket.
Snooze a ticket
Snoozing a ticket hides it from a view for a specified amount of time. You might snooze a ticket if you want to be reminded to follow up with the customer at a later time. When a ticket is snoozed, it disappears from your open view and reappears automatically when the snooze expires. Perfect if you want to check in on how a customer is liking a product you helped them with a few days after it’s been delivered.
- Click the Snooze button in the ticket header.
- Choose how long to snooze from the quick options: 1 hour, 3 hours, 6 hours, 1 day, 3 days, or 1 week. Or pick a specific date and time from the calendar.
A Snoozed badge appears on the ticket while it's snoozed, showing a countdown until it reopens. Click the badge to update the snooze timer or unsnooze the ticket.
Keyboard shortcuts
Gorgias has keyboard shortcuts for the most common ticket actions. You can review a full list of keyboard shortcuts in your helpdesk by clicking your profile picture in the bottom left corner, and selecting Keyboard shortcuts from the menu. The most useful ones for ticket handling are:
| Action | Shortcut |
|---|---|
| Open reply editor | r |
| Open macros search | m |
| Close ticket | c |
| Reopen ticket | o |
| Go to next ticket | → (right arrow) |
| Go to previous ticket | ← (left arrow) |
| Delete ticket | # |
