Manage Recharge subscription via FlowsUpdated 6 months ago
You can create a Flow with HTTP request that will enable your customers to manage their Recharge subscriptions without involving your team.
Steps
1. You can start the Flow with the Trigger button I'd like to manage my subscription: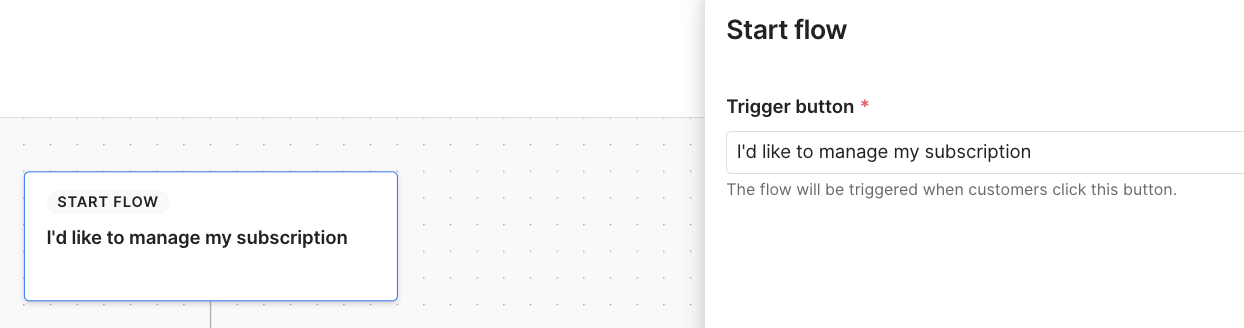
2. For the second step select Customer login option - they'll have the option to get the one-time code via email or SMS to log in.
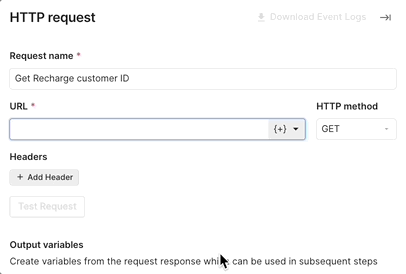
3. Next, add HTTP request Flow step and fill in the following information:
- Request name: Get Recharge customer ID
- URL: https://api.rechargeapps.com/customers?email=ADD VARIABLE CUSTOMER EMAIL
- HTTP method: GET
4. Click on Add Header button and fill out the newly created field:
- x-recharge-version: 2021-11
- x-recharge-access-token: your store token

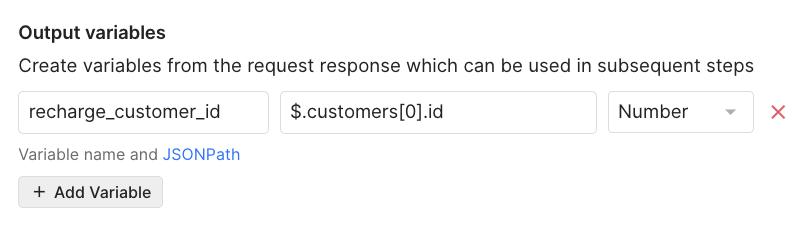
5. Click on Add Variable button and fill out the newly created field:
- recharge_customer_id | $.customers[0].id | number
6. You can test your request by clicking Test Request. If there's an issue with the request you'll get an error status code, if the request is successful you'll get a 200 OK response.
7. Click on ESC on your keyboard, or simply go to the + sign in the Flow builder to add a new step. Add another HTTP request step.
8. Fill in the following information:
- Request name: Get Recharge subscription and address ID
- URL: https://api.rechargeapps.com/subscriptions?customer_id=ADD VARIABLE RECHARGE CUSTOMER ID
- HTTP method: GET

9. Click on Add Header button and fill out the newly created field:
- x-recharge-version: 2021-11
- x-recharge-access-token: your store token
10. Click on Add Variable button and fill out the newly created field:
- recharge_subscription_id | $.subscriptions[0].id | string
- recharge_address_id | $.subscriptions[0].address_id | number

11. You can test this request by clicking Test Request. If there's an issue with the request you'll get an error status code, if the request is successful you'll get a 200 OK response.
12. Now that all the data is gathered in the background, you can offer different options through a Multiple choice step.
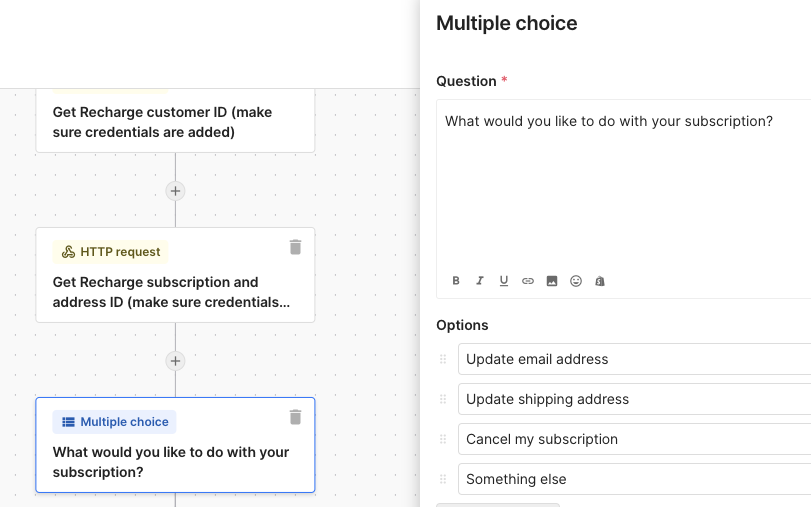
Multiple choice paths
Update email address
1. Select Collect text reply and ask for the new email address. 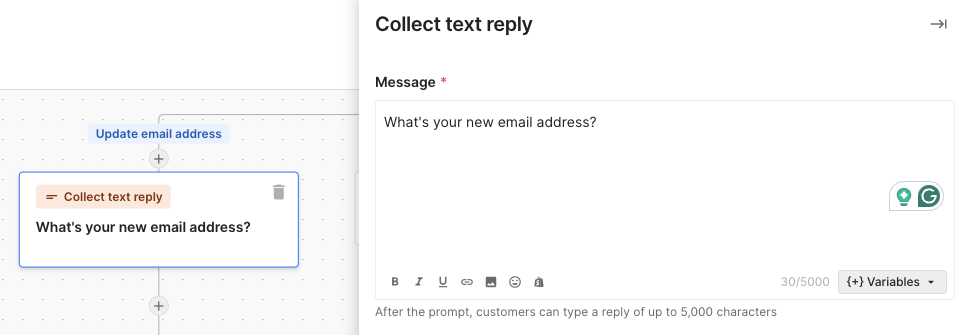
2. Add HTTP request step and fill out the following fields:
- Request name: Update customer's email address
- URL: https://api.rechargeapps.com/customers/ADD VARIABLE RECHARGE CUSTOMER ID
- HTTP method: PUT

3. Click on Add Header button and fill out the newly created field:
- x-recharge-version: 2021-11
- x-recharge-access-token: your store token
4. From the drop-down menu of Request body select aplication/json and paste the following:
1{2 "email": "EMAIL VARIABLE"3}
5. Add the variable from step 1 in the indicated spot.

6. You can test your request by clicking Test Request. If there's an issue with the request you'll get an error status code, if the request is successful you'll get a 200 OK response.
7. Click on ESC on your keyboard, or simply go to the + sign in the Flow builder to add a new step - we recommend adding an Automated answer step that'll inform the customer that their email address has been updated. You can use the variable from step 1 to personalize the experience.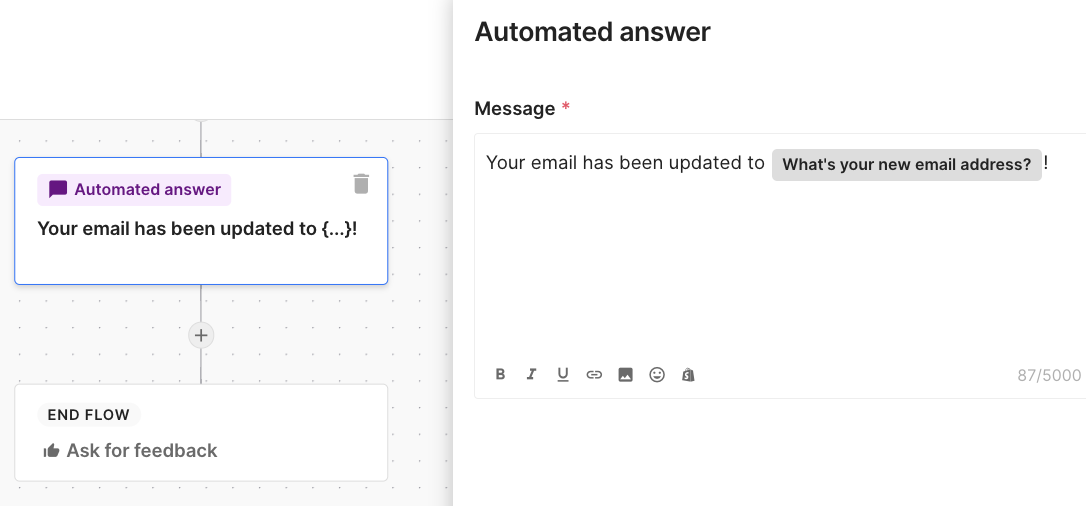
8. The ending of the Flow path will be automatically set to Ask for feedback - you can leave it like that so the customer can ask for additional assistance if needed.
Alternatively, you can change it to End interaction so the customer will have to leave the Flow to ask for further assistance.
Update shipping address
1. Select Collect text reply and ask for the new address (Address 1).
2. Select Collect text reply and ask for additional details about the new address (Address 2).
3. Select Collect text reply and ask about the ZIP code.
4. Select Collect text reply and ask about the city.
5. Select Collect text reply and ask about the state.
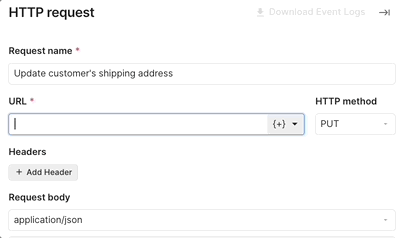
6. Add HTTP request step and fill out the following fields:
- Request name: Update customer's shipping address
- URL: https://api.rechargeapps.com/addresses/ADD VARIABLE RECHARGE ADDRESS ID
- HTTP method: PUT
7. Click on Add Header button and fill out the newly created field:
- x-recharge-version: 2021-11
- x-recharge-access-token: your store token

8. From the drop-down menu of Request body select aplication/json and paste the following:
1{2 "address1": "ADDRESS 1 VARIABLE",3 "address2": "ADDRESS 2 VARIABLE",4 "city": "CITY VARIABLE",5 "province": "STATE VARIABLE",6 "zip": "ZIP VARIABLE"7}
9. Replace everything in caps with appropriate variables.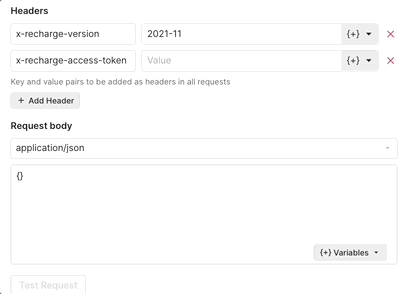
10. You can test your request by clicking Test Request. If there's an issue with the request you'll get an error status code, if the request is successful you'll get a 200 OK response.
11. Click on ESC on your keyboard, or simply go to the + sign in the Flow builder to add a new step - we recommend adding an Automated answer step that'll inform the customer that their shipping address has been updated. You can use appropriate variables to personalize the experience.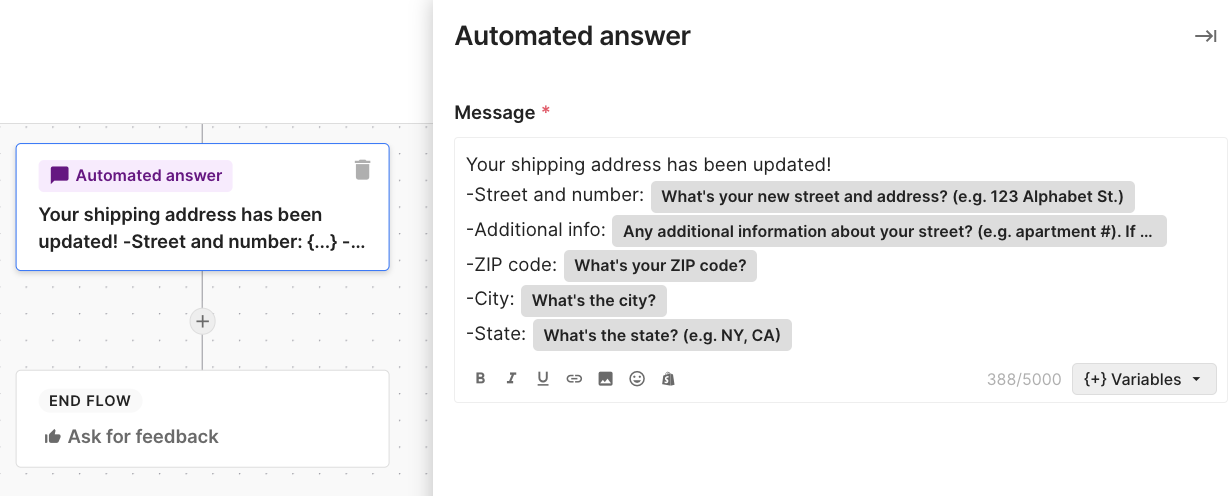 12. The ending of the Flow path will be automatically set to Ask for feedback - you can leave it like that so the customer can ask for additional assistance if needed.
Alternatively, you can change it to End interaction so the customer will have to leave the Flow to ask for further assistance.
Cancel my subscription
1. Select Collect text reply to ask for the cancellation reason. Alternatively, you can use Multiple choice step if you don't want to ask open-ended question.
2. Add HTTP request step and fill out the following fields:
- Request name: Cancel subscription
- URL: https://api.rechargeapps.com/subscriptions/ADD VARIABLE RECHARGE SUBSCRIPTION ID/cancel
- HTTP method: POST
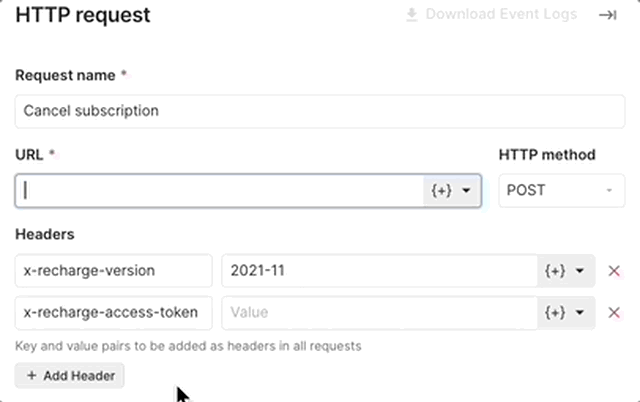
3. Click on Add Header button and fill out the newly created field:
- x-recharge-version: 2021-11
- x-recharge-access-token: your store token

4. From the drop-down menu of Request body select aplication/json and paste the following:
1{2 "cancellation_reason": "CANCELLATION REASON",3 "send_email": "true"4}
5. Replace everything in caps with appropriate variables.
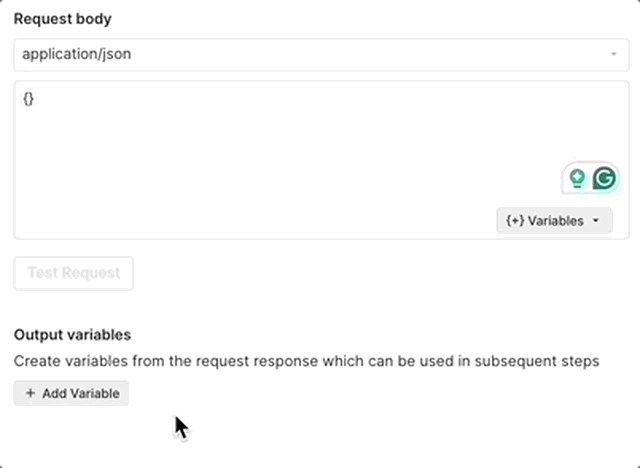
6. You can test your request by clicking Test Request. If there's an issue with the request you'll get an error status code, if the request is successful you'll get a 200 OK response.
7. Click on ESC on your keyboard, or simply go to the + sign in the Flow builder to add a new step - we recommend adding an Automated answer step that will inform the customer that their subscription has been cancelled. Use appropriate variables to personalize the experience.
8. The ending of the Flow path will be automatically set to Ask for feedback - you can leave it like that so the customer can ask for additional assistance if needed.
Alternatively, you can change it to End interaction so the customer will have to leave the Flow to ask for further assistance.
Something else
1. Select Collect text reply to ask for contact reason.
2. Set the ending of the Flow path to Create ticket. You can set Tags and ticket assignment directly in the Flow.
3. Once you're satisfied with your added steps, click Publish and the Flow will be live on any of your connected channels.
