Gorgias Voice call flow and IVR menu examplesUpdated 2 months ago
We’ve compiled some examples of Interactive Voice Response (IVR) menus and call flows that you can use as inspiration to create your own. Follow the steps to replicate ours exactly, or add them into an existing call flow.
Requirements
- Available on Helpdesk Plans with the Voice Add-on
- Only Admins can manage Voice and create IVR menus
When you set up a Voice integration, we’ll create a default call flow that you can edit to design an experience for your callers. If you’d like to design a call flow from scratch, click the three dots icon on the first step in the flow, then select Delete to delete this step and every step that follows. Once you have a blank canvas, you’re free to design any flow you’d like. If you need inspiration, the steps below will guide you through creating:
- A flow with multiple IVR menu levels
- A flow that automatically re-routes calls when a queue is at capacity
- A flow that automatically routes calls to specific teams of agents based on your staffing schedule
- A flow that routes VIP customers and fraudulent callers to different outcomes
Multi-level IVR menu
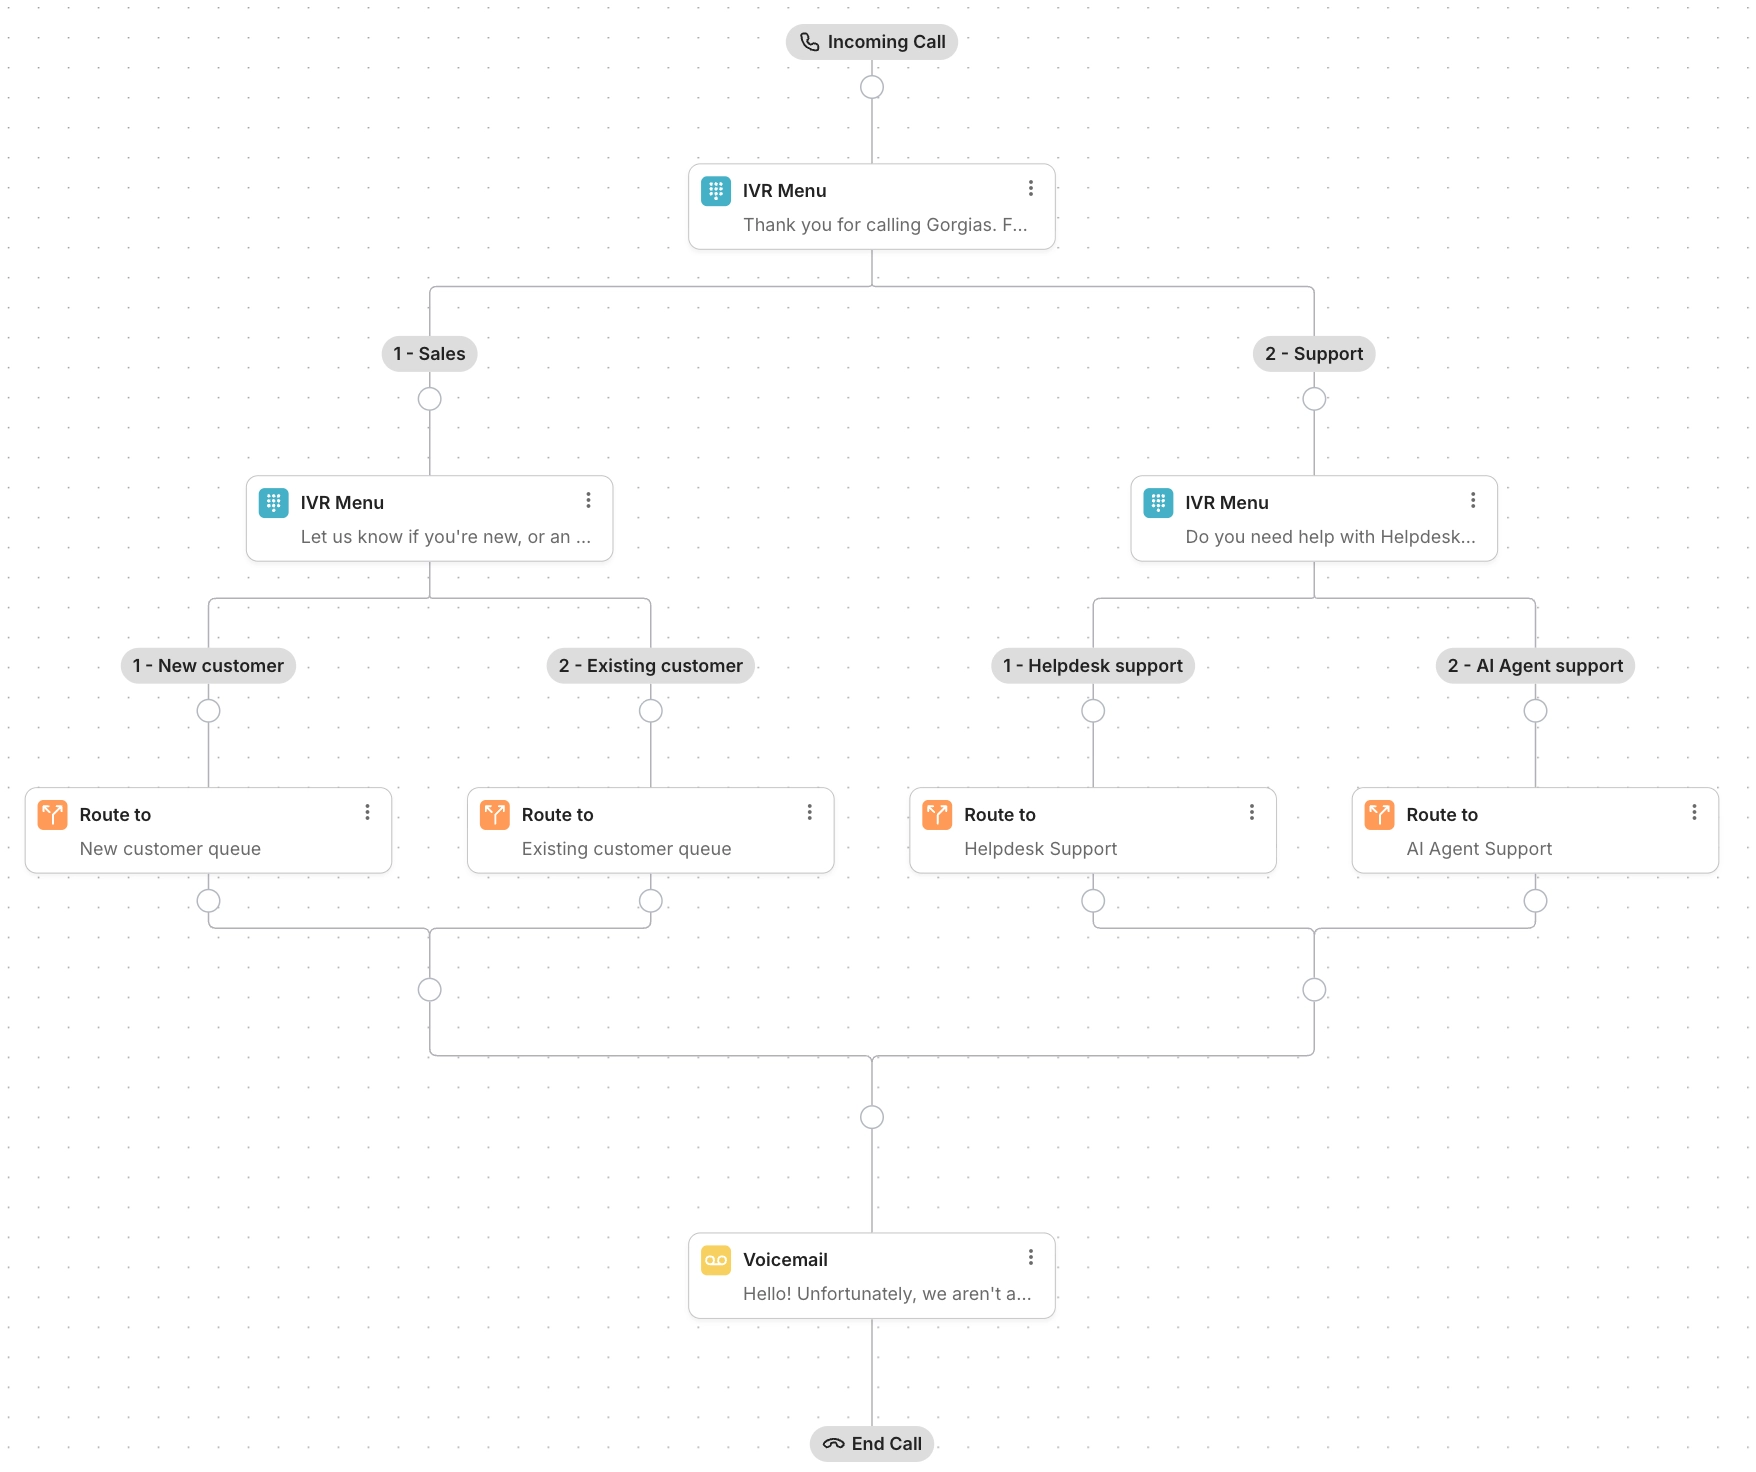
A multi-level IVR menu helps you route callers more efficiently by adding submenus to your main phone menu. Instead of listing every possible option in one long message, a multi-level IVR breaks choices into logical layers so callers can navigate to the appropriate call queue more efficiently.
In our example, we’ve created a call flow that routes customers to specialized support teams, but you might set up a multi-level IVR menu to offer different language options, route callers based on location, or simply to reduce confusion by offering multiple short lists of options rather than one long list. Here’s how to create a multi-level IVR menu:
Step 1: Open the call flow editor
- From your helpdesk, click the Settings icon in the bottom-left corner.
- In the menu, locate Channels, then select Voice.
- From the Integrations tab, select an integration from the list.
- Click the Call Flow tab to open the call flow editor.
Step 2: Add steps to your call flow
- Click the Add step icon on a branch of your call flow, then select IVR Menu.
- From the dropdown menu, select Text-to-speech and write a message that describes the menu options, or select Custom recordingto upload a recording.
- For example: “Thank you for calling Gorgias. For Sales, press 1. For customer support, press 2. Please note that this call may be recorded for quality assurance and training purposes.”
- Under Menu Options, create two options and update the labels to match your recording. Each option will create a new branch in your call flow for customers to follow. When you’re ready, return to the call flow editor.
- Under the Sales branch, click the Add step icon, then select IVR Menu, add a message that describes the menu options, and create the menu options.
- For example: “If you’re a new customer, press 1. If you’re an existing customer, press 2. To go back, press 9.”
- Under your Customer Support branch, click the Add step icon, then select IVR Menu, add a message that describes the menu options, and create the menu options.
- For example: “For helpdesk support, press 1. For AI Agent support, press 2. To go back, press 9.”
- Click the Add step icon, then select Route to and select a queue for each branch on the flow. The queue you select should be staffed by a team of agents best suited to answer questions related to the branch.
- Click Save Changes.
That’s it! Callers will now be able to navigate different support offerings and speak with an agent who is trained to answer their specific issue. In our example, we always routed callers to internal queues, but you might also route callers to a separate Voice integration, or forward their call to an external phone number. The choice is yours!
Handle busy queues
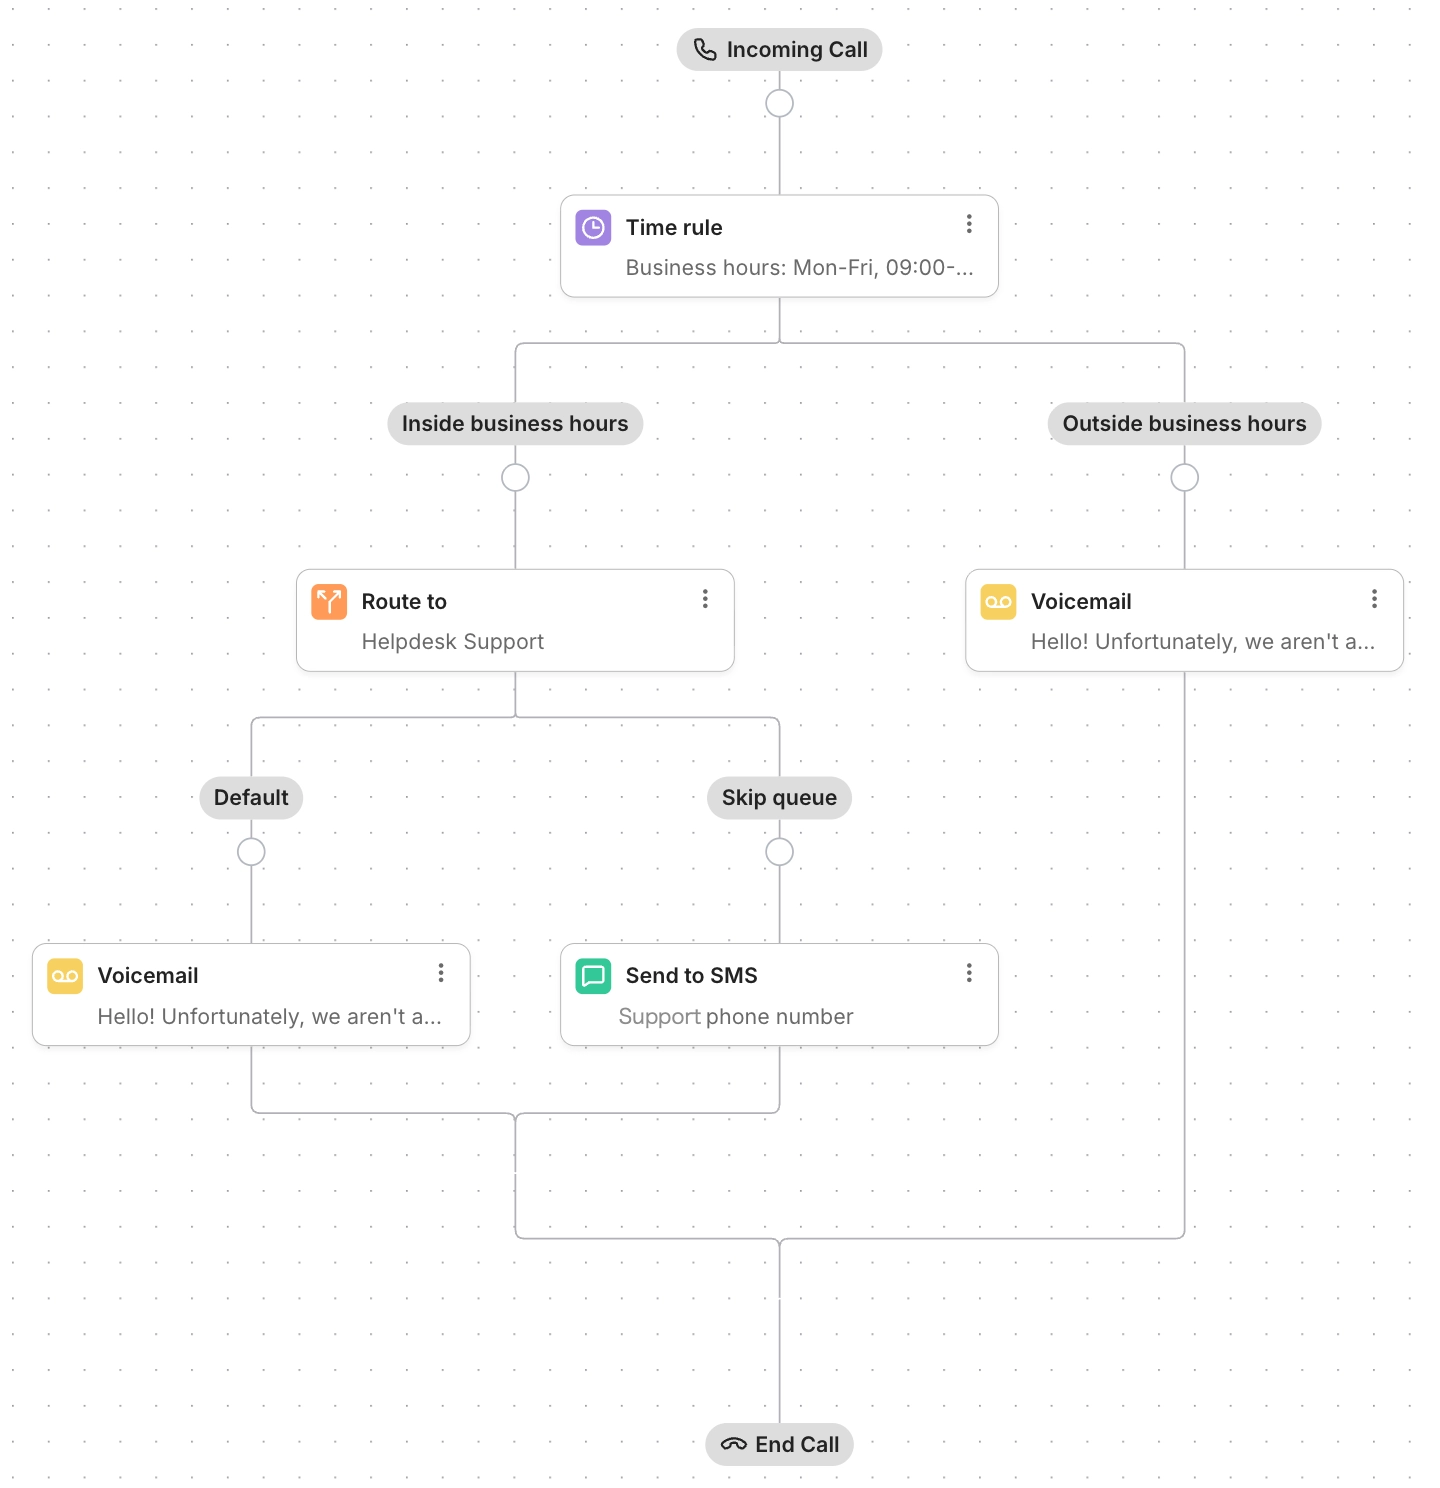
When you create a queue for callers to wait in, you can set a capacity on the queue to help manage excessive call volume. When the queue reaches capacity, the call flow will move the caller to the next step, which you can design based on how you’d like to route these overflow calls. The example below demonstrates sending overflow callers to SMS, but you might also choose to create a specific queue for overflow calls, or forward the call to an external number.
Step 1: Open the call flow editor
- From your helpdesk, click the Settings icon in the bottom-left corner.
- In the menu, locate Channels, then select Voice.
- From the Integrations tab, select an integration from the list.
- Click the Call Flow tab to open the call flow editor.
Step 2: Add steps to your call flow
- Click the Add step icon on a branch of your call flow, then select Route to.
- Select Queue, then click the dropdown menu to search for and select a queue.
- Under Handle busy times, check the box next to Skip queue when it’s too busy. This will create a Default and Skip queue branch on your call flow.
- On the Skip queue branch, click the Add step icon, then select Send to SMS.
- Under Where should this call go, click the dropdown menu and select an SMS integration.
- Under Transition message, click the dropdown menu and select either Text-to-speech or Custom recording, then type a message or upload a recording. In the message, you might explain that you’re experiencing higher than normal wait times, and you’ll reach out via text to continue the conversation.
- On the Default branch, click the Add step icon, then select Send to voicemail and configure voicemail for customers who reach the maximum wait time in the queue.
- Click Save Changes.
Ta da! Callers who are able to join the queue will be connected with an available agent when they reach the front of the queue, while all other callers can leave a voicemail for your agents to review, and call back later.
Route calls based on team schedule
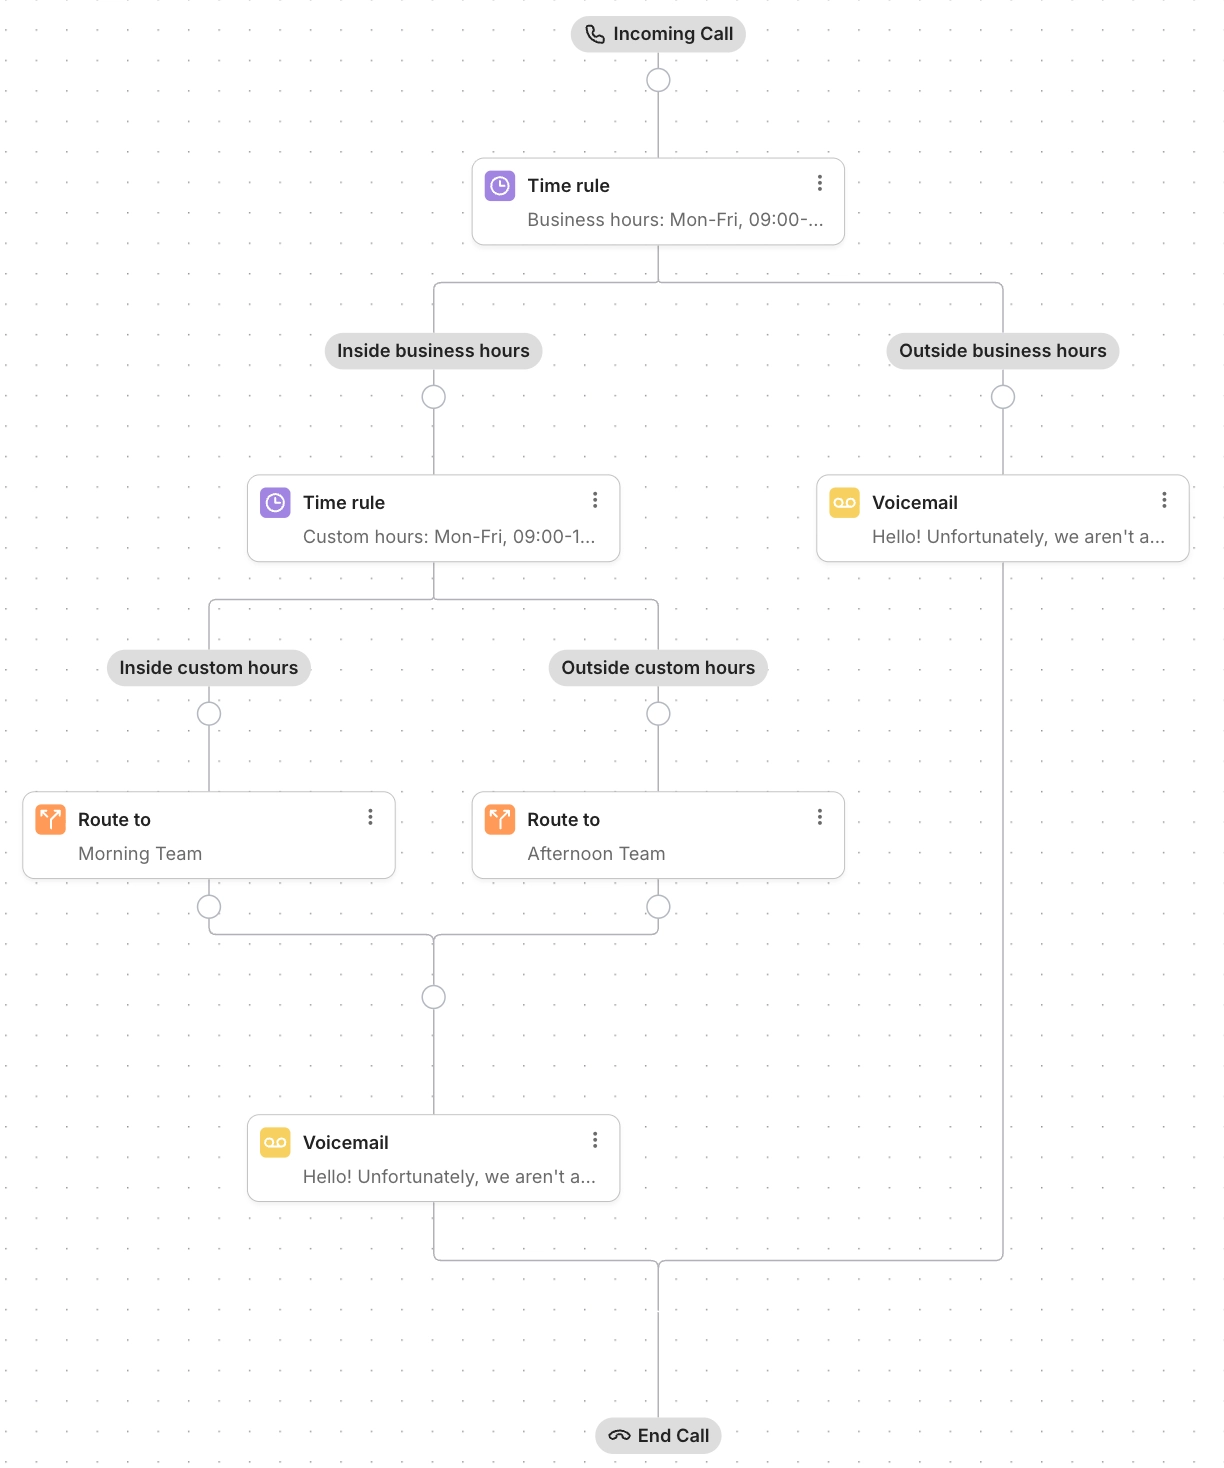
If you staff your support team in shifts, you can add the agents to a team for each shift, then build a call flow to automatically route calls to a team based on the time of day. The example below routes calls based on a morning and afternoon shift, but you can break this up however you’d like.
Step 1: Create teams
- From your helpdesk, click the Settings icon in the bottom-left corner.
- In the menu, locate Account, then select Teams.
- Click Create Team in the top-right corner.
- Add the agents on the morning shift to the team, then click Create Team.
- Click Create Rule Later.
- Repeat the steps to create a team with agents on your afternoon shift.
Step 2: Assign teams to queues
- From your helpdesk, click the Settings icon in the bottom-left corner.
- In the menu, locate Channels, then select Voice.
- Click the Queues tab, then click Create Queue.
- Name the queue, then set a capacity.
- Under routing options, click Distribution mode.
- Under Ring to, click the dropdown menu then search for and select your morning shift team.
- Customize the ring time, then decide if you’d like to enable wrap up time.
- If you’d like to customize the call waiting experience, click Caller experience, then adjust the settings.
- Click Save Changes, then repeat the process to create a queue for your afternoon shift.
Step 3: Open the call flow builder
- From your helpdesk, click the Settings icon in the bottom-left corner.
- In the menu, locate Channels, then select Voice.
- From the Integrations tab, select an integration from the list.
- Click the Call Flow tab to open the call flow editor.
Step 4: Add steps to the call flow
- Click the Add step icon on a branch of your call flow, then select Time Rule.
- Select Business hours. This will create an Inside business hours branch and an Outside business hours branch on your call flow.
- On the Outside business hours branch, click the Add step icon then decide what should happen when your agents are offline. We’ve added a Send to voicemail step in this example, but the experience is up to you.
- On the Inside business hours branch, click the Add step icon, then select Time Rule.
- Select Custom hours, then enter the days and time range for your morning shift agents. This will create an Inside custom hours and an Outside custom hours branch on your call flow.
- On the Inside custom hours branch, click the Add step icon, then select Route to.
- Select Queue, then click the dropdown menu to search for and select the morning shift queue you created in Step 2.
- On the Outside custom hours branch, click the Add step icon, then select Route to.
- Select Queue, then click the dropdown menu to search for and select the afternoon shift queue you created in Step 2.
- Click Save Changes.
Done! Now, when people call your support team during your morning shift’s hours, the call will only ring for the agents on your morning shift team. If they call after the morning shift has ended, but before business hours end, the call will ring for your afternoon shift team. If the call comes in after business hours, the caller will be sent to voicemail.
Automatically route VIP customers to a special queue
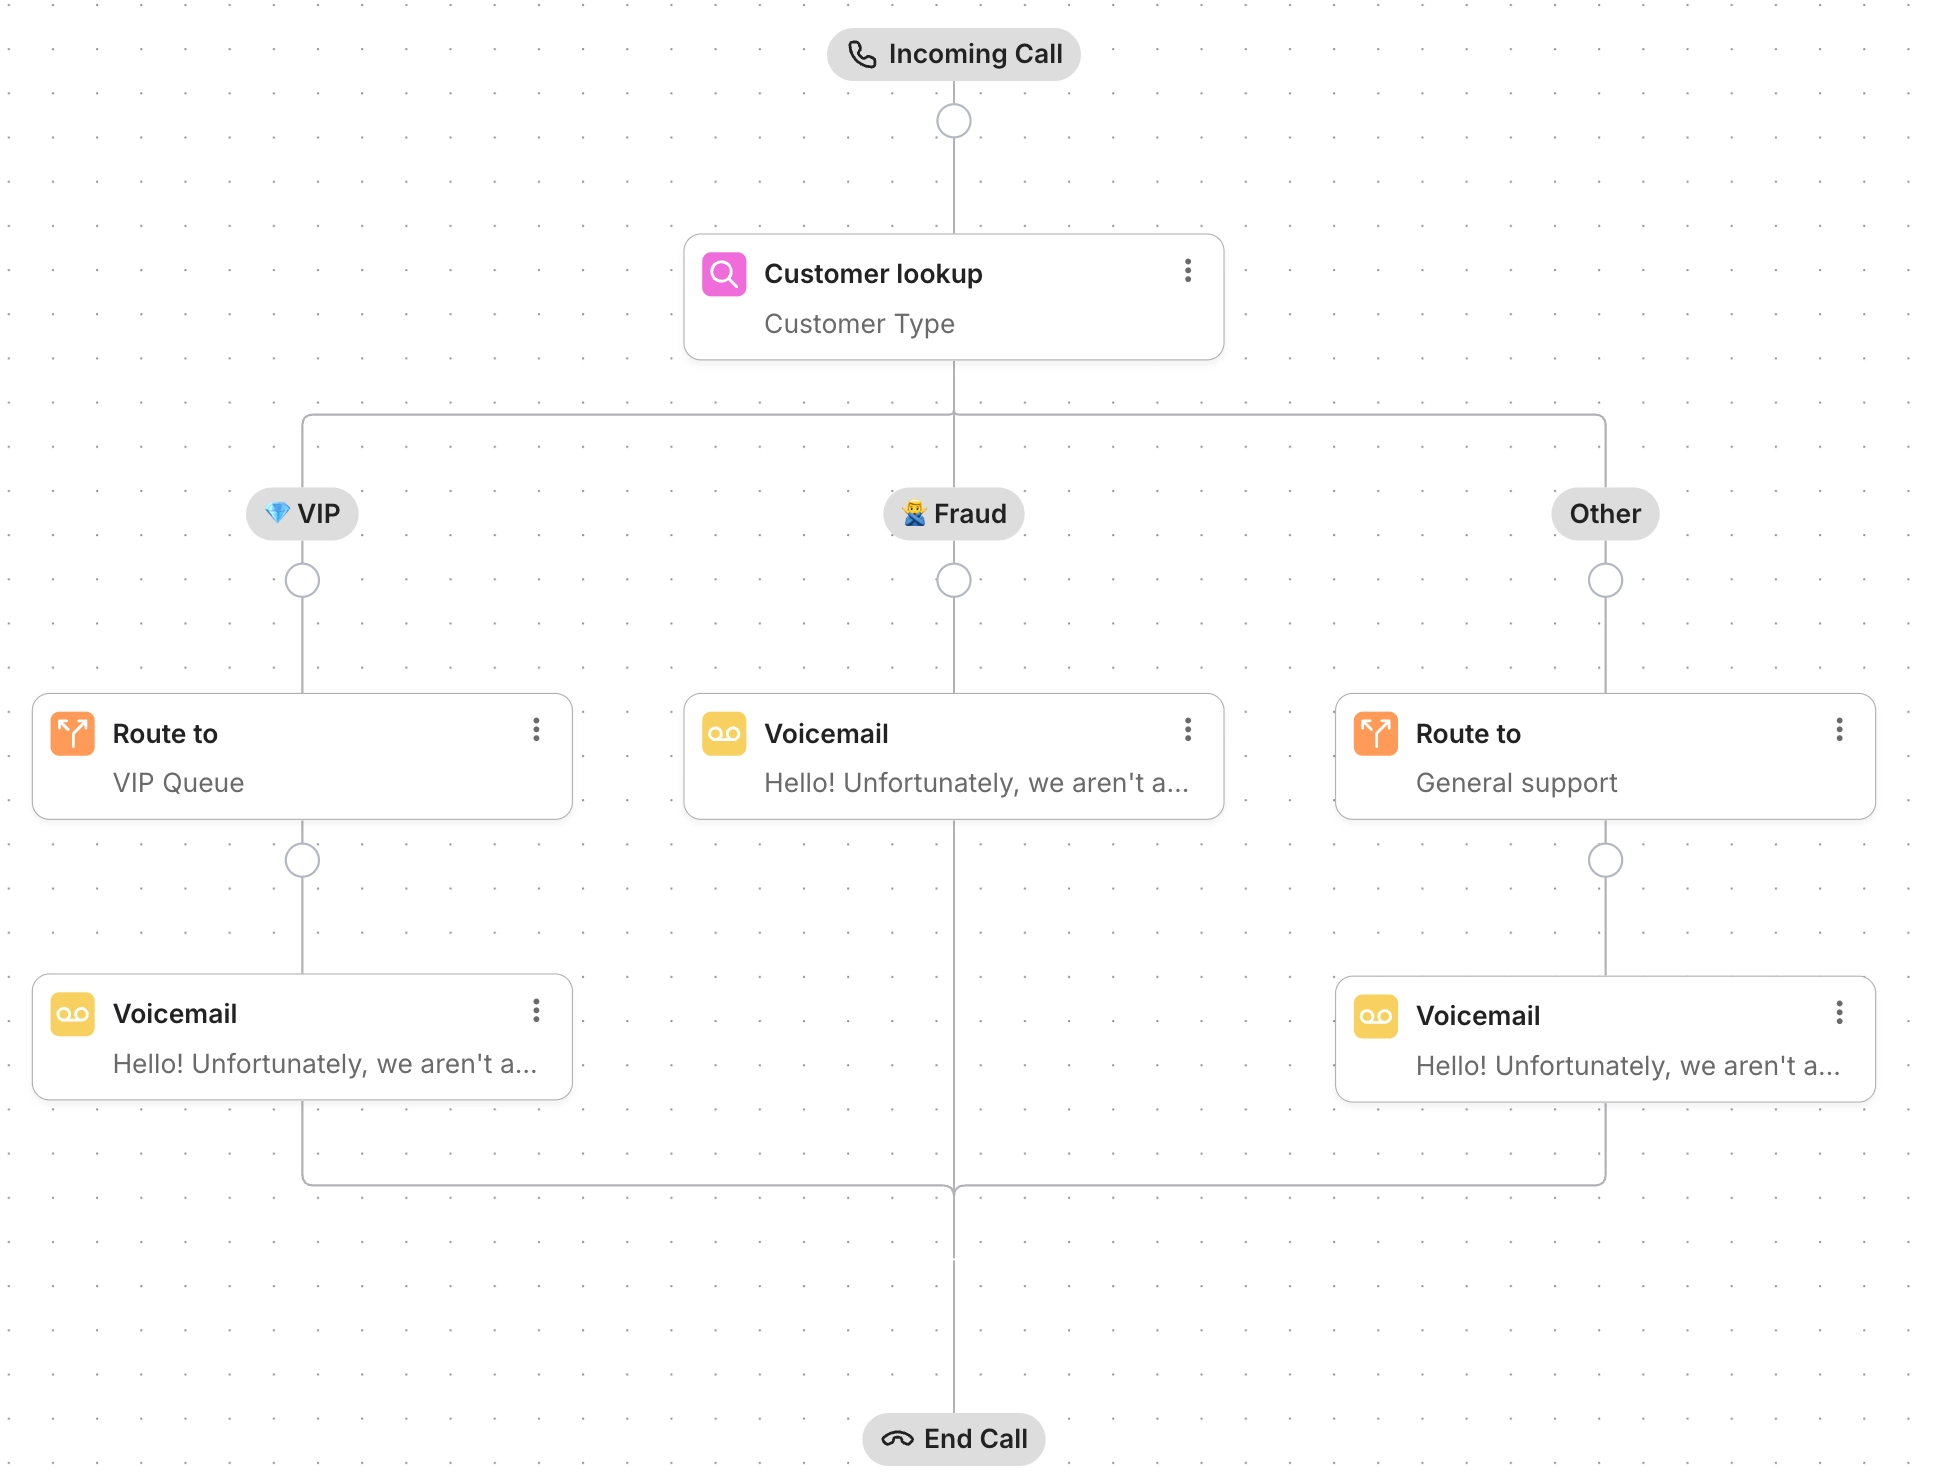
If you use customer fields to keep track of your customers, you can add a Customer Lookup step to your call flow to check the field values in a caller’s profile, and route them accordingly. In the example below, we created a Customer Type field with VIP and Fraud values to give callers with these values a unique call path. Callers with VIP in their profile are routed to a queue with a smaller capacity and enhanced call waiting options, while fraud callers are sent straight to voicemail without an option to leave a message. If a caller doesn’t have either in their profile, or if they’re an unknown caller, they’re sent down the Other branch, and are routed to the General support queue.
This call flow requires that you add customer fields to customer profiles. If you’re not already familiar with customer fields, you can review our documentation before you get started.
Step 1: Create a VIP call queue
Create a special queue for your most important customers. When creating this queue, you might want to staff it with a team of specialized agents, or set it to a smaller capacity to prevent customers from waiting on hold for too long.
- From your helpdesk, click the Settings icon in the bottom-left corner.
- In the menu, locate Channels, then select Voice.
- Click the Queues tab, then click Create Queue.
- Name the queue, then set a capacity.
- Under routing options, click Distribution mode.
- Under Ring to, click the dropdown menu then search for and select the team who should handle VIP calls.
- Customize the ring time, then decide if you’d like to enable wrap up time.
- If you’d like to customize the call waiting experience, click Caller experience, then adjust the settings.
- Click Save Changes.
Step 2: Add steps to your call flow
- Click the Add step icon on a branch of your call flow, then select Customer lookup.
- Click the dropdown menu, then select a field. Our field is called Customer type.
- Click + Add option, then select the VIP value. Click +Add option again to select the Fraud option. This will create a VIP branch, a Fraud branch, and an Other branch.
- On the VIP branch, click the Add step icon, then select Route to.
- Select Queue, then search for and select the VIP queue you created in Step 1.
- Configure how you’d like to Handle busy times and whether you’d like to enable Callback requests. Since these are VIP callers, in our example we’re allowing them to request a call back request, rather than wait on hold.
- Configure the callback request. Select either Text-to-speech or Custom recording, then type a message or upload a custom recording. In the message, explain which button they should press to request the callback. Next, add a confirmation message. If you’d like the caller to leave a Voicemail, check the box next to Allow caller to leave a voicemail. If you leave this unchecked, the caller will hear your confirmation message, then the call will end.
- On the Fraud branch, click the Add step icon, then select Send to voicemail.
- Click the dropdown menu and select either Text-to-speech or Custom recording, then type a message or upload a recording to use as the Voicemail greeting. In the message, you might explain why they’ve been detected as fraud, and what to do if they were sent here by mistake.
- Leave the box next to Allow caller to leave a voicemail unchecked, so the call ends after the message.
- On the Other branch, click the Add step icon, then select Route to.
- Select Queue, then search for and select your standard support queue.
- Click Save Changes.
Callers will now be routed automatically based on the fields in their profile.
