Troubleshooting for Mailgun domain verificationUpdated a year ago
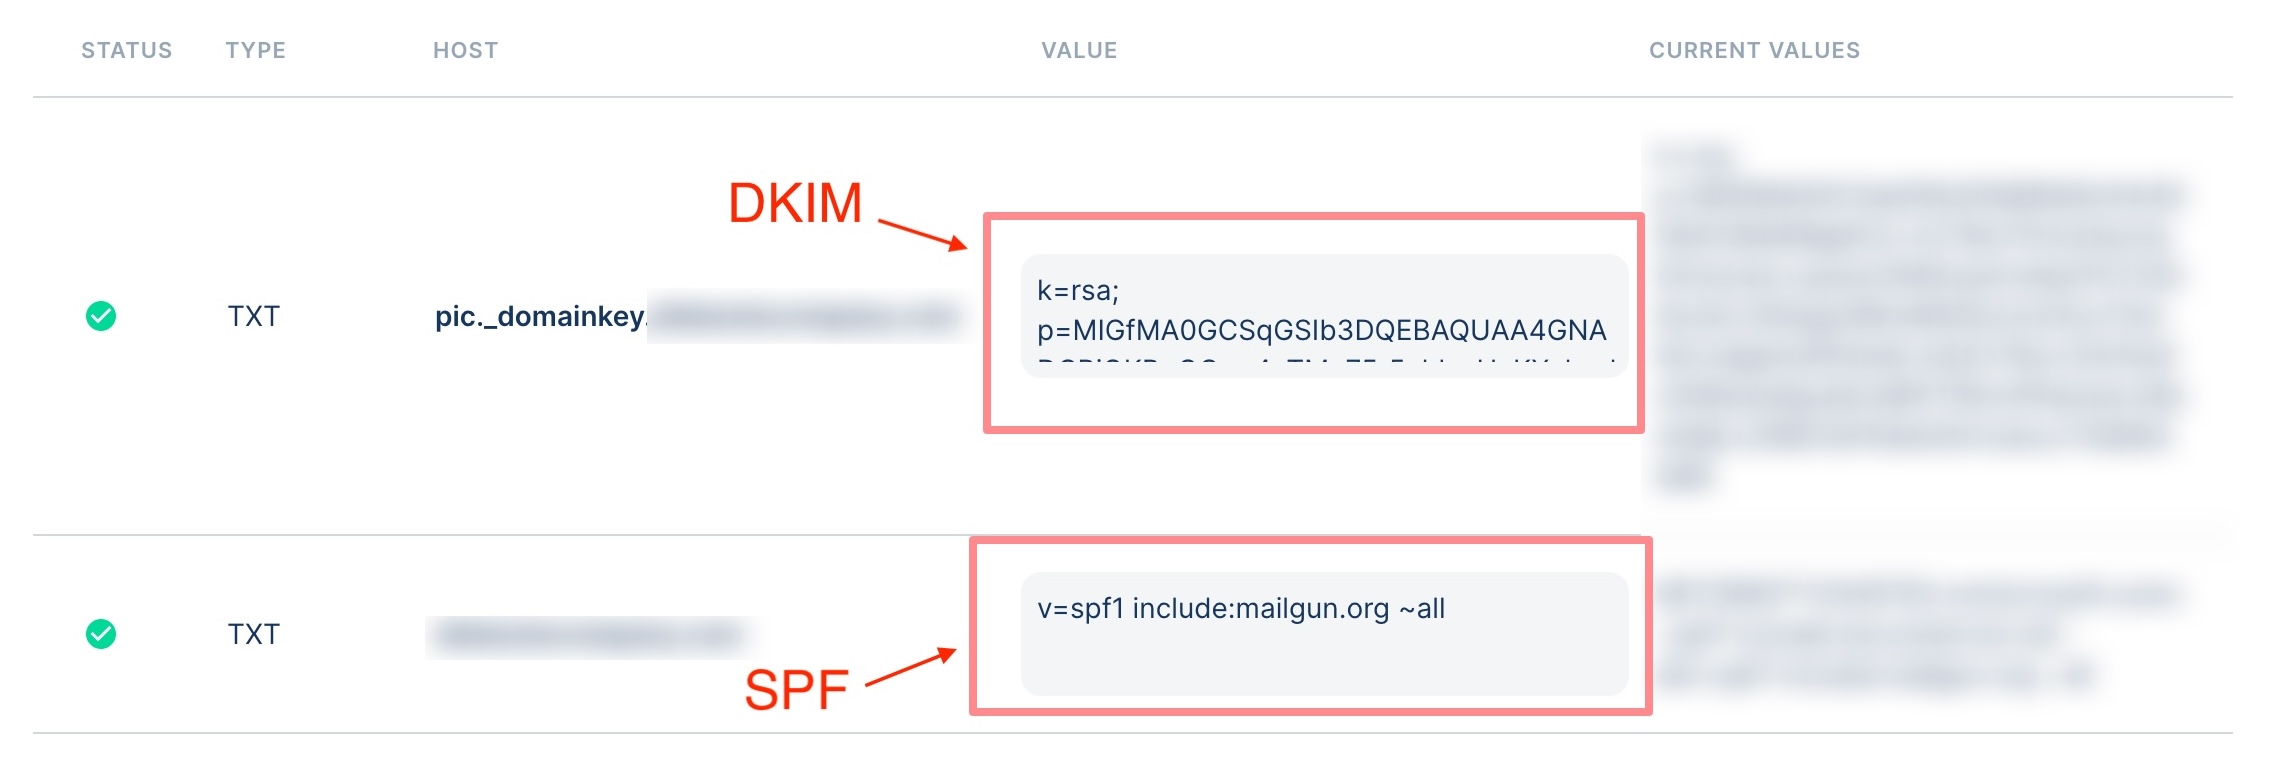
You'll see two rows of records - the first one is for DKIM, and the second one is for SPF.
Both records need to be added to the dashboard of your email domain provider (GoDaddy, Namecheap, Blue Host, HostGator, etc.). You can find instructions for some domain registrars here, but you can also check out the website for your domain provider.
When you copy the values from Gorgias, make sure to use the copy button on the side to prevent any spelling errors.
 DKIM
DKIM
Add the new record in the domain registrar, choose type TXT, copy the HOST field (e.g., pic_domainkey.bakehousestoreusa.com from the example above) from Gorgias, and then the value from the grey field.
In some domain registrars, you need to add only the first part of the DKIM HOST field, without your domain (for example, only pic_domainkey instead of pic_domainkey.bakehousestoreusa.com).
SPF
Before adding this record, go to MX Toolbox, type your domain, click on MX Lookup, and choose SPF Record Lookup from the drop-down menu.
If there's a red X next to the SPF published record (like in the example above), you can simply add the SPF from your helpdesk.
Go to your domain provider dashboard, add a new value as TXT type, add your domain (for example, bakehousestoreusa.com or just @ if the domain isn't needed), and then copy the value from Gorgias: v=spf1 include:mailgun.org ~all
If you do get some results in a green or a red box, you'll need to merge them all in one value.
In that case, you need to find this value in your domain registrar and just add include:mailgun.org in it. For this example, the end result would look like this:
v=spf1 include:shops.shopify.com include:_spf.google.com include:mailgun.org ~all
If you get the result in red, this means that you already have more than one SPF - you should add all values in one entry (like in the example above), and delete the others.
I added all three values, but my domain is still not verified
If you already pasted the records to the dashboard of your domain provider and your domain is still not verified, try these troubleshooting steps to finalize the process.
Check your SPF
Go to MX Toolbox, type your domain, and then click on MX Lookup. After that choose SPF Record lookup from the drop-down menu that will appear.
If you get two or more results in red, it shows that you have multiple SPF records, which is why your domain is being rejected - you need to merge all of your SPF records into one.
For example: "v=spf1 include:shops.shopify.com include:_spf.google.com ~all" and "v=spf1 include:mailgun.org ~all" can be merged like this:
"v=spf1 include:shops.shopify.com include:_spf.google.com include:mailgun.org ~all"
If you get one result in red, it might indicate that your SPF is too long. If you need all the values included in your SPF, or you're unsure which ones you can remove, you can simply divide them into two with quotation marks.
For example: “v=spf1 include:shops.shopify.com include include:spf.protection.outlook.com include:_spf.google.com include:mailgun.org include:customeriomail.com ~all” can be divided into two strings by separating them with quotation marks “v=spf1 include:shops.shopify.com include include:spf.protection.outlook.com include:_spf.google.com” “ include:mailgun.org include:customeriomail.com ~all”
Check the records for typos
If you haven't used the copy button in Gorgias, check if there are any typos in your domain registrar. Alternatively, just remove the records you already added, and use the copy button in Gorgias to add them again.

Check the type of records that you added
Make sure that both of your records are added as TXT type in your domain registrar.
Check the TTL value
Time To Live, or TTL for short, is the sort of expiration date that's put on a DNS record - it serves to tell the recursive server or local resolver how long it should keep said record in its cache. The longer the TTL, the longer the resolver holds that information in its cache.
By default, the TTL should be set to 60 minutes or 1 hour.
Go to MX Toolbox, type your domain, and then click on MX Lookup. Check if the TTL value is 60 minutes. If not, change it to that in your domain registrar.
After that, choose TXT Lookup from the drop-down menu. Also, check if the TTL is 60 minutes for all the values, and change them in your domain registrar if they're not.
Check your priority value
Go to your domain register and check the priority value for the records that you copied from Gorgias - by default, it should be 10. If your domain is still not verified, you can change it to a lower value - to 9 or 8.
This indicates the order in which mail servers should be used - the lower the value is, the more prioritized it will be. The value can't be below 0.
Check your SPF ending
Make sure that the SPF data you added from Gorgias (third row) ends with ~all and not with -all.
The difference between the two is that -all will be rejected and not sent if the email doesn’t comply with the set rules, and ~all will be tagged as SOFTFAIL, but still sent if the email doesn’t comply with the set rules.
72-hour propagation
It can take a few days for the records to be propagated and the domain to show as verified in Gorgias. You can always check the status by going to MX Toolbox, typing your domain, and clicking on MX Lookup.
After that, choose SPF Record lookup from the drop-down menu - if your SPF records show as green, they're verified.
After that, copy the HOST value from Gorgias (first row), paste it into MX Toolbox, and choose DKIM Lookup from the drop-down menu - if the records show as green, your domain is verified.
