Assign priority to tickets in GorgiasUpdated 7 days ago
Who can use this feature?
You can assign a priority to tickets in your helpdesk to help your team resolve customer issues based on their urgency and impact. You can use ticket priority as a condition for creating rules, as a filter for views, and as a sorting option for tickets. Using priority effectively allows teams to manage workload, meet SLAs, and deliver a better support experience by focusing attention where it’s needed most.
Assign ticket priority
Any new tickets that come into your helpdesk queue will be set to Normal by default. You can manually update the priority, or you can create a rule to automatically set the priority on tickets that meet certain conditions. Setting ticket priority isn’t mandatory, and how you determine the priority of each ticket is up to you. When setting ticket priority, you can select one of four available values:
- Low
- Normal (default)
- High
- Critical
If you have auto-assignment rules enabled on your helpdesk, tickets will be assigned to agents in order of priority — from critical to low. If two tickets have the same priority, the ticket with the earliest created time will be assigned first.
Manually set priority
If the urgency of a conversation changes, or a rule set the wrong priority, you can update a ticket's priority at any time.
- From your helpdesk, open a ticket from any ticket view.
- At the top-right corner of the ticket, click the Normal icon . If the priority of the ticket has already been updated, you’ll see the selected priority ( Low, High or Critical) here instead.
- Select the new priority from the list.
To change the priority on several tickets at once, select the checkbox next to each ticket in the view, click the more actions icon, then select Change priority and choose a value.
Use a rule to set priority
If you’d like to automatically assign a priority to new tickets in your helpdesk, admins and leads can create rules to set the priority on tickets that meet specific conditions.
- From your helpdesk, click the dropdown menu in the top-left corner.
- Select Workflows.
- In the menu, locate Tools, then select Rules.
- Click Create rule.
- Click Create Custom Rule.
- Configure the trigger and any conditions using the WHEN, IF, THEN builder.
- Click THEN, select Action, then choose Set priority.
- Select either low, high, or critical.
- Click Create rule.
Use ticket priority
You can use ticket priority as a filter when creating a view, and as a condition to trigger a rule. For example, you might create a view for high or critical priority tickets to keep an eye on their resolutions, or a rule that sends an automated response to low priority tickets letting the customer know when to expect a reply. You can also sort tickets by priority in Views and in Advanced Search results.
Filter a view by priority
To help prioritize the tickets in the queue, you can create a view based on the ticket priority.
- From your helpdesk, click the dropdown menu in the top-left corner.
- Select Inbox.
- In the sidebar, hover over either Shared views or Private views, then click the plus icon and select Create view.
- Add a name for the view, and select an emoji, if you'd like.
- Click Add Filter, then select Priority from the menu.
- Select an operator, then choose a value — Low, Normal, High, or Critical.
- Click Create View.
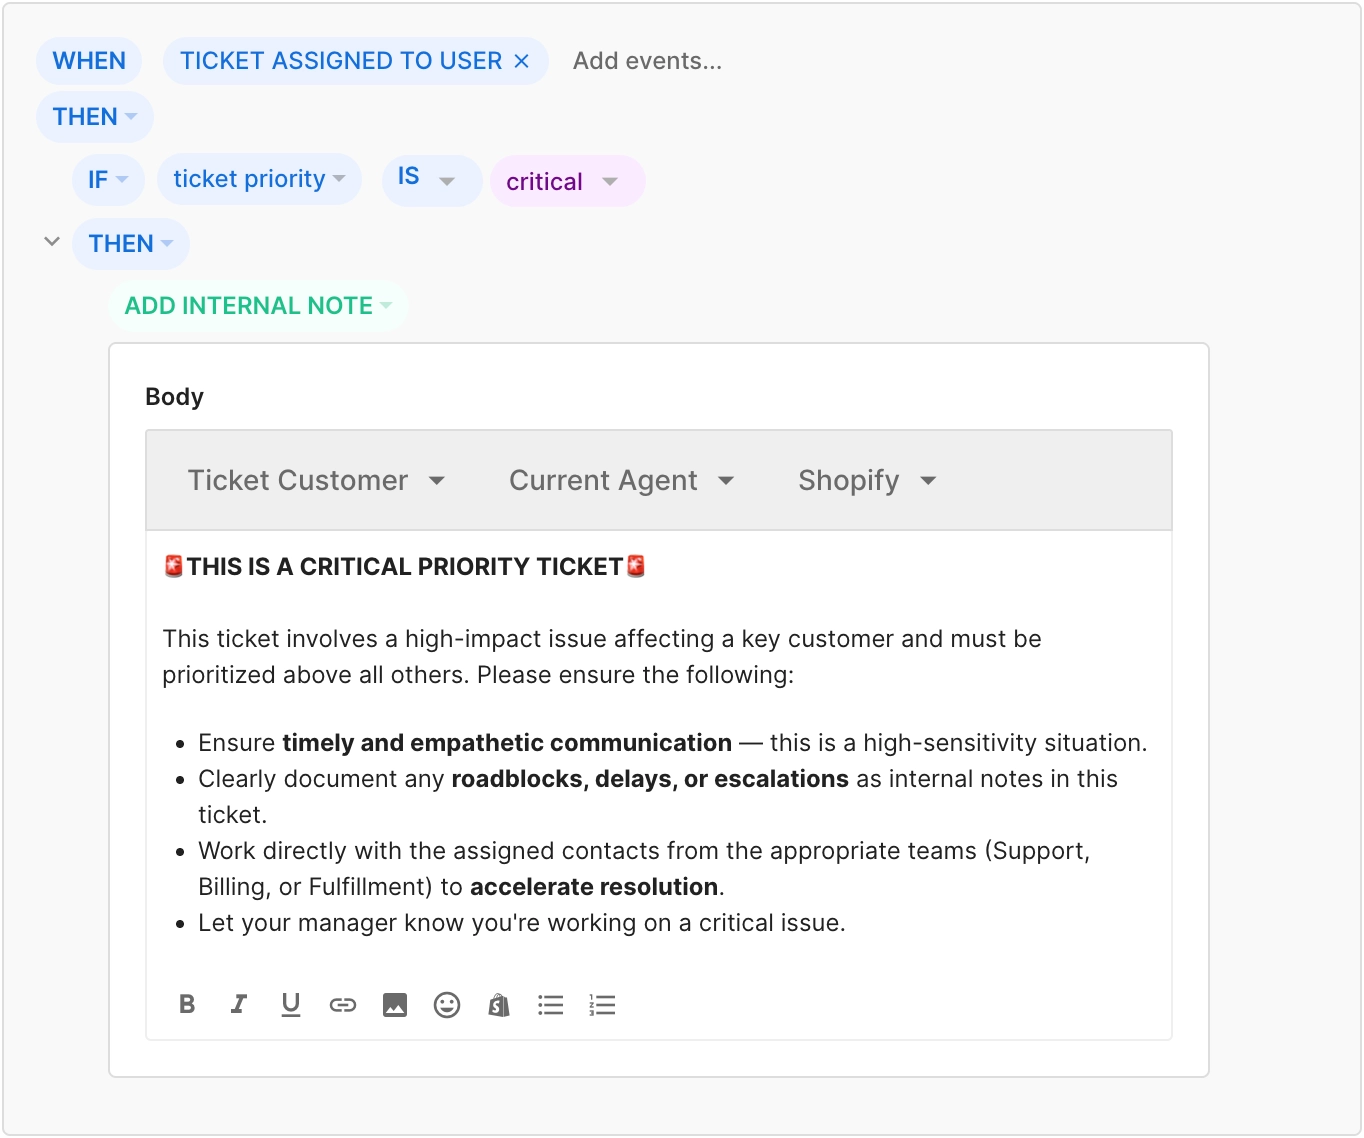
Trigger a rule with priority as a condition
You can use ticket priority as a condition for rules to create an automation that triggers based on the ticket's priority. For example, you might add an internal note with handling instructions whenever a Critical ticket is assigned to an agent, or send an auto-reply to Low priority tickets letting the customer know when to expect a response.
- From your helpdesk, click the dropdown menu in the top-left corner.
- Select Workflows.
- In the menu, locate Tools, then select Rules.
- Click Create rule.
- Click Create Custom Rule.
- Set your trigger with the WHEN block.
- Click THEN, select "IF" statement, then set the condition to Priority, choose an operator, and select a value.
- Add the action you want to run when the condition is met.
- Click Create rule.