Gorgias logo
Gorgias logo

All articles

Rules 101Updated a month ago

Rules allow you to perform actions to tickets based on custom triggers. If you want to automate repetitive tasks, such as tagging tickets or responding to common questions, you're in the right place! 


How it works

To get started, here's a helpful video tutorial breaking down the most common components of rules.


Common variables in rules

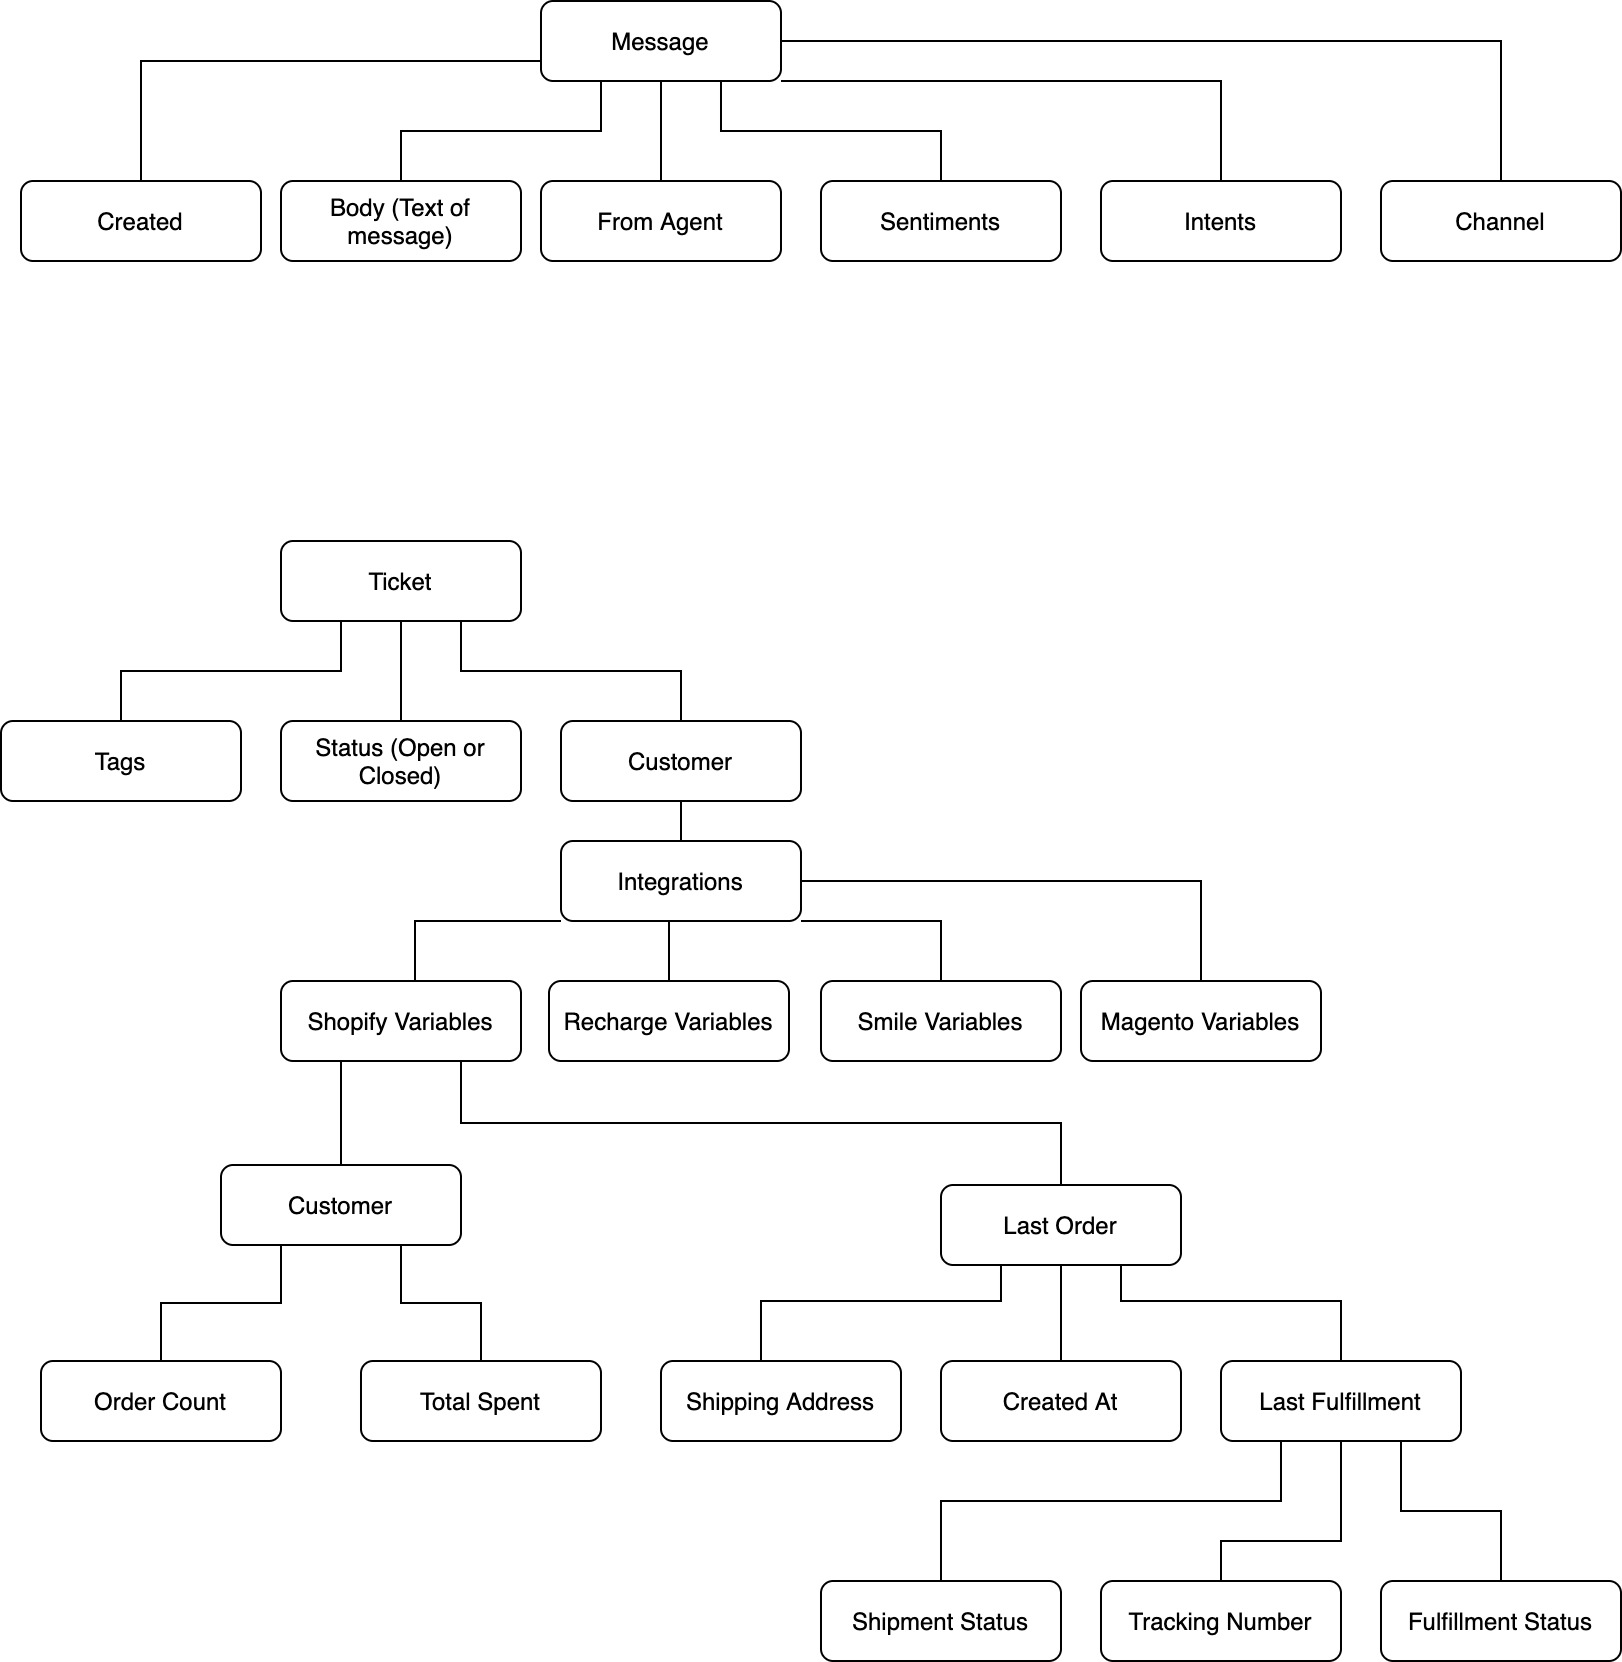
We know that it can be difficult to start using rules, especially if you don't know how to find some common variables like whether a ticket is opened or closed, how many orders a customer has made, or if an intent has been detected in a message.

To make it easier, we've put together a diagram showing where to find the most common variables so you can start automating tickets quicker and more effectively.


Rule conditions

Some information regarding rule conditions:

1) The "Contains one of" condition is handling the keywords you entered as if there is an "OR" between them. To trigger the rule, at least one keyword needs to be present.

2) The "Contains all of" condition is handling the keywords you entered as if there is an "AND" between them. To trigger the rule, all of the keywords need to be present.


*Tip: Visit our Rules Glossary guide on what each rule node does exactly!


*Note: When using keywords in your rules, we suggest setting one keyword at a time ("new", "order", "only"). If you enter an entire phrase (e.g. "new order only"), then the order of the words needs to be the same for the rule to trigger (this means that "only new order" would not trigger the rule).
Please note:

- 'Does not contain one of' rule filter label has been renamed 'Does not contain all of' triggering only if any of the listed elements is missing.

- The 'Reply to ticket rule' action was renamed 'Reply to customer' and now only triggers as a response to the customer’s message (as opposed to an agent’s message). Note that you can still use the 'Apply macro' or 'Send email' actions to reproduce the initial behavior.


Actions to remove 

An action which we have recently added is the ability to remove tags using rules as per the instructions below:

This way you can remove tags without having to reset them!


Date formats in rules 

It is very simple to trigger a rule according to a particular date using the following date format: weeks (w), days (d), hours (h), minutes (m) and seconds (s). 

This applies to the following date conditions in your rules:


Ticket:

  • Closed datetime 
  • Created datetime 
  • Last message datetime 
  • Last received message datetime 
  • Opened datetime 
  • Updated datetime


Message:

  • Created datetime


*Example: Ticket closed datetime is less than or equal to 3d 2h 20m.


Now let's help you set up your first rule! Below you'll find examples of some of the most common setups.


Setup Instructions

To create your first rule, please follow the steps below:

1. Go to SettingsRules. This is the page that you will land on, showing you all of your currently installed and active/inactive rules.

2. From here click on the blue Create Rule button in the top right corner

3. You will now be presented with a choice. Install a Managed Rule (Autoresponders and Rule Templates) from our library, or build your own rule manually from scratch:


Autoresponders

These rules need no code, no setup. Install them directly from the aforementioned library and you are good to go! You can read in more detail about Autoresponders here.

They use AI technology to deflect and resolve tickets. These rules need no code, no setup. Install them directly from the aforementioned library and you are good to go!

Rule Templates

For your convenience, we also offer you pre-made rules in the form of rule templates. Here's how to install:

  • Once you click on the rule template that you want to install, you will be met with this prompt:
  • This prompt will ask you to create a corresponding view, just like with autoresponders previously, and then to install it. It will also show you an estimate of how many tickets per month it can handle on its own!
  • Once installed, you can edit it just like any other manually built rule, just remember to save your changes by clicking the 'Update Rule' button once you're done and happy with your setup!
    And again, on the 'Affected tickets' tab you will be able to see which exact tickets triggered this rule.

Other rules

Perhaps you still want to build your own custom rule from scratch. And we hear you, every business is unique and has its own daily workflow! So here's how to build a new rule from scratch:

  • Click the blue Create Custom Rule button in the upper-right-hand corner of Rule Templates page:
  • You will then be met with the old familiar interface where you can build a rule on your own, exactly how you want it. Of course, if you still need some inspiration, you can always go back to Rule Templates from the same page.

Just remember to hit 'Create Rule' once done and happy with your setup! And it's done. 💪

For more on rules, visit the rest of our documentation here.


Apply for the Masterclass

You can apply for the Rules Masterclass here


Stuck and in need of a bit of assistance with your rules? Our Support Team is here for you 24/7 via live chat or email at [email protected].


Was this article helpful?
Yes
No