Manage Gorgias call flows and IVR menusUpdated a month ago
With the Gorgias Voice Add-on, you can design the path your customers follow when they contact your support team by phone. The call flow editor allows you automatically triage callers based on your Business Hours or fields in their profile, and to map out how callers move through IVR menus, which queues they’re routed to, when they’re put on hold, when they’re sent to voicemail, and more.
Requirements
- Available on Helpdesk Plans with the Voice Add-on
- Only Admins can set up Voice
- All users (except Observers) can place or answer calls
Components of a call flow
The call flow editor allows you to visualize and customize the experience that callers have when they contact your support team by phone. To get started with editing a call flow, it’s helpful to familiarize yourself with a few key components:
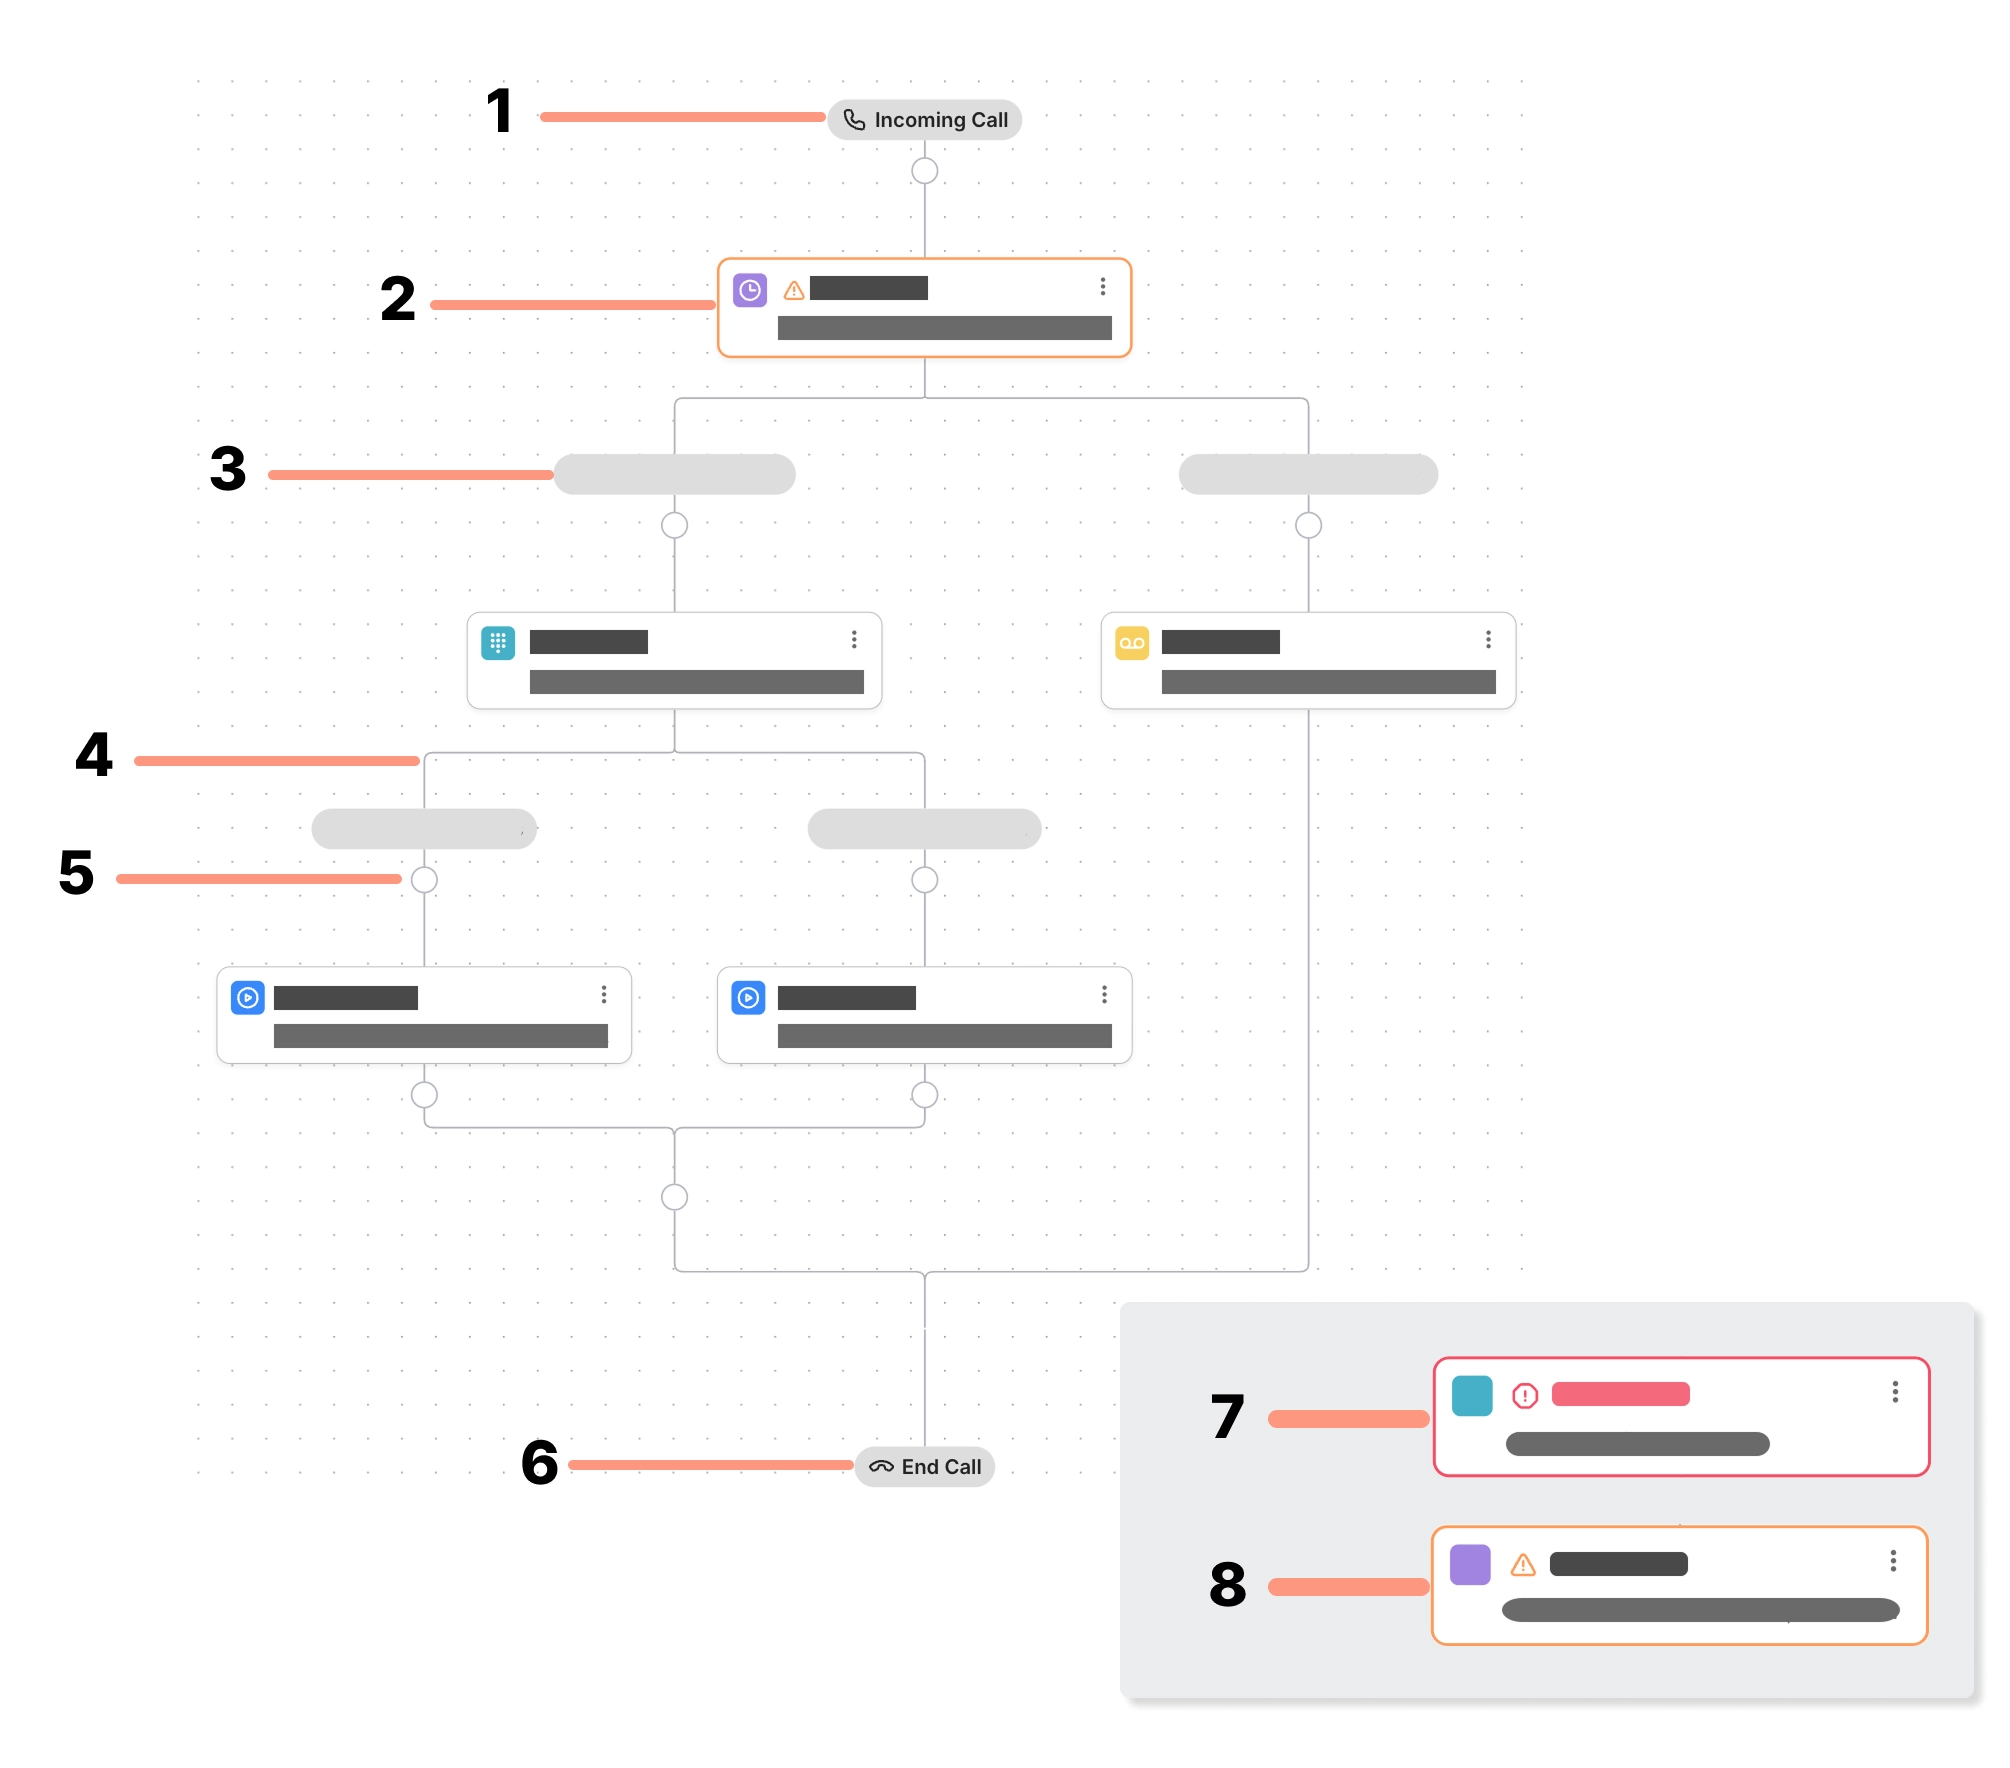
| Component | Description |
|---|---|
| 1. Call start | This is the entry point to every call flow. You’ll connect this point to the first step — usually a greeting message, or a menu. |
| 2. Step | Steps represent the specific events that happen in your call flow, like playing a message, collecting an input, or routing a call. |
| 3. Branch label | Branch labels indicate what action a caller took at the previous step to lead them down that branch of the call flow. For example, if the previous step is an IVR menu with two options, the branch labels would be 1 and 2, and the caller will move along the branch of the option they chose. |
| 4. Branch | The branches of the call flow demonstrate how the flow moves from one step to another based on a condition or menu choice. |
| 5. Add step icon | When you see a circle on a branch in the flow, it means you can add a new step in the call flow between existing steps. |
| 6. Call end | Once the caller has been through each step in their call flow, the call ends. |
| 7. Step warning (red) | When a step appears with a red warning, it indicates that the setup for the step is incomplete, and that the flow is in an unusable state. For example, if you’ve added an IVR menu step but haven’t added a text-to-speech message or uploaded a recording, your customers won’t be able to use the menu, so we prevent you from saving your flow until the missing details are added. |
| 8. Step warning (orange) | When a step appears with an orange warning, it indicates that the design of your flow might not work as expected. For example, if you haven’t added any steps to a branch, the call will disconnect when a caller navigates to it. The step before the empty branch will turn orange to flag the issue, but you’ll be able to save the flow and use it this way if you’d like. |
Create or edit a call flow
When you select the routing behavior for a new Voice integration, a basic, customizable call flow will be generated in the Call Flow tab. Open the Call Flow tab, then click each step to configure the experience for your callers.
- From your helpdesk, click the Settings icon in the bottom-left corner.
- In the menu, locate Channels, then select Voice.
- Select a Voice integration from the list, then click the Call Flow tab at the top of the screen.
- To add a step, click the Add step icon along the branch you’d like the step to occur.
- Once you’ve added a step, configure its settings in the side panel. Click any step in the call flow to manage its configuration.
- Click Save Changes in the top-right corner of the call flow editor.
Add and configure steps
The steps in your call flow represent the actions and events your customers will encounter when they call your phone number. Once you add the step to your flow, you’ll configure the step to define how it behaves. You can add the following steps to your call flow:
Time rule
A Time rule step will create two branches in your call flow. The first branch is the path that callers who call within the time rule’s time range will follow, and the second is the path for callers outside of the time range. You can choose Business hours to create branches for inside and outside of your business hours, or Custom hours for a more specific time range.
- From the call flow, click the Add step icon, then select Time rule.
- From the side panel, select either Business hours or Custom hours. If you select Custom hours, choose a timezone, day and time range.
As an example, if you set the Time rule step to Business Hours, you can create a branch that connects your caller to a queue during business hours, and another that routes the call to voicemail when the call comes through outside of business hours.
Customer lookup
A Customer lookup step allows you to create separate branches based on customer fields. When the caller reaches this step in the call flow, it checks their profile for the values you specified during setup, and automatically routes them to the matching branch. For example, you could route customers with VIP in their profile to a branch with a dedicated, less busy queue, while everyone else is routed to the general queue.
- From the call flow, click the Add step icon, then select Customer lookup.
- From the side panel, click the dropdown menu and select the customer field, then enter the values. Each value will create a new branch on the call flow, and callers will automatically be routed to the branch that matches the value in their profile.
- To add more options, click +Add Option.
This step will automatically create an “Other” branch for callers that don’t have a matching customer field in their profile.
Play message
Your caller will hear a text-to-speech message or custom recording when they reach a Play message step in your call flow.
- From the call flow, click the Add step icon, then select Play message.
- From the side panel, click the dropdown menu then select either Text-to-speech or Custom recording.
- If you selected Text-to-speech, enter a message in the text box. If you selected Custom recording, click Upload File to upload your recording.
IVR Menu
IVR menu steps enable callers to route their own calls by pressing a number on their phone’s keypad. A pre-recorded message presents the caller with menu options, such as: “Press 1 for Support, Press 2 for Sales, Press 3 for Billing.” If you’re building an IVR menu for the first time, check out our IVR menu inspiration for setup ideas.
- From the call flow, click the Add step icon, then select IVR menu.
- From the side panel, click the dropdown menu then select a greeting message type (either Text-to-speech or Custom recording). The greeting message should outline the menu options and the number the caller should press to select an option.
- If you selected Text-to-speech, enter a message to convert to speech in the text box. If you selected Custom recording, click Upload File to upload your recording.
- Enter the menu options in the text boxes. To add more options, click + Add Option.
Every menu option creates a new branch in your call flow. Add steps to each additional branch to define the path the caller follows based on their menu selection.
You can create multi-level IVR menus to further funnel the callers’ path. Each IVR menu can have up to 8 options, so that callers can press 9 to go back to the previous menu.
Route to
When the caller reaches a Route to step in the call flow, their call will be sent to either a queue or another voice integration. The call will then be assigned only to agents assigned to that queue or integration.
- From the call flow, click the Add step icon, then select Route to.
- From the side panel, select either Queue or Voice integration, then click the dropdown menu to specify where the call should go.
When a Route to step routes to a queue, you can decide how to Handle busy times and whether you’d like to allow Callback requests. If you choose Skip queue when it’s too busy, a Default and Skip queue branch will be added to the call flow, so you can decide what happens to customers when the queue they’re meant to join is at capacity.
Forward to
Use the Forward to step to move calls out of Gorgias to an external phone line. When the caller reaches this step in the flow, the call will be automatically forwarded to the phone number you provided.
- From the call flow, click the Add step icon, then select Forward to.
- From the side panel, click the dropdown menu to select a country code, then enter a phone number in the textbox.
Send to SMS
When a caller reaches a Send to SMS step in your call flow, they’ll hear a message confirming the switch to SMS, the call will end, and they’ll automatically receive a text message to resume the conversation. Since the Send to SMS step ends the call, it can only be used as a final step.
- From the call flow, click the Add step icon, then select Send to SMS.
- From the side panel, click the dropdown menu under Where should this call go, then select an SMS integration.
- Add a transition message that will play while the caller is on the line that explains they’ll be moving to SMS messaging. Click the dropdown menu and select either Text-to-speech or Custom recording, then enter your message or upload a recording.
- In the text box under Opening SMS message, write the message that will be automatically sent to your customer.
Send to voicemail
When a caller reaches a Send to voicemail step in your call flow, they’ll hear a voicemail greeting message, and have the option to leave a voicemail before hanging up. The Send to voicemail step can only be used as a final step, since the call ends once the caller leaves a message.
- From the call flow, click the Add step icon, then select Send to Voicemail.
- From the side panel, click the dropdown menu and select either Text-to-speech or Custom recording, then enter your message or upload a recording.
- Check the box next to Allow caller to leave a voicemail. If you leave this unchecked, the caller will hear your message, then the call will end.
If you have a call flow branch that contains a Route to step, we recommend adding a Send to voicemail step as the final step in the branch. This way, when your customer is routed to a busy queue, they’re sent to voicemail if they reach the maximum wait time in the queue. If you don’t add a step after the Route to step, the call will disconnect.
Channel: Mono
Sample rate: 16000 Hz
Bit rate mode: Constant
Bit rate: 64 kbps
