Set business hours for Gorgias Support ChannelsUpdated a month ago
Set business hours in Gorgias to define the days and hours your support team is available to respond to customer inquiries. Your business hours can be used in conditions when creating rules, and they control when the chat widget on your website appears online to shoppers, as well as when phone calls are routed to agents.
Requirements
- Available on Basic, Pro, Advanced and Enterprise plans
- The account owner and admins can set business hours
Set up business hours
Your default business hours apply to the integrations in your helpdesk, and dictate whether rules with a business hours condition are run. In some cases, you might need to override your default business hours for specific integrations — like if you're a brand with multiple international stores with varying support hours in each region. To do this, you can set custom business hours for each related integration.
If you don't set default business hours, your rules and integrations (that don't have custom business hours) will operate as though it's outside of business hours, and follow the offline behavior you set for them. This could look like a customer seeing an Offline Capture form on Chat, a call being routed to Voicemail, or a rule designed to trigger during business hours not running.
Configure Default business hours
Select a day or range of days, then add a time range to specify your support team's online hours. You can add multiple time ranges to set different hours for each day of the week.
- From your helpdesk, click the Settings icon in the bottom-left corner.
- In the sidebar, locate Workspace, then select Business hours.
- Under Default business hours, click the Pencil icon.
- Select a timezone from the drop-down menu.
- Click + Add Time Range.
- Select a day, or range of days, from the drop down menu, then click the Clock icon to specify the start and end of business hours. • For 24-hour coverage, set the start time to 12:00AM and the end time to 11:59PM. • To add another time range, click + Add Time Range.
- Click Save Changes.
Configure custom business hours
If you've set up multiple support channels, or multiple integrations of a single channel that have different hours of operation, you can set custom business hours for each integration. When setting custom business hours, you can apply each schedule to multiple integrations.
- From your helpdesk, click the Settings icon in the bottom-left corner.
- In the sidebar, locate Workspace, then select Business hours.
- Under Custom business hours, click the + Add Custom business hours button.
- Add a name, timezone and schedule for your business hours. • For 24-hour coverage, set the start time to 12:00AM and the end time to 11:59PM.
- In the Integrations section, search for and select the integrations that should follow this schedule.
- Click Add business hours. To add another custom schedule, click + Add custom business hours.
Change business hours
Occasionally, you might want to adjust your business hours to reflect things like updated availability, agent vacation, or holiday hours. You can edit your business hours any time, and change them back once your schedule has returned to normal.
Edit default business hours
- From your helpdesk, click the Settings icon in the bottom-left corner.
- In the sidebar, locate Workspace, then select Business hours.
- Under Default business hours, click the Pencil icon.
- Under Schedule, select a new day or range of days from the drop-down menu, or click the Clock icon to update the time range. To remove the time range, click the red X icon.
- Click Save Changes.
Edit custom business hours
- From your helpdesk, click the Settings icon in the bottom-left corner.
- In the sidebar, locate Workspace, then select Business hours.
- Under Custom business hours, locate the schedule you'd like to change, then click the Pencil icon.
- Edit the name, timezone or schedule for your business hours, or click Select Integrations to update the integrations that follow this schedule. Click Delete business hours to delete the schedule entirely.
- Click Save Changes.
Use business hours as a rule condition
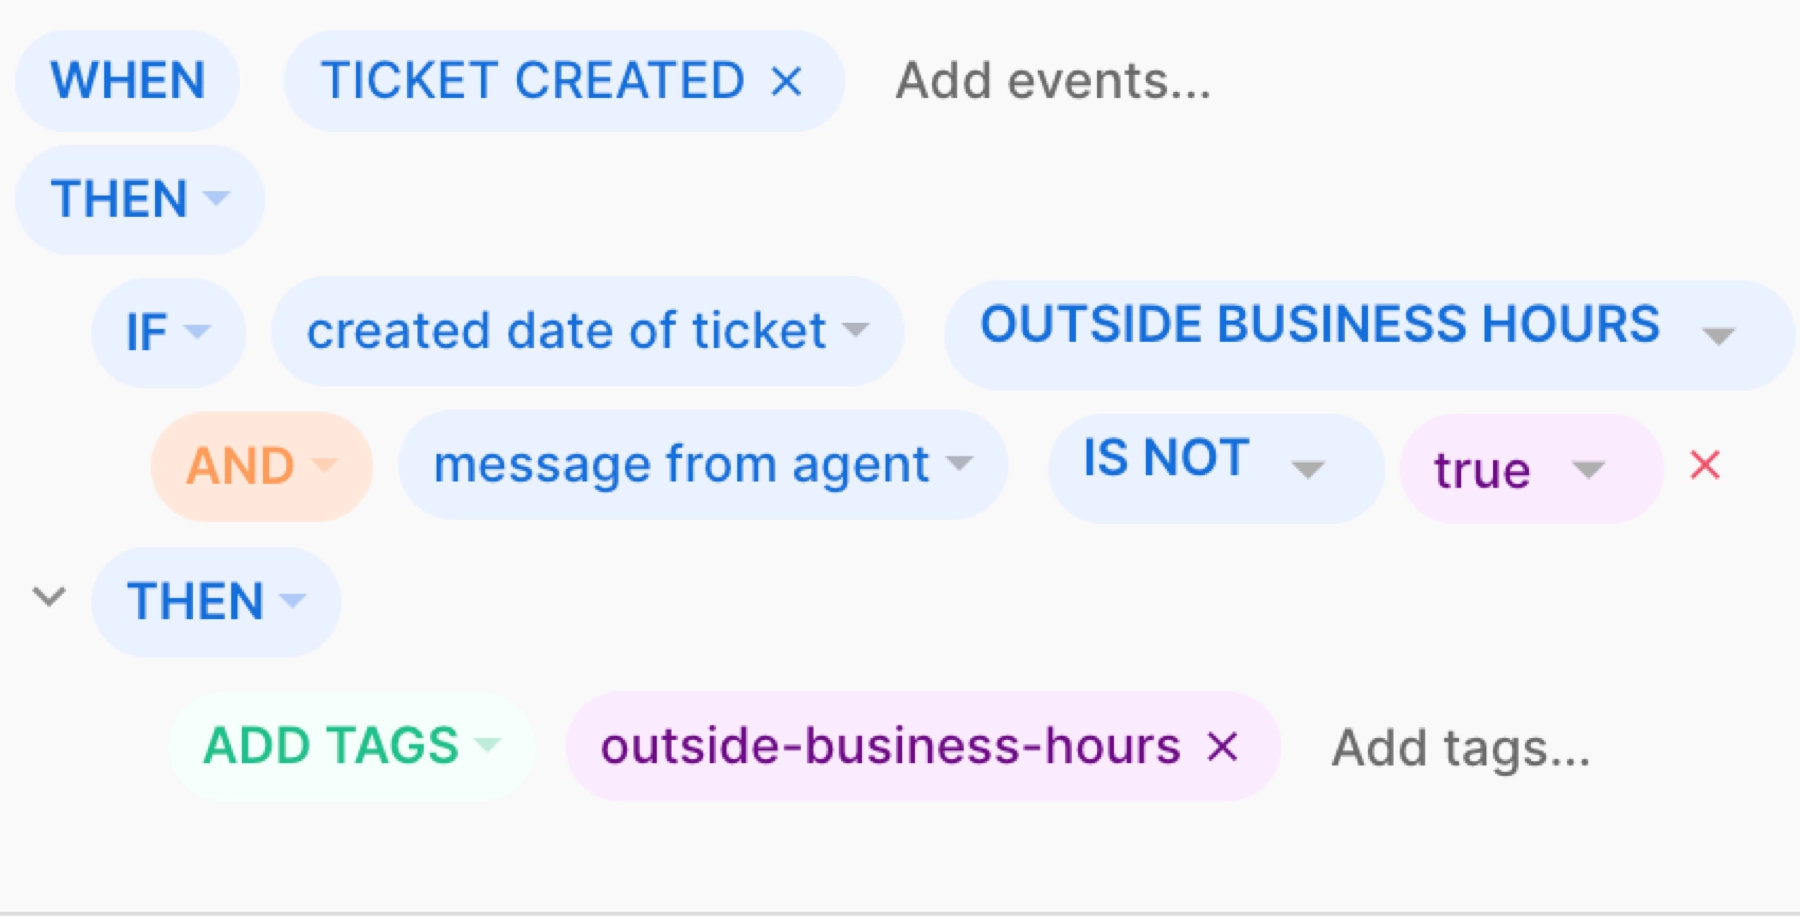
You can use rules to automate certain actions in your helpdesk. If you'd like an action to happen based on whether a ticket is received during or outside of your business hours, use the business hours value in a rule condition. In the example below, outside business hours is used as a condition to automatically tag tickets received outside of business hours, but you can use business hours to set up any rule that meets your needs.
Tag tickets received outside business hours
Consider creating a rule to add an "outside of business hours" tag on tickets created when your support agents aren't online to respond. When they're back online, agents can prioritize these tickets by creating a ticket view and filtering by the tag.
From your helpdesk, click the dropdown menu in the top-left corner.
Select Workflows.
In the sidebar, locate Tools, then select Rules.
Click Create Rule in the top-right corner, then click Create Custom Rule.
Add a name for your rule, then add the following conditions:
- WHEN TICKET CREATED
- THEN
- IF created date of ticket OUTSIDE BUSINESS HOURS
- AND message from agent IS NOT true
- THEN ADD TAGS outside-business-hours
Click the toggle next to Enable rule to ON, then click Create Rule.
