
Set business and holiday hours for Gorgias support channelsUpdated a day ago
Who can use this feature?
Set business hours to tell Gorgias when your support team is available, then schedule holiday hours to close or shorten your hours on specific dates. Your hours decide whether rules with a business hours condition run, when SLA timers pause and how phone calls are routed. Because holiday hours switch on and off automatically, you never have to change your hours the morning of a holiday and remember to change them back.
Set your default business hours
Your default business hours apply to every integration in your helpdesk that doesn't follow a custom schedule. If you don't set default business hours, Gorgias treats all time as outside business hours. Integrations without custom hours then follow their offline behavior, such as routing calls to voicemail, and rules designed to run during business hours won't run.
- From your helpdesk, click the Settings icon in the bottom-left corner.
- In the sidebar, locate Workspace, then select Business and holiday hours.
- On the Business hours tab, under Default business hours, click the Pencil icon.
- In the Edit default business hours panel, select your Time zone from the drop-down menu.
- Under Schedule, click Add time range.
- In the day drop-down menu, select the days this time range applies to, such as Mon-Fri, Weekend or a single day.
- Enter the start and end times of your support hours in the time fields.
- To give different days different hours, click Add time range again and repeat the previous two steps.
- Click Save.
To change your default hours later, repeat these steps. To remove a time range, click the X next to it.
Configure custom business hours
Use custom business hours when some of your channels or stores keep different hours than your default schedule. For example, your team in one region might answer calls on a different schedule than your email team. Custom business hours replace your default hours for every integration you assign to them.
- From your helpdesk, click the Settings icon in the bottom-left corner.
- In the sidebar, locate Workspace, then select Business and holiday hours.
- On the Business hours tab, under Custom business hours, click Add custom business hours.
- In the Title field, enter a name for the schedule.
- Select a Time zone from the drop-down menu.
- Under Schedule, click Add time range, then select the days and enter the start and end times for this schedule.
- Under Integrations, select the checkbox next to each integration that should follow this schedule. Use the search bar, or the Channel and Store filters, to find integrations quickly.
- Click Add business hours.
Each integration can follow only one custom schedule. If you select an integration that already belongs to another custom schedule, a warning appears. Select I confirm overwriting the existing schedules to move the integration to the new schedule.
Edit or delete custom business hours
When a team's availability changes permanently, update its custom schedule. To change hours for specific dates only, add holiday hours instead.
- From your helpdesk, click the Settings icon in the bottom-left corner.
- In the sidebar, locate Workspace, then select Business and holiday hours.
- Under Custom business hours, locate the schedule you'd like to change, then click the Pencil icon.
- Edit the title, time zone, schedule or assigned integrations.
- Click Save.
To delete a schedule, click Delete business hours at the bottom of the panel, then click Delete to confirm. You can also click the Trash icon next to the schedule in the list. When you delete custom business hours, every integration assigned to that schedule goes back to your default business hours.
Add holiday hours
Holiday hours are exceptions to your regular schedule. Use them to close for a day or a whole week, or to open with shorter hours on dates like Christmas Eve. On the dates you choose, holiday hours replace the default or custom business hours of every integration you assign to them. Once the dates pass, those integrations go back to their regular schedule automatically.
- From your helpdesk, click the Settings icon in the bottom-left corner.
- In the sidebar, locate Workspace, then select Business and holiday hours.
- Click the Holidays & exceptions tab.
- Click Add holiday hours.
- In the Title field, enter a name for the holiday, like "Christmas schedule".
- Under Schedule, click the Date drop-down menu, then select a single date or a start and end date.
- Select how your team works on these dates:
- Fully closed: Gorgias treats the entire date range as outside business hours.
- Open with different hours: Gorgias replaces your regular hours with the time ranges you enter.
- If you selected Open with different hours, select a Time zone, then enter the times you're open next to Open from. To add another time range for the same dates, click Add time range.
- To apply the same dates every year, click the Repeat every year toggle to turn it on.
- Under Integrations, select the checkbox next to each integration this holiday applies to. To select every integration shown, select the checkbox at the top of the list. Use the search bar, or the Channel and Store filters, to narrow the list.
- Click Add holiday hours.
How holiday hours apply
A holiday only affects the integrations you assign to it, and it overrides whichever schedule those integrations normally follow, whether that's your default or a custom schedule. Integrations you don't assign keep their regular hours.
A Fully closed holiday uses each integration's own business hours time zone, so the closure starts and ends at midnight local time for that integration. An Open with different hours holiday uses the time zone you select in the form, which defaults to the time zone of your default business hours. Outside the time ranges you enter, Gorgias treats those dates as outside business hours.
A single holiday can span up to 366 days. If you turn on Repeat every year, the holiday applies to the same calendar dates each year, including date ranges that cross into the new year.
Resolve overlapping holidays
An integration can't belong to two holidays with overlapping dates, because Gorgias wouldn't know which schedule to follow. When you select dates, a warning icon appears next to any integration already assigned to another holiday on those dates. Hover over the icon to see which holiday it belongs to.
If you select a conflicting integration, a warning banner appears and you can't save the holiday. To fix the conflict, deselect the integration, change your dates, or remove the integration from the other holiday first.
Manage your holiday hours
The Holidays & exceptions tab lists every holiday you've created, so you can check what's coming up and keep your schedule current. For each holiday, the list shows its name and schedule, its status, whether it repeats every year and the integrations it applies to. Hover over the integration count to see which integrations are included.
Each holiday has one of three statuses. Active means the holiday is happening today, Upcoming means its dates haven't started yet, and Expired means its dates have passed. For holidays that repeat every year, the status and dates reflect the next time the holiday occurs. By default, the list is sorted by status, starting with active holidays. Click the Name & schedule or Status column header to change the sort order, or use the search bar to find a holiday by name.
Edit holiday hours
- From your helpdesk, click the Settings icon in the bottom-left corner.
- In the sidebar, locate Workspace, then select Business and holiday hours.
- Click the Holidays & exceptions tab.
- Locate the holiday you'd like to change, then click the Pencil icon.
- Edit the title, dates, schedule or assigned integrations.
- Click Save.
Delete holiday hours
When you delete a holiday, the integrations assigned to it follow their regular business hours on those dates.
- From your helpdesk, click the Settings icon in the bottom-left corner.
- In the sidebar, locate Workspace, then select Business and holiday hours.
- Click the Holidays & exceptions tab.
- Locate the holiday you'd like to remove, then click the Trash icon.
- Click Delete to confirm.
Use business and holiday hours in rules
Rules can act differently depending on whether a ticket or message arrives while your team is working. Use business hours conditions to handle anything received while you're closed, and holiday hours conditions to target specific holidays, for example to tag tickets received over the Christmas break.
The during business hours and outside business hours conditions already take holiday hours into account. When a message arrives through an integration that's on a holiday, the rule evaluates the holiday schedule instead of that integration's regular hours. You don't need to update your existing rules.
To target specific holidays, use the during holiday hours or outside holiday hours conditions. These work with ticket dates (created, opened, updated, closed, last message and last received message) and message dates (created and sent).
Tag tickets received outside business hours
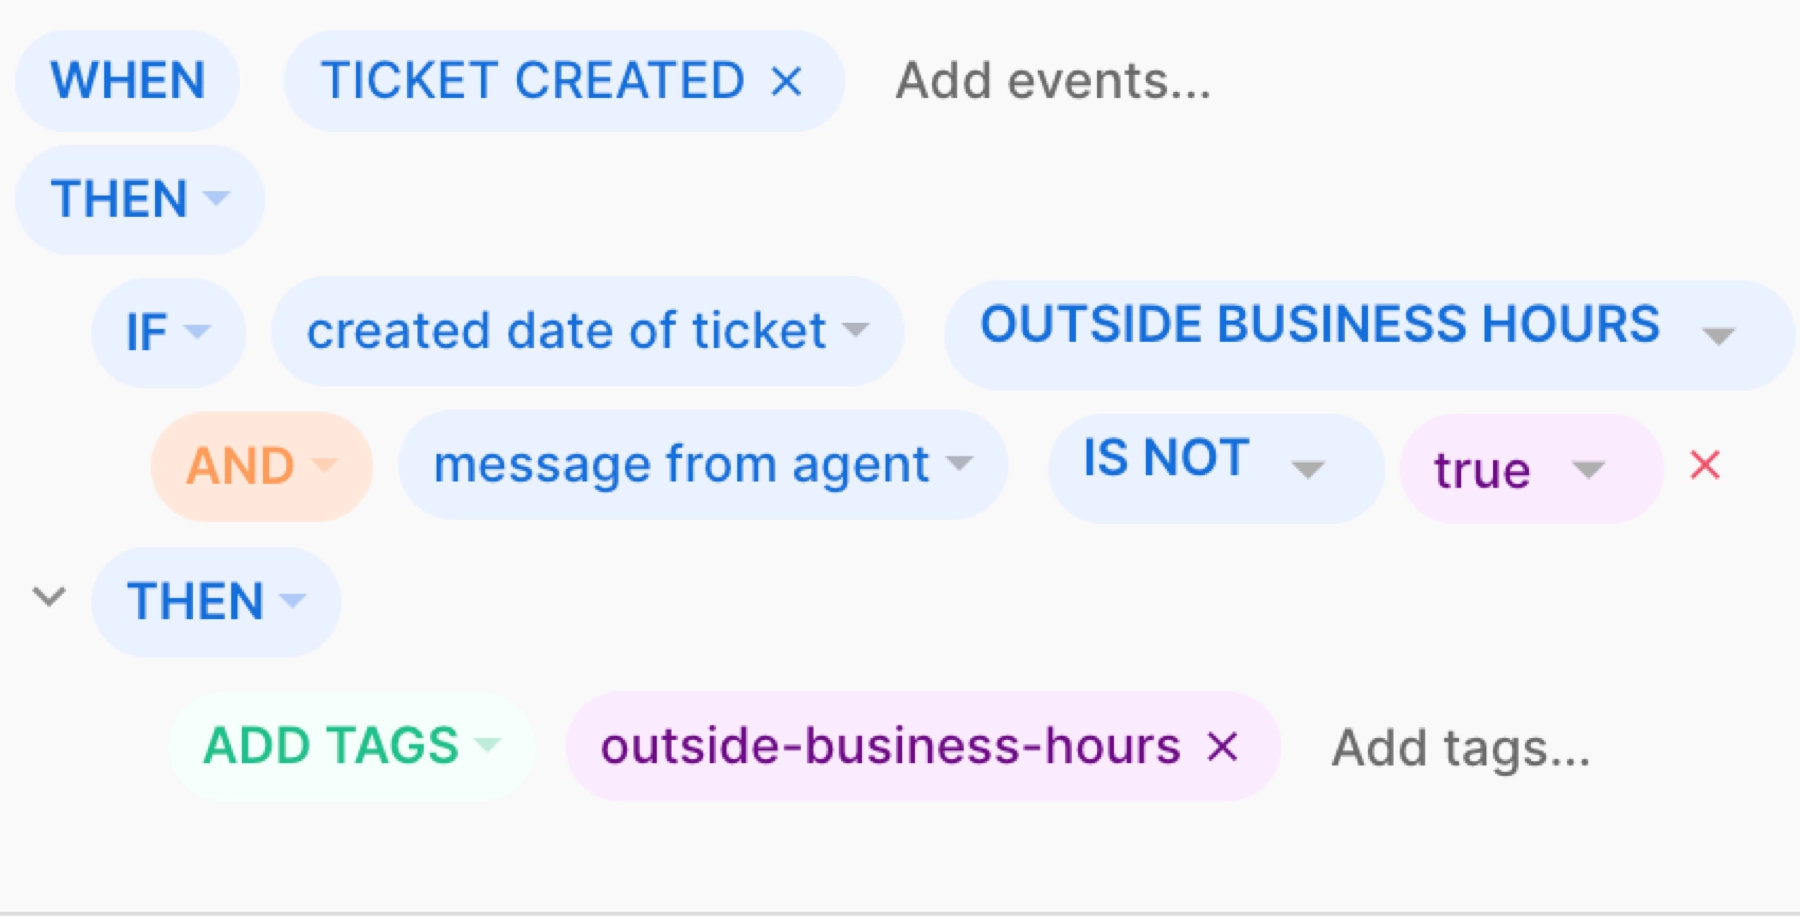
Consider creating a rule to add an "outside of business hours" tag on tickets created when your support agents aren't online to respond. When they're back online, agents can prioritize these tickets by creating a ticket view and filtering by the tag. Because this condition accounts for holiday hours, tickets that arrive during a holiday closure are tagged too.
- From your helpdesk, click the dropdown menu in the top-left corner.
- Select Workflows.
- In the sidebar, locate Tools, then select Rules.
- Click Create rule in the top-right corner, then click Create Custom Rule.
- Add a name for your rule, then add the following conditions:
- WHEN TICKET CREATED
- IF created date of ticket outside business hours
- AND message from agent IS NOT true
- THEN ADD TAGS outside-business-hours
- Click the toggle next to Enable rule to turn it on.
- Click Create rule.
Add a holiday hours condition to a rule
Use a holiday hours condition when a rule should only apply on certain holidays, like tagging tickets for a seasonal closure. A holiday condition checks the dates of the holidays you select, whether or not the ticket's integration is assigned to them.
- From your helpdesk, click the dropdown menu in the top-left corner.
- Select Workflows.
- In the sidebar, locate Tools, then select Rules.
- Open the rule you'd like to edit, or create a new rule.
- In an IF or AND condition, select a date field, such as created date of ticket.
- Select during holiday hours or outside holiday hours as the operator.
- Click Select holidays, then select one or more holidays from the list.
- Add the actions you'd like the rule to perform, then save the rule.
The during holiday hours condition is met only when the date falls inside the closed part of a selected holiday. For a holiday that's Open with different hours, the condition isn't met during the hours you're open.
Route calls during holiday hours
When a holiday is assigned to a voice integration, the Time rule step in that integration's call flow checks the holiday before your regular hours. By default, calls that arrive during a holiday follow your outside business hours branch. You can give holidays their own branch instead, so you can play a holiday greeting or route calls differently without editing your regular call flow.
- From your helpdesk, click the Settings icon in the bottom-left corner.
- In the sidebar, locate Channels, then select Voice.
- Select the voice integration you'd like to update.
- Click the Call Flow tab.
- Click the Time rule step in your call flow.
- Under Holiday hours, select how holiday calls are routed:
- Treat as outside business hours: holiday calls follow your Outside business hours branch. This is the default. If your time rule uses custom hours, this option reads Treat as outside custom hours.
- Give holidays their own branch: adds a During a holiday branch to your call flow.
- If you added a During a holiday branch, add the steps you'd like holiday calls to follow, such as a voicemail with a holiday greeting.
- Click Save.
For holidays that are Open with different hours, calls during the hours you're open follow your inside business hours branch. Calls outside those hours follow the During a holiday branch if you added one, or the outside business hours branch if you didn't.
The holiday hours setting only appears on the first Time rule step in a call flow. Time rule steps nested under another time rule don't show it.
Pause SLA timers during holiday hours
If your SLA policies pause outside business hours, they also pause during holiday hours. This way your team isn't counted as breaching an SLA while it's closed for a holiday.
- From your helpdesk, click the dropdown menu in the top-left corner.
- Select Workflows.
- In the sidebar, locate Tools, then select SLAs.
- Open the SLA policy you'd like to update.
- Click the toggle next to Pause SLA timer outside of business hours and holiday hours to turn it on.
- Save the policy.
The SLA timer uses the holidays assigned to the ticket's integration when the policy is applied to the ticket.
