Create a Convert CampaignUpdated 8 months ago
You can use Convert campaigns to engage with shoppers who visit your Shopify store in real time, and create an experience that closely resembles in-store interactions.
Campaigns are proactive messages that appear in the Gorgias chat widget whenever a shopper visits your store and meets certain conditions. You can use campaigns to upsell and cross-sell, offer pre-sales assistance, or educate shoppers with access to resources like videos, quizzes and guides.
See our Convert Campaign Library to explore examples of campaigns from successful brands.
Requirements
- You must have an active Convert subscription
- You must have Admin permissions to create new Convert campaigns
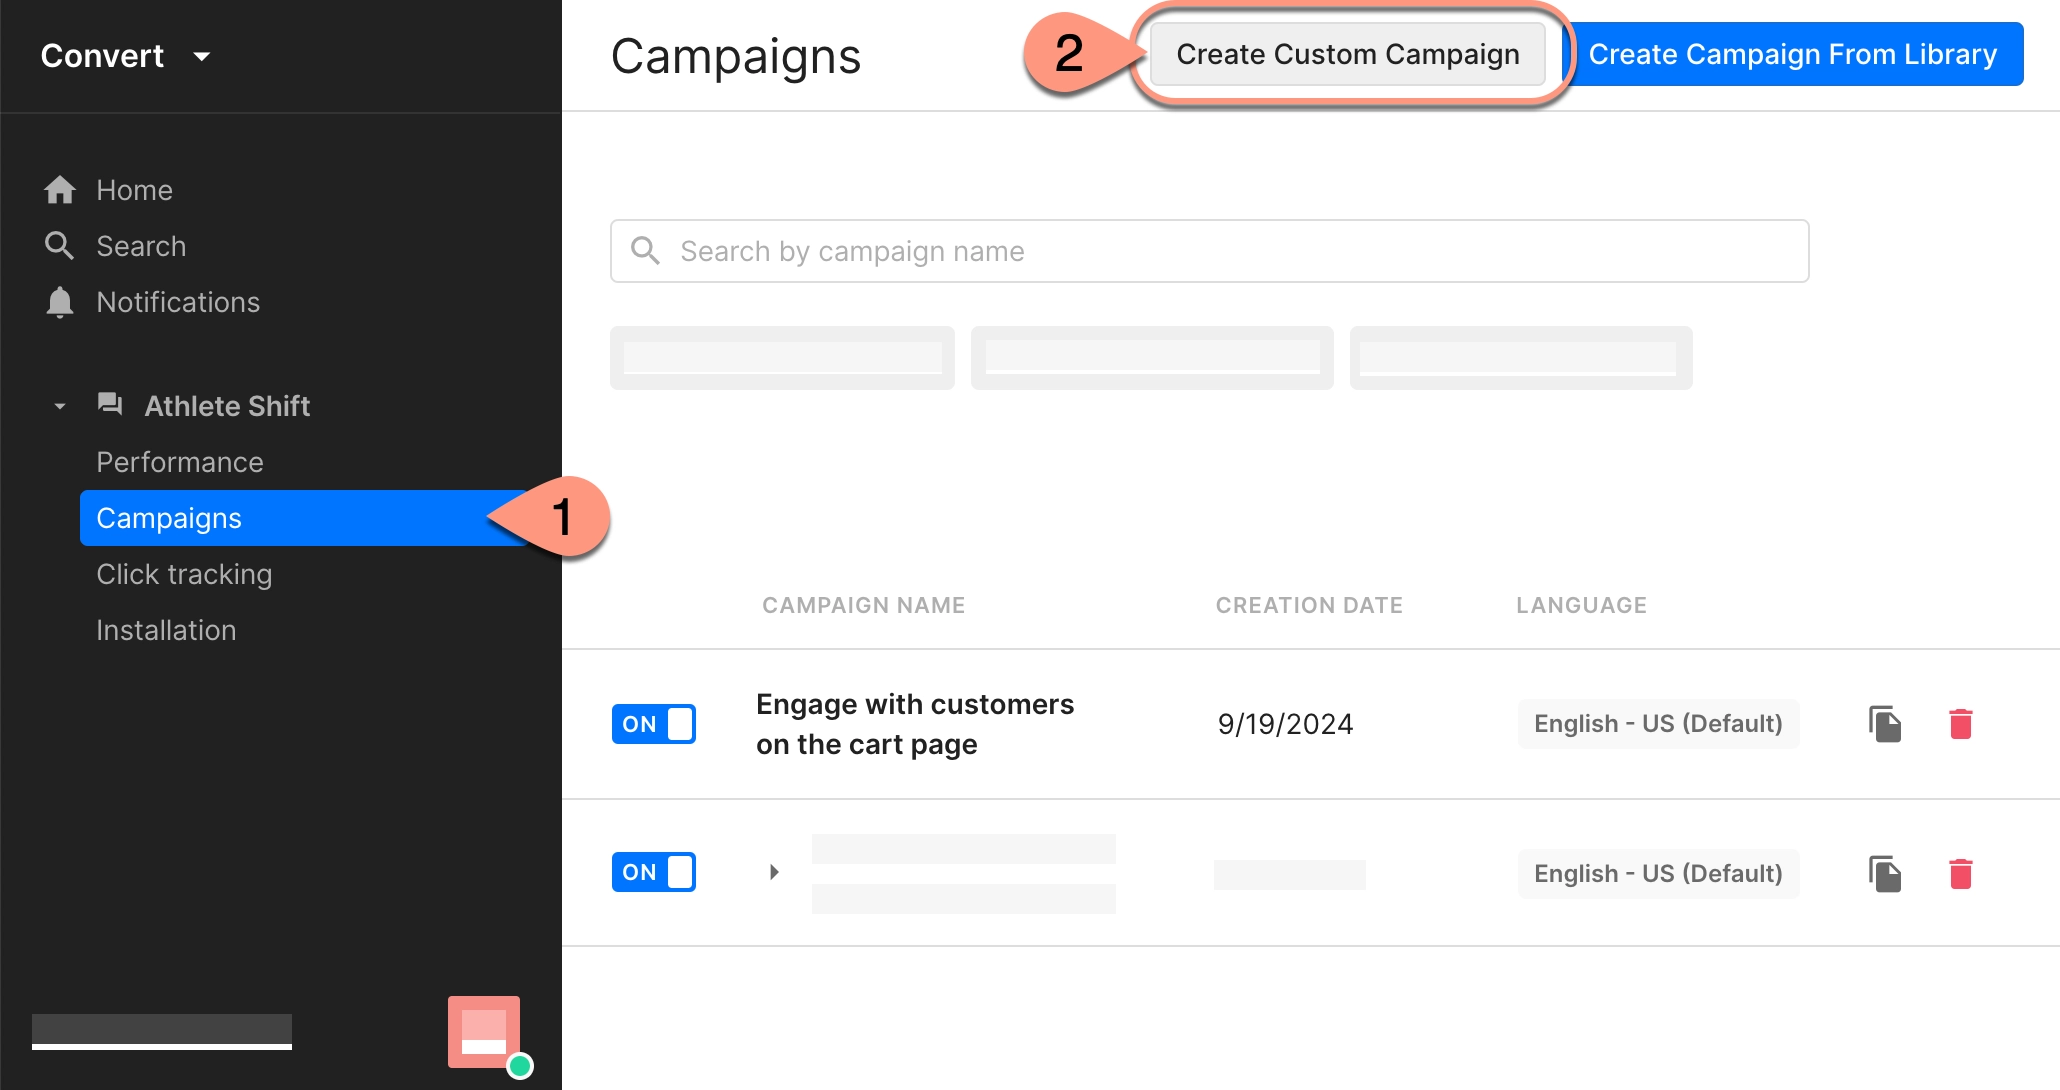
Creating a new campaign
Open the Convert menu in your Gorgias account to create a new campaign.
- Go to Convert → Campaigns
- Select Create Custom Campaign to create your own campaign
- Alternatively, select Create Campaign From Library to browse successful, pre-made campaign templates
- Under Set up the basics, give your campaign a name and select a language
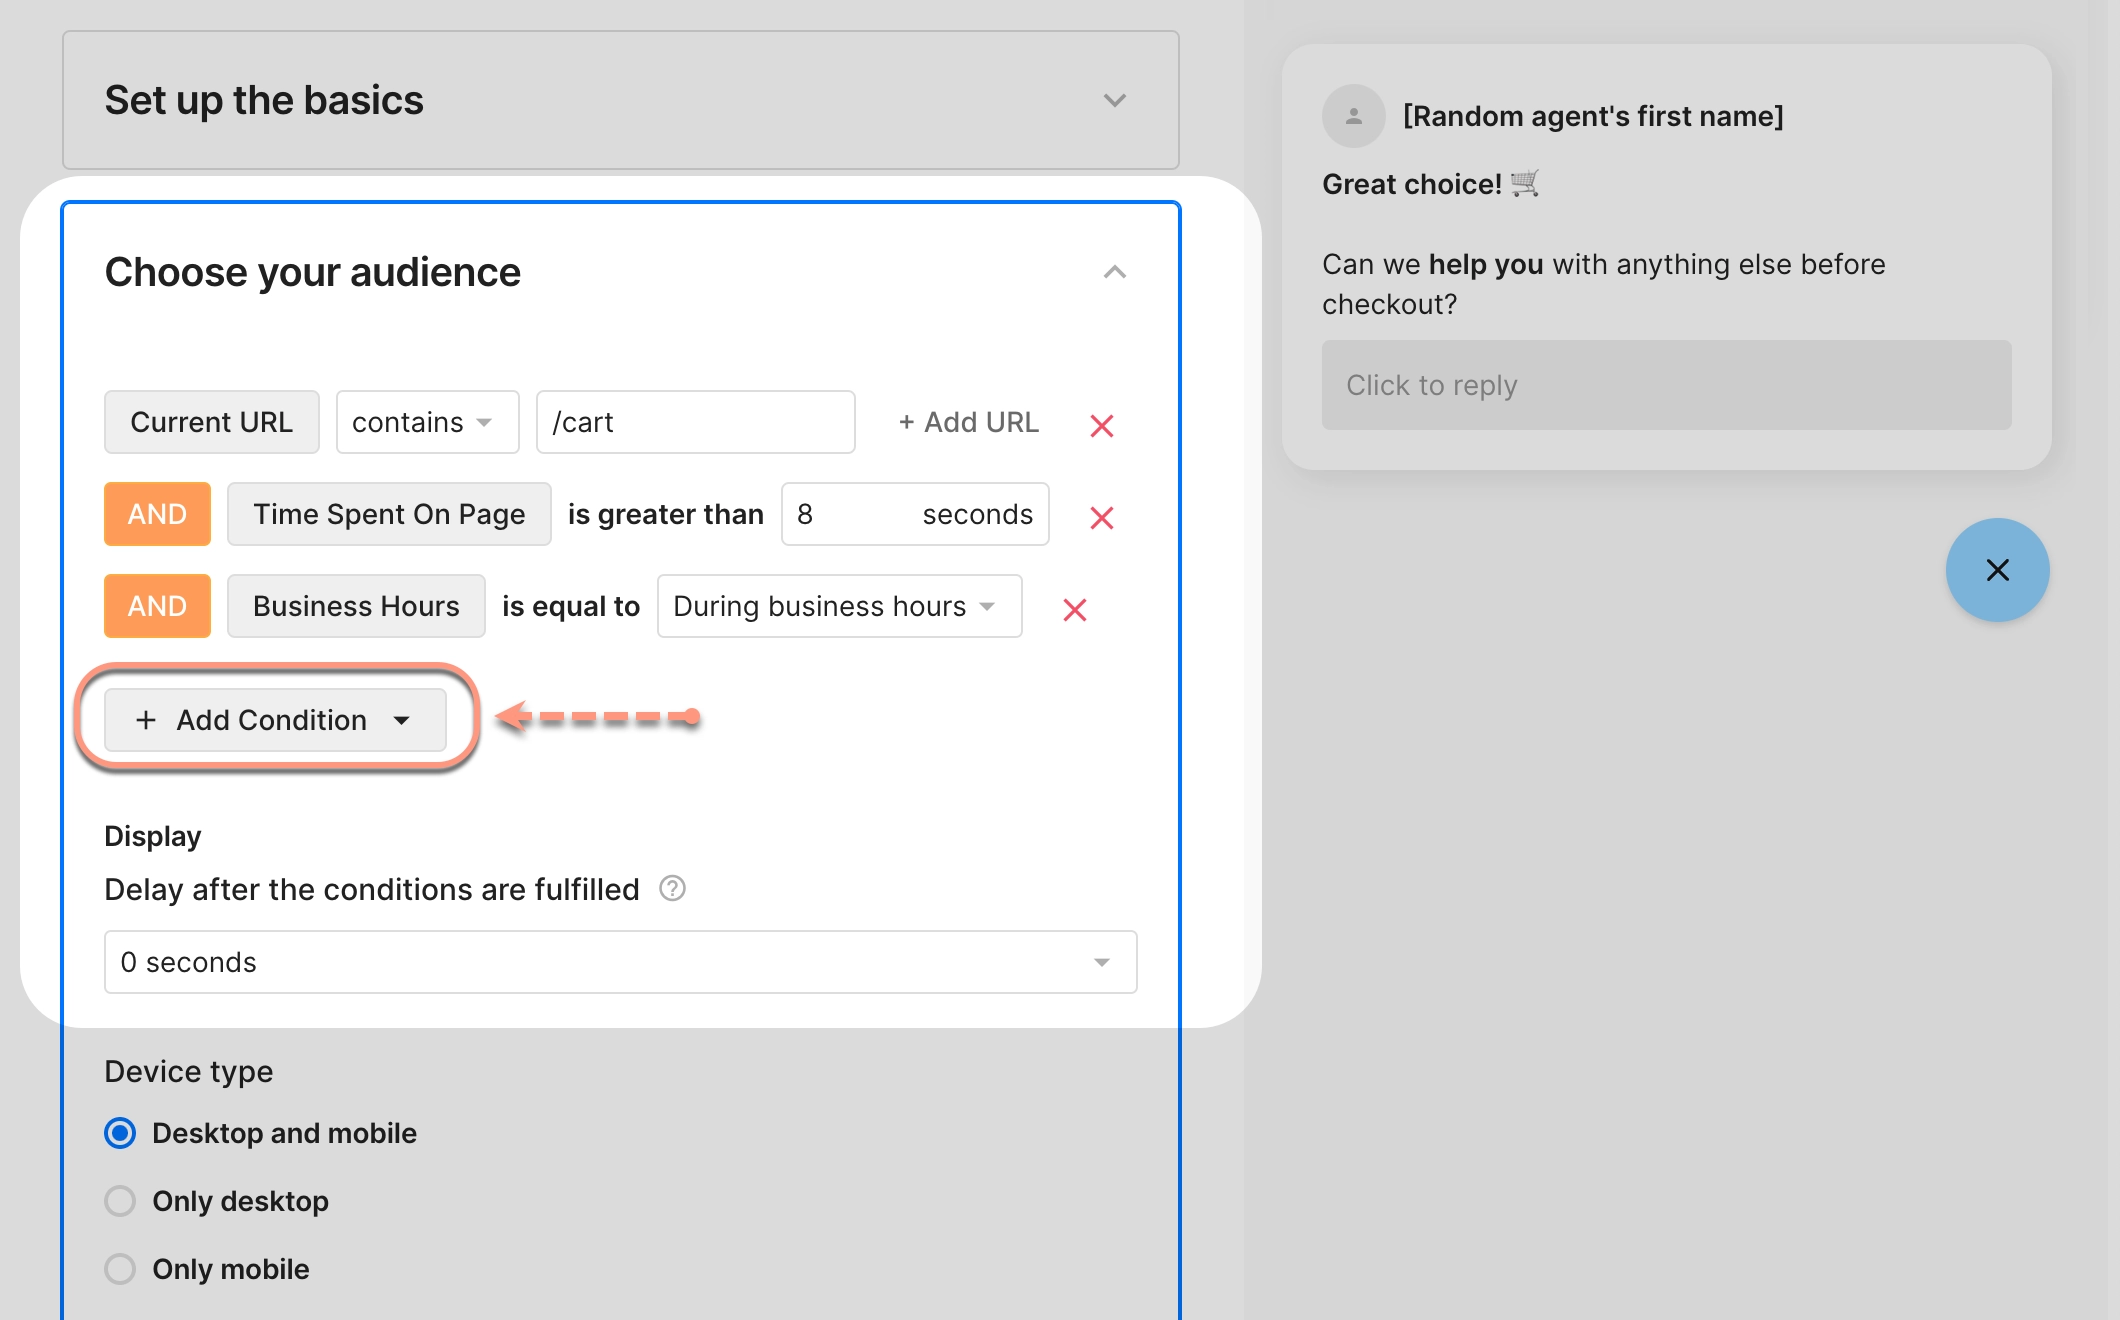
Choosing your campaign’s audience
Your audience determines who will see your campaign when they visit your store.
You can define an audience based on a set of conditions or “triggers”. When a shopper meets the conditions of the campaign, they are shown your campaign message in the Gorgias Chat widget.
Your conditions may include variables such as: the shopper’s behavior on your store, the current state of their shopping cart, information from their Shopify customer profile, and other factors like the shopper’s location.
- Open the Choose your audience section
- Select + Add Condition to set a one or more audience conditions
- Use the dropdown menu to set a delay, if applicable
- Delays determine how long it takes for your campaign to appear after all audience conditions have been met
- Choose the type of device your shopper must be using to see the campaign (mobile, desktop or both)
- Use the toggles to adjust your campaign preferences
- Customers can reply to this campaign → allows shoppers to reply to the campaign in chat, creating a new ticket for your team to answer (*recommended for campaigns that run during business hours).
- Incognito visitors will also see the campaign → show the campaign to any shopper that meets all campaign conditions, but who does not have an existing Shopify customer profile with your store, or is not currently signed in to your Shopify store (*only applies to campaigns with customer-specific conditions).
Here’s a breakdown of the conditions you can use to define your campaign audience:
| Condition type | Condition | Description |
| Behavior | Current URL | Show the campaign to shoppers based on whether they visit a specific page(s) on your store |
| Time spent on page | Show the campaign to shoppers based on the amount of time they spend on a page | |
| Currently visited product | Show the campaign to shoppers based on whether they visit a page with specific product tags | |
| Number of visits | Show the campaign to shoppers based on the number of times they have visited your store | |
| Time spent per visit | Show the campaign to shoppers based on the amount of time they have spent on your store per visit | |
| Exit intent | Show the campaign to shoppers when they demonstrate an intent to exit the store. Exit intent includes: the shopper minimizes or navigates away from the current tab (on mobile); the shopper moves their mouse close to the edge of the page (on desktop); they scroll quickly to the top of the page, or change focus to a different app. | |
| Out of stock product pages | Show the campaign to shoppers who visit a product page where all variants are out of stock | |
| Cart | Product tags added to cart | Show the campaign to shoppers based on the products added to their cart |
| Amount added to cart | Show the campaign to shoppers based on the total value of products in their cart | |
| Customer | Shopify customer tags | Show the campaign to shoppers based on tags in their Shopify customer profile |
| Number of orders placed | Show the campaign to shoppers based on the number of previous orders they have placed | |
| Total spent | Show the campaign to shoppers based on the amount they have spent on past orders | |
| Products purchased | Show the campaign to shoppers based on specific products they have previously purchased | |
| Other | Business hours | Show the campaign to shoppers based on your store’s business hours |
| Visitor location | Show the campaign to shoppers based on the country where they are located (based on IP address). Use this condition to include or exclude shoppers from campaigns when you want to communicate a regional offer or service. |
Writing a campaign message
Writing an effective and compelling message entices shoppers who see your campaign to engage with your team or complete an action.
You might use a campaign message to: nudge shoppers to complete their order with a discount code, increase the value of their cart by adding another product, or access product education outside of business hours when your team is offline.
- Use the From dropdown menu to choose the name of an agent who the campaign “comes from”
- Use this as a way to personalize your campaign message for shoppers, as if its coming directly from a member of your team
- Enter your campaign messagein the text editor
- Alternatively, use AI Copy Assistant to help write your message
- Format your message with links, rich media and personalization. Use the toolbar in the editor to:
- Add links (learn how to set up your own short-link domain and track clicks)
- Add an image
- Add a video
- Insert emojis
- Insert Shopify products cards (use this option to recommend products from your catalogue)
- Insert Shopify discount codes
- Insert Email Capture Form
Writing a message with AI Copy Assistant
Rather than write a new message from scratch, you can use AI Copy Assistant to create an effective message for your campaign or improve a message that you’ve already written.
AI Copy Assistant automatically uses your store’s website to suggest a message that matches your brand’s tone of voice. It also uses campaign best practices to recommend the most effective message — keeping it short (max 150 characters) and using emojis to get shoppers’ attention.
You can edit or regenerate AI Copy Assistant’s suggestion until you have a campaign message that you like.
- Open the Write your message section in the campaign editor
- In the message textbox, describe what you want your campaign to say or do
- Select Regenerate to get an optimized message suggestion from AI Copy Assistant
- If you’re not satisfied with the suggestion, you can update your prompt and select Regenerate again
- Select Apply to use AI Copy Assistant’s suggestion
.webp)
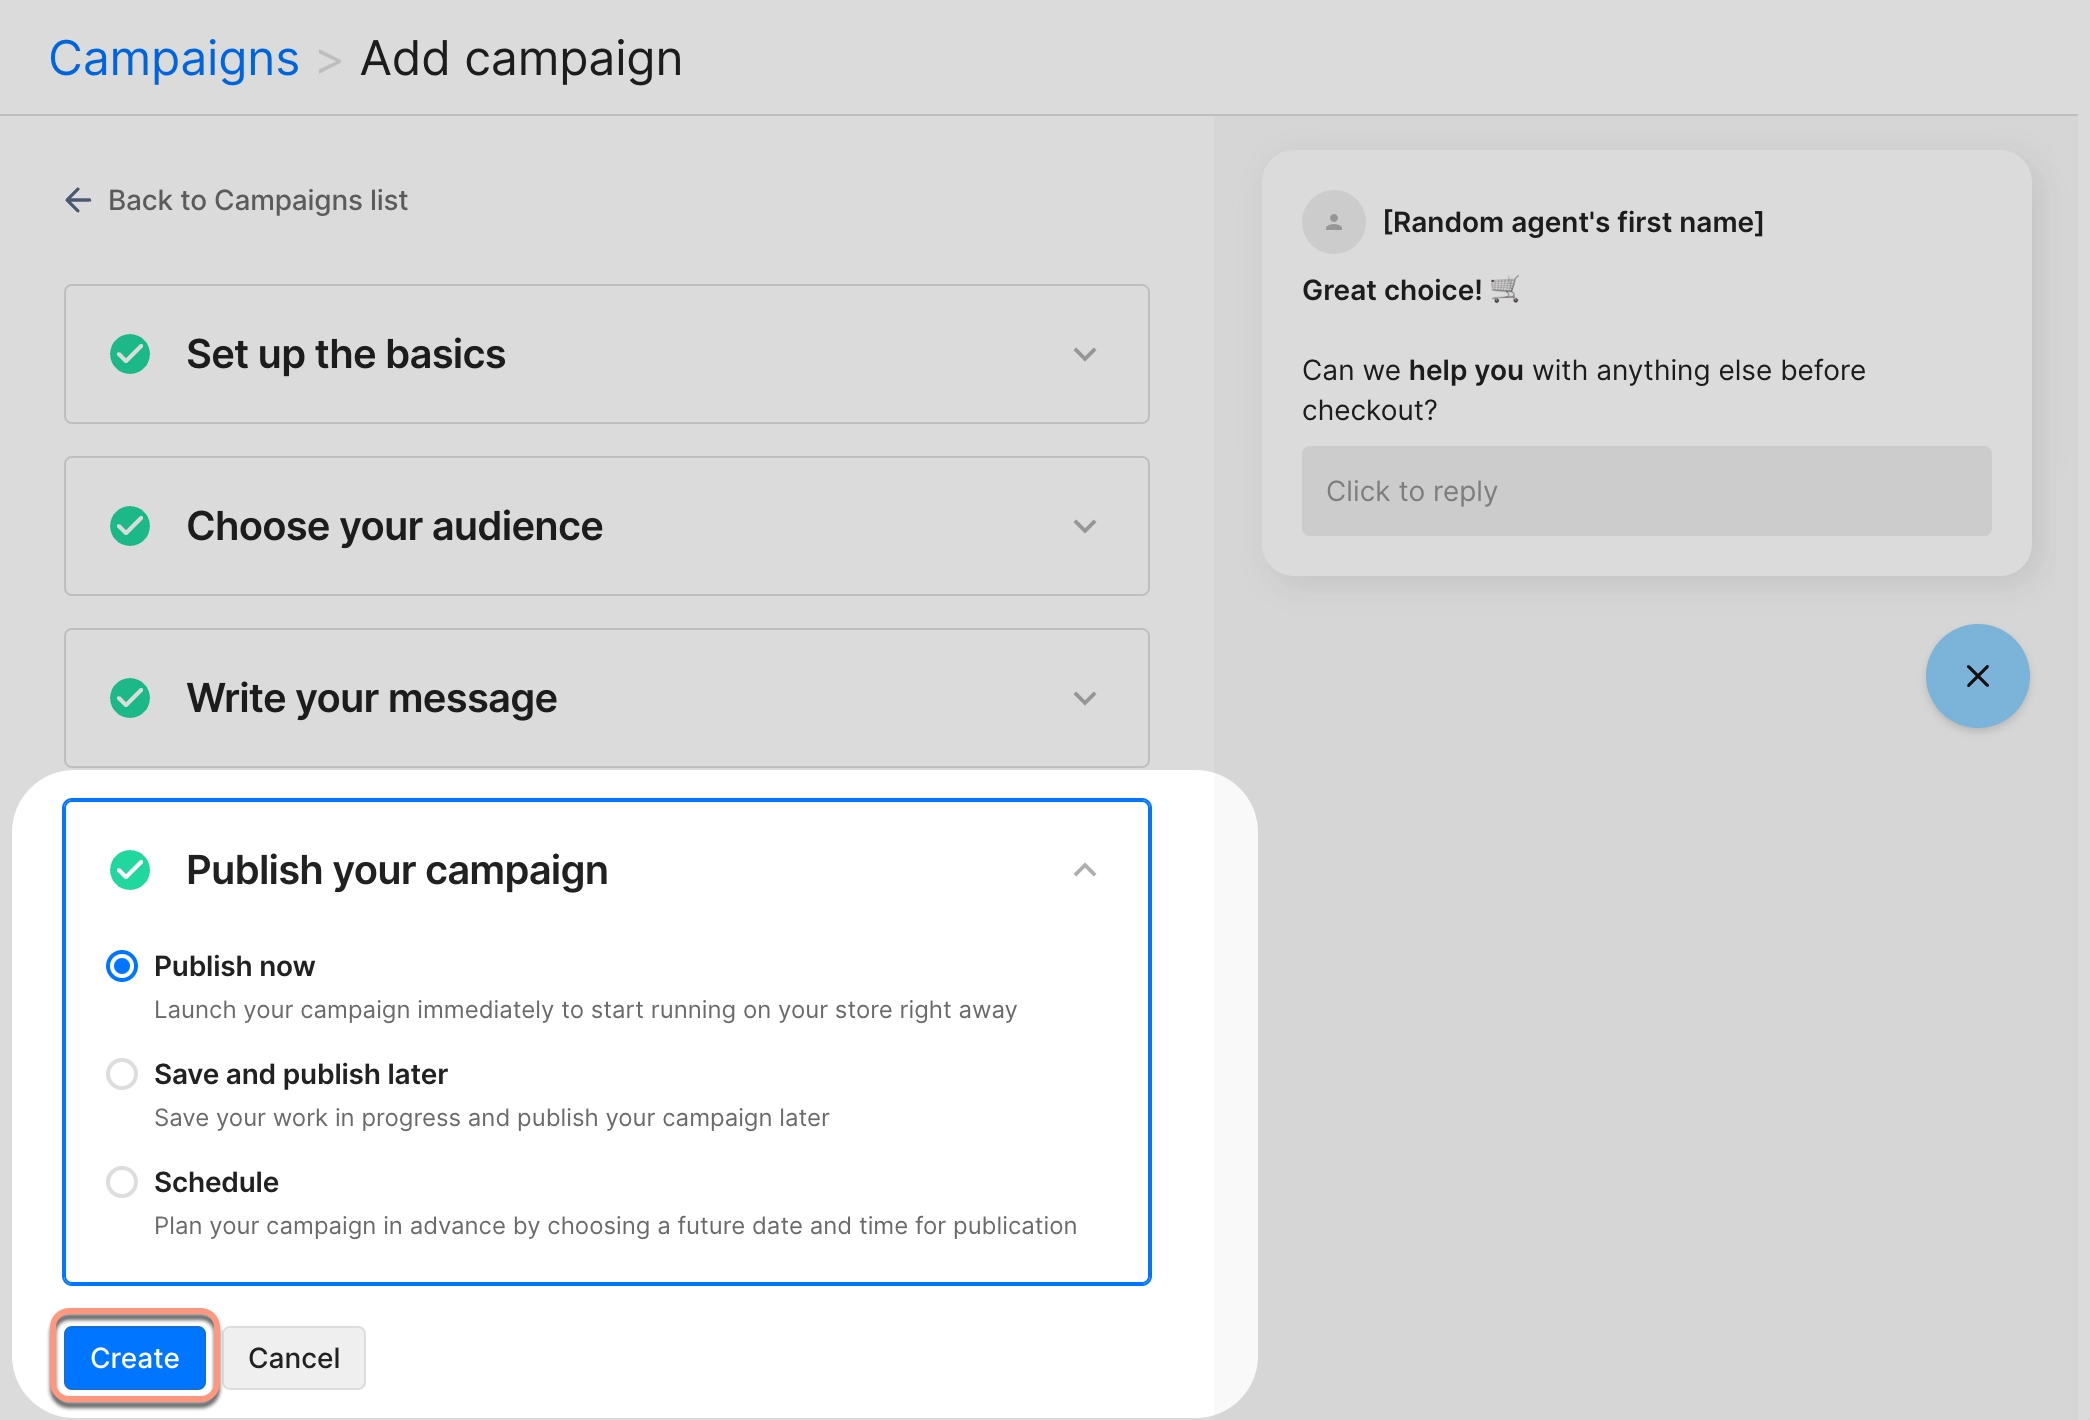
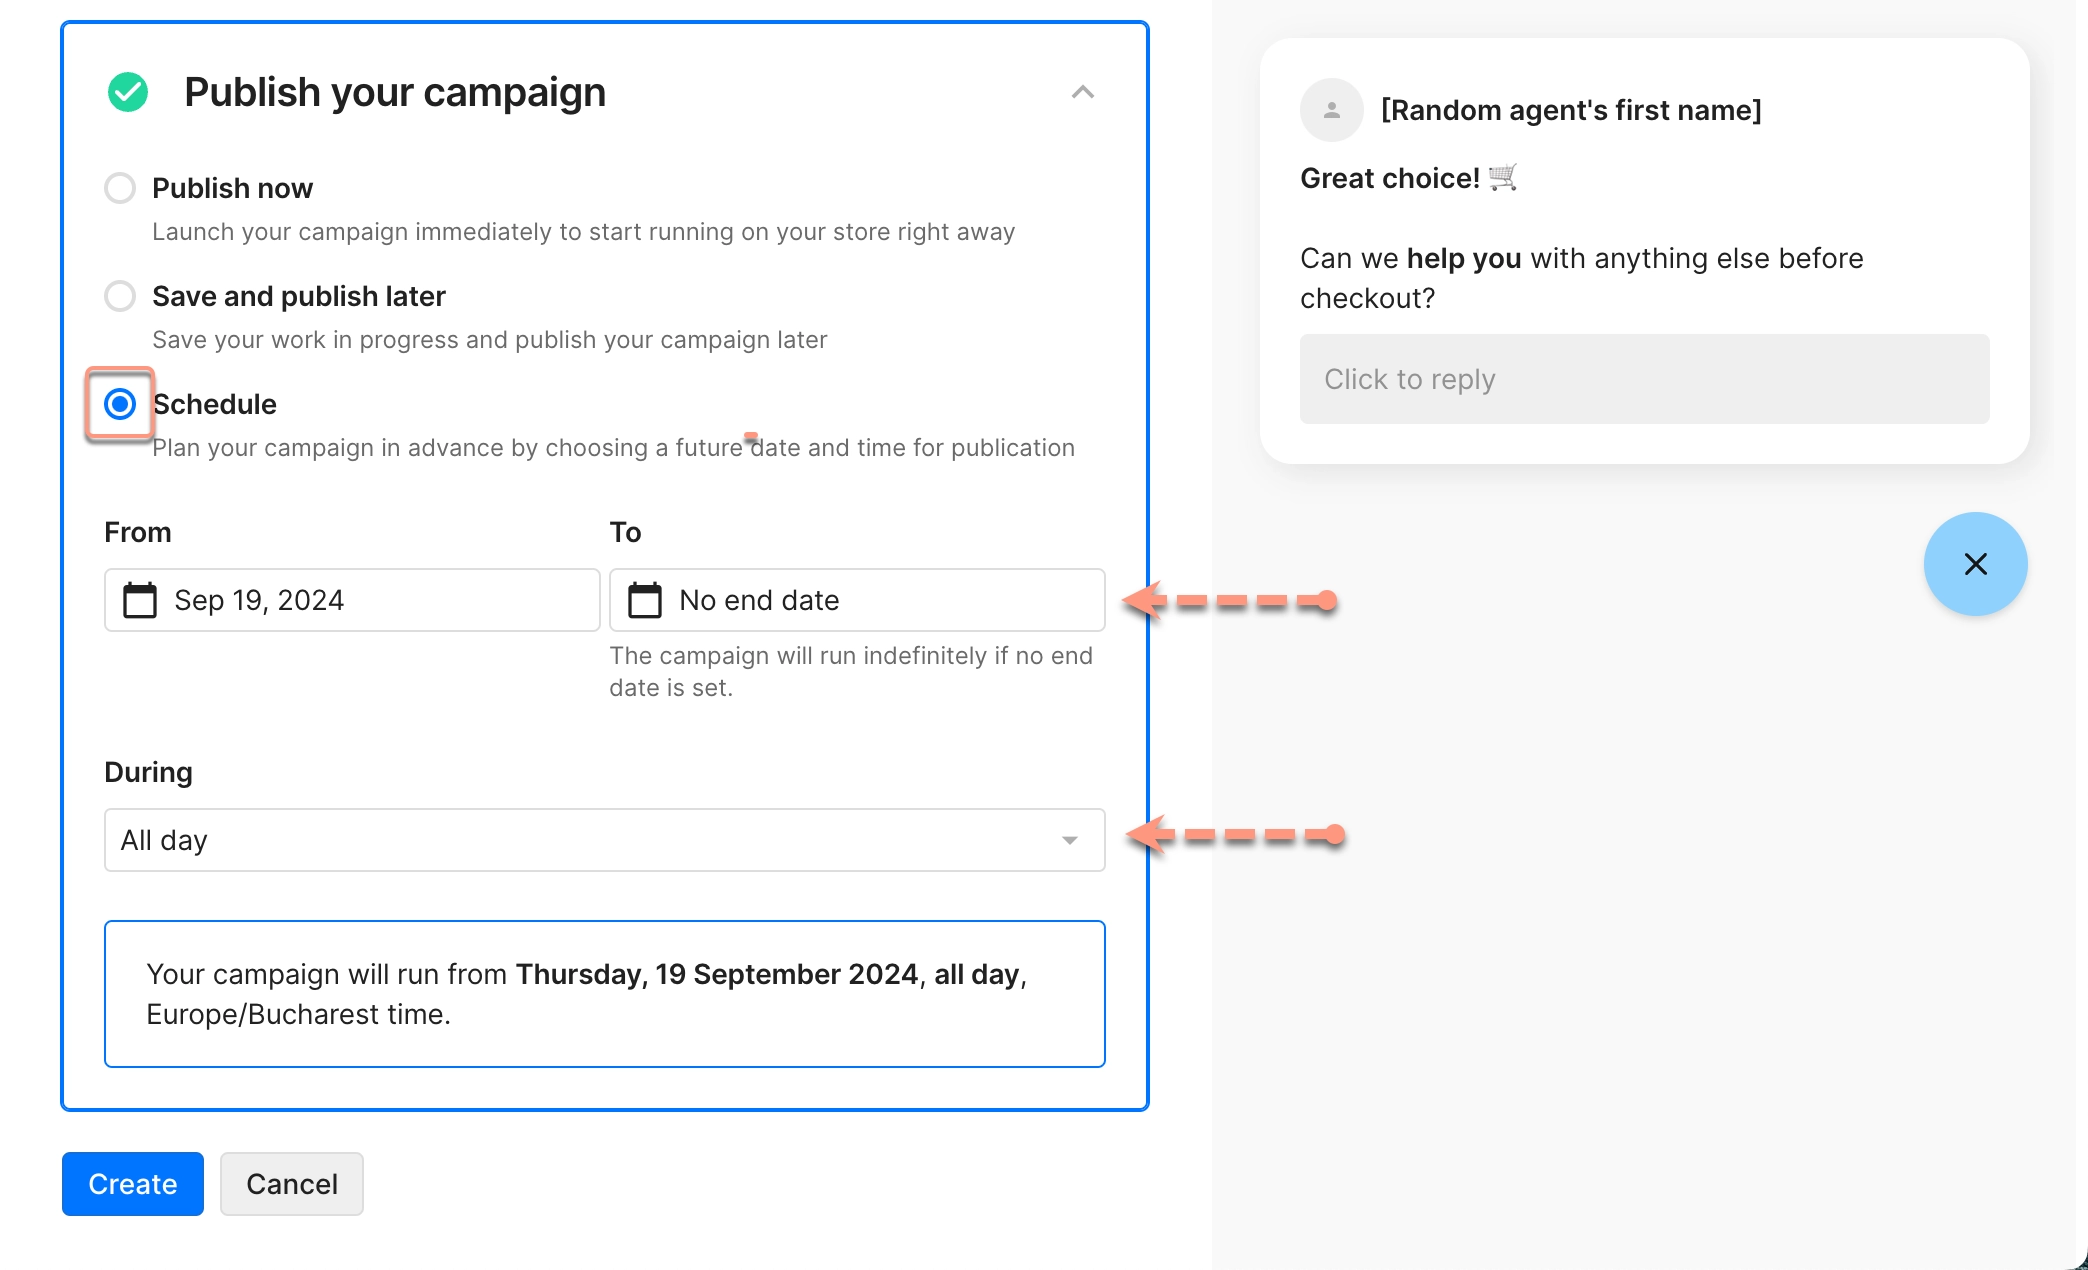
Publishing your campaign
Once you’re satisfied with your campaign setup, you can decide when to publish the campaign to your store.
- Open the Publish your campaign section
- Choose when to publish your campaign
- Publish now → start your campaign immediately
- Save and publish later → save your campaign as a work-in-progress to publish later
- Schedule → plan your campaign in advance by setting an automatic start and end date
- Select Create to finish
Schedule your campaign
When publishing your campaign, you can use the Schedule option to set a specific date and time for when your campaign goes live and ends on your store.
Scheduling is useful if you want to plan your campaigns in advance, or automatically start and stop a campaign based on a predetermined schedule (for example, during BFCM, Boxing Day, or when managing a new collection or excess inventory).
- Open the Publish your campaign section
- Select Schedule
- Use the calendar to choose a start date and an end date, if applicable
- Open the dropdown menu to choose the time of day when the campaign runs (*only available if your campaign does not use Business Hours as an audience condition).
- All day → 24 hours/day
- Business Hours → only during your store’s business hours
- Outside Business Hours → only outside of your store’s business hours
- Custom → use this option to set custom hours for specific days of the week
Explore types of campaigns
- Use campaigns to upsell and cross-sell
- Offer shoppers promo codes with Cart campaigns
- Offer pre-sales assistance with a conversational campaign
- Exit intent campaigns
Helpful campaign resources
- How to create winning Convert campaigns
- Explore examples of successful campaigns from other brands
- Learn about conversion rate optimization (CRO)
